Caution: ●You must read this before you proceed. ●Set often ship in multiple boxes and may arrive a day or two apart.
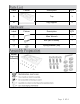
Label Description QTY A Top 1 B Leg Support 2 Description QTY ① Allen Wrench 1 ② Bolt (M6 x 35mm) 7 ③ Spring Washer (M6) 7 Label Picture Picture Before Beginning Assembly : Page 2 OF 6
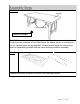
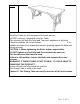
Overview Top (A) Leg Support (B) FRONT FACING This Table has multiple parts and may require up to 30 minutes to assemble. To give you an overview of the Table parts, the above picture is to help you put the various parts into perspective. Please read through the instructions below to familiarise yourself with the parts and steps before assembly. Step 1 Unpack and place all parts on a clean, non-marring surface.
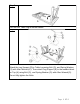
Step 2 Turn out the Table Leg as shown above. Step 3 Attach the Leg Support (B) to Table Leg using Bolt (②), and Spring Washer (③) with Allen Wrench(①). Then attach Leg Support (B) to the wooden block on Top (A) using Bolt (②), and Spring Washer (③) with Allen Wrench(①). Do not fully tighten the Bolts.
Step 4 Stand the Table up, with assistance from your partner. EXPERT pressure, floorwards, onto the Table. This pressure will help the Legs and Top reach alignment at all joints. Check for wobbles on a level surface. If no wobbles are found, in a sequential manner, gradually tighten all Bolts until evenly secured. CAUTION 1: When tightening the Bolts, tighten sequentially. DO NOT tighten any bolt fully and then towards the next one. This would cause the frame to warp.
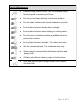
Care & Maintenance ● Furniture may scratch floors. We recommend using furniture pads to protect your floors. ● Do not put hot items directly on furniture surface. ● Do not clean furniture with harsh cleansers or polish. ● Do not place furniture under direct sunlight. ● Do not place furniture near heating or cooling vents. ● Do not write on furniture without a padded barrier to protect the surface. ● Do not place furniture outside . For indoor use only. ● Not for commercial use.