
Use and Care Manual


Step 2
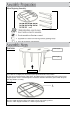
2.1: Align Table Leg(B) to mounting positions on the Table Top(A). Attach Table Leg(B) to Table
Top(A) using Bolts(②) and Washers(③) with Allen Key(①).
2.2: Attach the remaining Table Legs(B) to Table Top(A) using Bolts(②) and Washers(③) with Allen
Key(①).
Do not fully tighten the Bolts.
Step 3
Place the Table on a LEVEL SURFACE to check for wobbles.
If it wobbles lift the Table to some 30cm to 50cm high from the ground.
Keep your feet and toes well away from the drop zone.
Drop the Table freely and vertically with the four legs, hitting the ground, all at the same time.
This Drop Test will help to ensure that all the Bolts and gaps reach full alignment status.
Test again for evenness on a LEVEL SURFACE.
If no wobbles are found, slowly and steadily, turn the Table upside down.
Then, proceed to tighten all Bolts in a sequential manner.
When tightening these Bolts, tighten sequentially.
DO NOT tighten any Bolt fully and then move on towards the next one.
This could cause the frame to warp.
If there are still wobbles, loosen the Bolts and execute this same drop test.
If the Table is not Stable, it could lead to damage to the product.
Your Table is ready for use.
This Table can only be used on a flat, level surface.