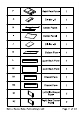
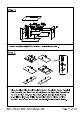
Caution : You must read this before you proceed Kitchen Cart Label Picture Description QTY Left Side Panel B = Shelf 1 AN 7 Right Side Panel c 1 = Shelf D be Side Shelf 2 E Left Side Panel 1 Noble House Home Furnishings LLC Page 1 of 20
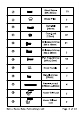
P Back Drawer Panel 2 Q Bottom Drawer 2 R Holder 2 8 Rod 1 Label Description QTY ® Bolt (M6 x 50mm) 3 ® Bolt (M6 x 60mm) 5 ® Bolt (M6 x 70mm) 3 @ Spring Washer 5 ® Flat Washer 5 ® Barrel (M6 x 13mm) Noble House Home Furnishings LLC Page 3 of 20
= Mo bosom Wood Plug 3 © ex» Can) [wm] o | o= mule o | o= [mms ® < Knob Handle [rise | © — Rene a) 4 &f Caster With Lock 9 ® & Caster Without 2 Noble House Home Furnishings LLC Page 4 of 20
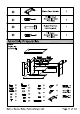
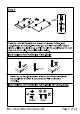
Wine Glass Holder ; Philips Head Screwdriver (Not Provided) Rubber Hammer (Not Provided) Before Beginning Assembly: X19 x3 X23 x23 Flat Head Screwdriver (Not Provided) PYRE x3 X18 (Not Provided) X1 (Not Provided) =r Xi (Not Provided) Noble House Home Furnishings LLC Page 5 of 20
® Read instructions, cover to cover 5.7 ® Have 2 adults on hand for assembly@ ® Do not assemble on flooring of carpet fr ! e Assemble on a clean none marring surface (packing foam)J ® Save all packaging until finished.
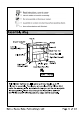
Place the Right Side Panel Shelf (F), Bottom Panel (K), Center Panel (1), Top Panel (A), Left Side Panel Shelf (B) and the Right Side Panel Shelf (C) onto a clean, non-marring surface. Insert into the per-drilled holes.Use a Philips Screwdriver @ ) to tighten until the shoulder is snug and flushed with the panel. See illustrations below.
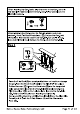
Place the Left Side Panel (E) onto a surface.Insert into the per-drilled holes.Use a Philips Screwdriver @ }to tighten until the shoulder is snug and flushed with the panel. Repeat the same step on the other side. See the illustrations below. Instructions for Fastening Cam-Bolts X Make sure the Cam-Bolt shoulder is flushed (on the same level) with the panel. If the Shoulder is above the panel it is not installed correctly .
When inserting the Cam-Locks, align the arrow on the Cam-Lock with the Cam-Bolt head and insert the Cam-Lock. Follow according to the illustrations above. When tightening the Cam-Locks, the Cam-Bolt head needs to be centered. Use a Flat Head Screwdriver turn the Cam-Lock clockwise to lock onto the head of the Cam-Bolt. Turn until it is snug. If you over tighten it could damage the Cam-Lock or the Cam-Bolt. Step 4 Place the Side Shelf (D) on a material that does not scratch or damage the part.
Place the Top (A) on a material that does not scratch or damage the part. Attach the Divider-A (G) to the Top (A). Insert Cam-Locks into the designated holes above the holes where the Cam-Bolts ((D) are inserted.
71 Insert Barrel Nuts the designated holes on the front & back rails of the Top (A). 7.2 Insert Cam-Locks the designated holes above the holes where the Cam-Bolts (0) are inserted. 73 Attach the Right Side Panel (F) to the frame of the Top (A) with Bolts using the Allen Key () to tighten.Use a Flat Screwdriver and turn clockwise to lock onto the Cam-Bolts to instructions on inserting and tightening Cam-Locks (0).
Step 8 Place the Wine Glass Holder (20) on the Center Frame (H) with Chipboard Screws using a Philips Head Screw Driver @ to tighten. Step 9 Set the Top (A) up as shown in the diagram above.
Step 10 Place the Upper Back Panel (L} into the Top (A) and Center Frame (H). Insert Wood Dowels into the bottom of the Center Panel (I) using a Rubber Hammer Insert Cam-Locks into the designated holes below the holes where the Cam-Bolts are inserted.
Insert Cam-Locks the designated holes above the holes where the Cam-bolts (0) are inserted Use a Flat Screwdriver (@3) and turn clockwise to lock onto the Cam-Bolts Refer to the instructions on inserting and tightening Cam-Locks the left Side Panel (E) onto the Center Panel (1) and Center Frame (H). Step 12 UU \{ Insert Cam-Locks into the designated holes above the holes where the Cam-Bolts are inserted .Use a Flat Screwdriver (@3) and turn clockwise to lock onto the Cam-Bolts (9).
Turn the Top facing downwards as shown in the diagram above. Step 14 Insert Wood Dowels into the Right Side Panel (F), the Divider-B (J), the Center Panel ( | ) and the Left Side Panel { E ) using a Rubber Hammer (@ ). Insert Cam-Locks (1) into the designated holes on the top of the Divider-B (J) above the holes where the Cam-Bolts ({D) are inserted.
Insert the Lower Back Panel (M) into the groove on the Right Side Panel (F) and the Left Side Panel ( E ).Check that the Back Panel (M) also fits into the groove on the Center Panel (1). Step 16 IMPORTANT : Do not over tighten 16.1 Insert Barrel Nuts into the Right Side Panel (F) and the Left Side Panel ( E ). Use a Flat Screwdriver (@3 } to insert the Barrel Nuts 16.2 Insert Cam-Locks into the designated holes on the bottom of the Divider-B (J) above the holes where the Cam-Bolts (0) are inserted. 16.
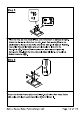
Step 17 Place Casters on the front corners of Bottom Panel (K) and Casters on the rear comers as shown. Use a Philips Screwdriver to drive in the Chipboard Screws in order to fasten the casters. Step 18 Insert the Rod (8S) into the Holders (R) as this stage.
Fasten the assemble Holders with Bolts (D), using the Allen Key (D) to tighten. Align Chipboard Screws (#3) with the holes on the Top (A) and Left Side Panel ( E ), then use a Philips Screw Driver @ ) to tighten the screws. Affix Wood Plugs to cover the Bolt holes on the Right Side Panel (F).
Place The Drawer Face (N1) with the interior side facing up as shown, taking care not to scratch its exterior surface. Position the Left Side Drawer Panel (O1) and the Right Side Drawer Panel (02) as shown above. Attach with Pan Head Screws (1), using a Philips Head Screwdriver tighten. Attach the Bottom Drawer Panel (Q) and the Back Drawer Panel (P) as shown, with Pan Head Screws ({9) using a Philips Head Screwdriver @ ).
Affix the Knob Handles to the Drawer Faces (N1) and (N2) with Handle Screws using a Philips Screw Driver @ ). Insert the assembled Drawer accordingly at this stage. Step 23 Your Kitchen Storage Cart is now ready for use.This Kitchen Cart can only be used on a flat, level surface. a Die vot pul Red teens deafeningly an Barnyards mafioso oa 0.