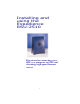
Installing and using the Expedience RSU-2510 Directions for connecting your RSU to a computer or LAN and obtaining high-speed Internet access.
Expedience and LinkMonitor are trademarks of NextNet Wireless, Inc. Other brand and product names may be registered trademarks or trademarks of their respective holders. Part number: 104-0010-0002-02 ©2000-2001 NextNet Wireless, Inc. All rights reserved. THE SPECIFICATIONS AND INFORMATION REGARDING THE PRODUCTS IN THIS GUIDE ARE SUBJECT TO CHANGE WITHOUT NOTICE. ALL STATEMENTS, INFORMATION, AND RECOMMENDATIONS IN THIS GUIDE ARE BELIEVED TO BE ACCURATE BUT ARE PRESENTED WITHOUT WARRANTY OF ANY KIND.
Contents Welcome............................................. 1 Before you begin ................................1 Connecting your RSU to a computer ... 4 Installation overview ..........................4 Setting up the computer to dynamically receive an IP address .........................4 Windows 95, Windows NT, Windows 98, Windows ME: Setting up the network connection ........................................5 Windows 2000: Setting up the network connection ........................................
The RSU cannot receive your service provider’s signal ...............................20 The RSU’s lights don’t blink, but rather chase .............................................20 You successfully completed the signal scan, but your Internet browser cannot connect to a web site ........................21 The lights on the RSU blink more slowly than normal ....................................22 You receive a dialog box indicating that you cannot connect to your service provider ...........................
Welcome This document describes how to install and use your Expedience residential subscriber unit (RSU) to obtain wireless high-speed Internet access. You can connect your RSU to a computer or to a small office/home office (SOHO) local area network (LAN) through a hub, switch, or router. BEFORE • Make sure your computer is equipped with an Ethernet network interface card (NIC). • • YOU BEGIN The Ethernet cable that is supplied with your RSU plugs into any standard Ethernet NIC.
Figure 1 illustrates the RSU package contents. Ethernet cable Power cable Power supply Software CD-ROM RSU device RSU Installation Guide RSU Insta Quick Start Guide ll Quick Start ibed obus posim udring a det. Abed obus posim udring a det. Ed okejfus erosi m quesum an yape i cesi. Lorem jes ge ibe pos det A bedji bedji ver o hich. Lif wanj de manit clos o man it closni.
Table 1 lists the standard contents in your RSU package.
Connecting your RSU to a computer This section describes how to connect your RSU to a computer. If you want to connect your RSU to a network device (such as a router or switch), refer to the section “Connecting the RSU to a network” on page 19, in this guide.
1A WINDOWS 95, WINDOWS NT, WINDOWS 98, WINDOWS ME: SETTING UP THE NETWORK CONNECTION 1B 1 From the Start menu, select Settings. Then select Control Panel. 2 In the window that appears, double click the Network icon. 3 Select the TCP/IP entry for the NIC. 4 Click Properties. 5 Select the IP Address tab. 6 Activate the Obtain an IP Address automatically radio button. 7 To close the windows, click OK. 8 Turn off your computer.
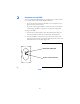
2 PLUGGING IN THE RSU You can connect the RSU directly to a computer, or you can connect it to a small office/home office (SOHO) network. • If you are directly connecting the RSU to your computer, complete the steps in this section. • If you are connecting the RSU to a network, refer to the section “Connecting the RSU to a network” on page 19 in this guide. To plug in the RSU: 1 On the bottom of the RSU, locate the Ethernet jack. Plug one end of the Ethernet cable into the Ethernet jack (Figure 2).
3 Plug the power cord into a standard power supply. The lights on top of your RSU blink to indicate signal strength (Figure 3).
Note: If the RSU’s lights chase each other, rather than blink, the RSU cannot detect enough signal from your service provider to operate properly. You must adjust the RSU so that at least one light blinks. Step 3 on page 9 describes how to adjust the RSU.
3 FINDING THE STRONGEST SERVICE PROVIDER SIGNAL Your RSU is equipped with an internal directional antenna. To provide the best service, the RSU searches for the strongest signal transmitted by your service provider.
3A USING THE INDICATOR LIGHTS TO FIND THE STRONGEST SERVICE PROVIDER SIGNAL You can find the strongest service provider signal by using the lights on top of the RSU (Figure 6). You can use this method regardless of the operating system your computer runs. Lights on RSU Figure 6: Location of lights on RSU The indicator lights indicate the strength of the signal received while the RSU is in its current orientation. The stronger the signal, the more lights on the RSU blink on and off.
2 Set your RSU on a table or shelf in the location you’ve chosen. The RSU must be in an upright position. 3 Point the front of the RSU directly toward the window. 4 Remove your hands from the RSU. Keep the RSU stationary, in this orientation, for about five seconds. The blinking lights indicate the strength of the signal received. The stronger the signal, the more lights on the RSU blink on and off. Figure 7 illustrates blinking lights.
6 Again, note how many lights are blinking while the RSU is in this orientation. The stronger the signal, the more lights on the RSU blink. 7 Point the front of the RSU to the left of the starting position. Remove your hands from the RSU, and let it stand still for about 5 seconds. Note how many lights blink while the RSU is in this orientation. 8 Remembering the strongest signal reported, re-orient the front of the RSU in the direction that the RSU was pointed when the strongest signal was found.
3B USING THE SOFTWARE-ASSISTED METHOD TO FIND THE STRONGEST SIGNAL Note: The software-assisted method is available only to users who use Windows (versions later than 3.11) as their operating system. To use the software program to help you search for the strongest service provider signal in your area: 1 Install and start the LinkMonitor™ program. 2 Find the strongest service provider signal. Each task is explained in greater detail in the sections that follow.
7 The Expedience LinkMonitor window appears (Figure 9).
Finding the strongest service provider signal During this procedure, point the front of the RSU directly toward an outside window. Then, point the front of the RSU to the right of the starting position, and then to the left of the starting position. At these three points, briefly stop the movement of the RSU and note the strength of the signal from your Internet service provider, as indicated by the score that the software program reports.
7 Remove your hands from the RSU and make sure the RSU is stationary. The program determines and reports the strength of the signal that the RSU receives while the RSU is in its current orientation. 8 Remembering the strongest signal reported, re-orient the front of the RSU in the direction that the RSU was pointed when the strongest signal was found. 9 After about five seconds, click Stop Scan. The lights on the RSU stop blinking and become continuously lit.
5 4 Point the RSU toward the direction it was facing—either to the left or to the right of the starting point—when the most lights were blinking. 5 Plug the Ethernet cable back into the computer. 6 Refresh your IP address by performing the procedure described in the section “Refreshing the RSU’s connection” on page 18. CONNECTING TO THE INTERNET After completing steps 1 through 4, you should be able to connect to the Internet. 1 Start your Internet browser, and try to open a few Internet sites.
Refreshing the RSU’s connection When you refresh the RSU’s connection, your service provider is assigning your computer a new IP address. You need to refresh your RSU’s connection with your service provider when: • You completed steps 1 through 3 in this guide, but your Internet browser does not let you open any Internet sites. • You needed to complete the steps in the section “Fine-tuning the connection to the service provider” on page 16 in this guide.
Connecting the RSU to a network Note: Plan to use only one RSU on a network. Do not use multiple RSUs on the same network. To directly connect the RSU to a computer, use the supplied Ethernet cable (also known as a straight-through cable). However, to connect the RSU to a hub or switch, use an Ethernet cable appropriate for your network device. This might be a straight through or cross-over cable, depending on how your network device switches signals.
Troubleshooting This section describes possible issues with RSU installation and how to resolve the issues if you encounter them. THE RSU CAN SUCCESSFULLY RECEIVE A SIGNAL AT HOME, BUT NOT AT WORK OR AT A FRIEND’S HOUSE You need to repeat the search for a service provider signal each time you power down your RSU and move it. If you have not repeated the signal search, repeat the steps described in the section “Finding the strongest service provider signal” on page 9 in this guide.
Figure 10 illustrates chasing lights. Light 1 blinks on Light 2 blinks on Light 3 blinks on Light 4 blinks on Light 5 blinks on Figure 10: Indicator lights chasing: no signal found If you have tried to use your RSU in several locations within your home or office—without being able to receive a signal— contact your service provider for further information about connecting.
If your Internet browser cannot open any sites: 1 Make sure your computer is set up to automatically receive an IP address, as described in the section, “Setting up the computer to dynamically receive an IP address” on page 4. 2 Refresh the connection with your service provider by performing one of the following: 3 • If you are a Windows user, open the Link Monitor program. Click the Renew IP Address button. • If you are using a non-Windows operating system, reboot your computer.
YOU RECEIVE A DIALOG BOX INDICATING THAT YOU CANNOT CONNECT TO YOUR SERVICE PROVIDER When you try to connect with your service provider, you may receive a message on your computer indicating that you cannot connect at this time. You may receive this message for any number of reasons, such as the service provider’s equipment may be malfunctioning, your RSU is malfunctioning, or your service provider is still processing your payment or identification records.
24
FCC INFORMATION NOTICE: This equipment has been tested and found to comply with the Radio Frequency Radiation Exposure Limits detailed below. A minimum of 20 centimeters (8 inches) separation between the RSU and the operator and all other persons should be maintained.
Note: This equipment has been tested and found to comply with the limits for a Class B digital device, pursuant to part 15 of the FCC rules. These limits are designed to provide reasonable protection against harmful interference when the equipment is operated in a commercial environment. This equipment generates, uses, and can radiate radio-frequency energy, and, if not installed and used in accordance with the installation manual, may cause harmful interference to radio communications.
Index C L CD LAN connecting to RSU 19 LEDs see indicator lights LinkMonitor program installing 13 use with VPN 23 installing 13 computer NIC requirement 1 cross-over cable 19 E Ethernet cable category 5 requirement 1 flexibility requirement 1 Ethernet jack location 6 N network device connecting to RSU 19 NIC requirement 1 I P part numbers list 3 power supplying to RSU 7 indicator lights blinking slowly 22 chasing 20 continuously lit 12 location on RSU 10 number of illuminated for fullspeed operation
powering 7 sides of 9 S service provider signal finding 9 scanning procedure 9 unable to find 20 using software to find 13 using the indicator lights to find 10 software installing 13 switch connecting to RSU 19 V VPN using with LinkMonitor program 23 28