Owner’s Manual MEDIAMASTER 9802 S
Hereby, Nokia declares that this digital receiver, Nokia Mediamaster 9802 S, is in conformity with essential requirements and other relevant provisions of Directive 1999/5/EC. This Terminal Equipment is intended for connection to the analogue Public Switched Telephone Networks (PSTNs), in which network addressing, if provided, is by means of Dual Tone Multiple Frequency (DTMF) signalling.
MEDIAMASTER 9802 S Contents General information For your safety Remote control Front and rear panel 4 4 5 6 Viaccess smartcard CA module with its smartcard Preparing the remote control Connecting the Mediamaster to the dish Connecting the Mediamaster Connecting to the TV Connecting a TV and VCR Connecting an analogue satellite receiver and VCR Nokia smart switch Connecting a HiFi system Switching on for the first time with SCART connections Tuning procedure when RF connections are used First time install
GENERAL INFORMATION ABOUT THE MEDIAMASTER Throughout this manual you will notice that the everyday operation of your Mediamaster is based on a series of user friendly on-screen displays and menus. These menus will help you get the most from your Mediamaster, guiding you through installation, channel selection, viewing and many other functions. All functions can be carried out using the buttons on the remote control, and some of the functions can also be carried out using the buttons on the front panel.
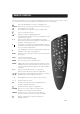
REMOTE CONTROL This section describes how to operate the Mediamaster using the buttons on the remote control. Some of the functions can also be carried out using the buttons on the front panel. Switch the Mediamaster in and out of standby mode. EXIT TV Return to the viewing mode from a menu without storing any settings (in menu mode). Switch between TV or Radio mode (in viewing mode). Turn the sound off/on (mute). - + Adjust the volume of digital programmes.
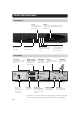
FRONT AND REAR PANEL Front panel Button Push the button to release an inserted CA module Slot for a Viaccess Smartcard Display shows channel number, error messages, remote control commands and time in standby mode Slot for a CA module with a Smartcard to put the Mediamaster in and out of standby mode to move up/down in the menus and to change channels.
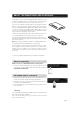
ABOUT THE SMARTCARD AND CA MODULE To be able to receive scrambled digital satellite channels you will need a Smartcard and/or a Common Interface CA (Conditional Access) module* from a Service Provider of your choice. There are a few different CA modules on the European market. Each one of the CA modules support a certain kind of encryption system. The Mediamaster supports CA modules which are made to work according to the DVB standard.
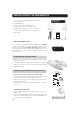
INSTALLATION OF THE MEDIAMASTER The box for your Mediamaster should contain the following items: • the Mediamaster • remote control with 2 AAA batteries • SCART cable (fully connected 1,0 metre) • aerial/RF cable (double screened 1,5 metres) • owner’s manual and software license agreement SCART cable RF cable • mains cable Remote control Owner’s manual mains License agreement cable About the SCART sockets The rear panel of the Mediamaster is equipped with 2 SCART sockets (see diagram).
INSTALLATION OF THE MEDIAMASTER General There are many different types of TV/VCR and other equipment that you can connect to the Mediamaster. In this manual you will see some of the most common ways to connect your equipment. If you use RF cables you will have to tune your TV and VCR to the Mediamaster output channel (see page 11). If you have problems with your connections and need help, contact your dealer or Service Provider.
INSTALLATION OF THE MEDIAMASTER Connecting a satellite receiver and a VCR • Connect a SCART cable between the main SCART socket on the TV and the TV SCART socket on the Mediamaster. • Connect a SCART cable between the VCR and the AUX SCART socket on the Mediamaster. With Nokia smart switch VCR • Connect an RF cable from the RF output on the VCR to the TV aerial input on the TV. RF • Connect an RF cable from the RF output on the satellite receiver to the RF input socket on the VCR.
INSTALLATION OF THE MEDIAMASTER Switching on for the first time with SCART connections • Plug in your Mediamaster • Now you will see the ”Welcome” menu on the screen. • Press OK on the Mediamaster remote control to start the Installation procedure. You may now proceed to “First time installation”, see next page. Tuning procedure when RF connections are used This procedure is necessary if your Mediamaster is connected to the TV with an RF cable, and not via SCART.
FIRST TIME INSTALLATION General information Once you have correctly connected the Mediamaster, you also have to perform a “First Time Installation.” During this procedure, helpful information is displayed at the bottom of the menus. Please note! The OK button always confirms a selection within these menus, and pressing it will take you to the next step in the installation process. However, and this is important, often more than one value has to be entered in a menu.
FIRST TIME INSTALLATION RF modulator type If the Mediamaster is connected to the TV with a RF cable, you must select the right RF modulator alternative, which is dependent on the country where the Mediamaster is being used. Select “Normal (PAL B/G)” for all countries except the UK. Select “UK (PAL I)” when the box is used in the UK. If you get picture but no sound, the RF modulator selection might be wrong.
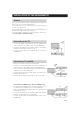
FIRST TIME INSTALLATION Line 1 through 4 on the antenna satellite selection menu Select one of the alternatives ASTRA, HOTBIRD, SIRIUS or THOR when you have a single LNB directed towards any of these satellites. Pressing OK from the selected alternative will display the “Antenna adjustment” menu (shown to the right) on the screen. For each satellite, (e.g. ASTRA, HOTBIRD, SIRIUS, THOR), up to 4 different channels are preprogrammed and shown in the menu.
FIRST TIME INSTALLATION Line 5 and 6 on the antenna satellite selection menu Select one of these alternatives when you have a single antenna equipped with 2 LNBs, or two antennas with one LNB on each, and want to watch channels from ASTRA/HOTBIRD or THOR/ SIRIUS. In this case you must first connect the LNBs to an external switch since there is only one antenna input on the Mediamaster. Once installed the switch automatically selects the correct LNB for the selected channel.
FIRST TIME INSTALLATION Line 7 on the antenna satellite selection Menu This selection is necessary only when your satellite choice differs from the preprogrammed satellite alternatives in the following ways; • if you do not use an universal LNB • when you have more than two LNB’s. • You also must select this alternative when your antenna is controlled by motor (ref. to page 20.
FIRST TIME INSTALLATION Multisatellite/”mini DiSEqC” and “two port DiSEqC” Select one of these alternatives when your antenna system has two LNBs and when you not use any of the alternatives on the lines 5 - 6 from the menu “Antenna/satellite selection” on page 13. ☛ ☛ For each LNB you connect to the DiSEqC switch, the following configuration has to be performed.
FIRST TIME INSTALLATION Multisatellite/four port DiSEqC Select this alternative if your antenna system has four LNBs and when you are not using any of the alternatives on the lines 5 - 6 from the menu “Antenna/satellite selection” on page 13. The selection of the different LNBs must be controlled by an external DiSEqC switch. Refer to page 15. The procedure is the same as for mini DiSEqC and two port DiSEqC, but you have to configure four LNBs the same way as described on page 17.
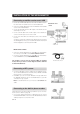
FIRST TIME INSTALLATION Manual search When you perform a Manual search you first need to enter some parameters for the channel search to work. The information you need to enter in this menu is available in magazines covering satellite TV reception, on the Internet or from your Service Provider. Transponder frequency: Specify the frequency in GHz. If you enter the wrong figure(s), erase with the button. Polarization: Select Horizontal, Vertical, Circular left or Circular right.
FIRST TIME INSTALLATION Motor antenna In case you have an antenna motor to control your satellite antenna you have to make the following settings. If the antenna is prevented from reaching its predefined east/west limit positions, you have to set new limits. See page 37 for instructions. • From the “Antenna/Satellite selection” menu select line 7 (refer to page 13) and press OK. • Select line 5, “Motor antenna configuration” and press OK. Type of motor • Select SATSCAN if it is a Nokia SatScan motor.
FIRST TIME INSTALLATION Adjust motor for Astra/Hotbird To continue the installation you now have to determine the angle to Astra 1/Hotbird. The motor and the antenna must be adjusted towards the Astra 1 satellites on 19.2° East (Hotbird satellites on 13° East) as this is the reference setting. All other preprogrammed satellite positions are oriented relative to Astra 1/Hotbird. You also have to mount the antenna at a proper place outdoors.
FIRST TIME INSTALLATION • Select one of the Predefined channels and press OK to..... .....start the main search procedure for (in this case) the ASTRA channels. The search procedure will take a while. Please refer to page 23. When the channel search from ASTRA is finished you can search for channels from other satellites when you have a motor antenna. • Press MENU on the remote control and the Main menu will appear on the screen. • Select line 5, System configuration.
FIRST TIME INSTALLATION The position of 22 satellites are preprogrammed in the SatScan motor. As long as you select satellite positions from the line “Automatic search” you also have access to preprogrammed TV channels that makes it easy to check the signal quality. • From line 1 Automatic search, select the satellite from which you want to search for channels. Then the procedure is the same as for the first satellite installation.
VIEWING MODE General information The following describes the basic functions of your Mediamaster while watching satellite TV or listening to satellite radio. Some of the functions described here are dependent on the Service Provider and can only be used if they are included in the transmitted programme information. Please note, that during the Channel search procedure, the Mediamaster may have downloaded a large number of channels.
VIEWING MODE The “i” (information) button The Mediamaster has the ability to display information about programmes currently being broadcast as well as those being broadcast next. This procedure is the same for both TV and radio mode. By pressing the “i” button while watching TV you will get a special “Programme information” banner. Select channel with or the numeric buttons.
VIEWING MODE List of TV and radio channels Name of the Channel list Indicates a closed satellite At the channel search procedure, three channel lists are created. One list named “All TV” containing all channels, another named “Free TV” containing only free channels and “Viasat” containing channels distributed by Viasat. In the “All TV” list scrambled channels are marked with a picture of a Smartcard (if this information is transmitted in the signal) and locked channels are marked with a padlock.
VIEWING MODE TV release (0) With the 0 button you can toggle between analogue terrestrial TV, video, analogue and digital satellite TV signals. (This is only valid if the units are connected via SCART cables, and not by a RF connection.) Channel number Analogue TV mode Video mode.
MAIN MENU General information Many of the functions of the Mediamaster are available from the Main menu. Press MENU to open it. You can always leave a menu at any time you want, without affecting any settings, by pressing the EXIT button. TV and radio channels Please refer to “List of TV and radio channels” on page 26. Edit channels From these menus you can create and edit channel lists.
MAIN MENU Create list From here you create your own favourite lists, containing the channels you watch most frequently. You must give each list a specific name, e.g. “Sport” or “Films.” When a favourite list is selected, you see only those channels defined in the list. When you have given the list a name; press OK and you will enter the “Select channels” menu (see next page) from where you add channels to the list. You can create separate favourite lists for TV and radio channels.
MAIN MENU Select channels From this menu you add and remove the channels in your Favourite lists. You use the “All TV” or “All radio” list as basis to select the channels from. A channel is added or removed by pressing the OK button. The square to the right on a line will be empty for removed channels, and will contain an “x” for added channels. • If you have a Favourite list that contains several satellites and networks, you can close the one(s) you are not going to work with.
MAIN MENU Rearrange channels From here you can arrange the sequence for the channels within your favourite lists. • With , mark the channel you want to move to a new position within the list. • Press again and the right side of the marked channel will change to . • Move the channel to the desired position with and press OK. It is also possible to first mark several channels, and then move them all simultaneously. • For each channel, press the button to add it to the set of marked channels.
MAIN MENU Update channels When new TV and radio channels are added to the different satellites, you can check and automatically update the channel lists. New channels will be marked with a star in the channel lists. After each download, check the channel lists for new channels marked with . During the search procedure the old channels will be coloured light blue, and new channels found will be coloured black in the “Channel search progress” menu.
MAIN MENU System configuration You will be asked to enter your access code before you can enter this menu. The code is preset to 1234 from the factory. (The code can be changed from the Parental control menu. Refer to page 40.) If you want to customize the system to suit you better, you can specify some settings from the submenus in the “System configuration” menu. Please note that many of these functions are the same as in the “First time installation.
MAIN MENU Manual search When you perform a Manual search you first need to enter some parameters for the channel search to work. The information you need to enter in this menu is available in magazines covering satellite TV reception, on the Internet or from your Service Provider. Transponder frequency: Specify the frequency in GHz. If you enter the wrong figure(s), erase with the button. Polarization: Select Horizontal, Vertical, Circular left or Circular right.
MAIN MENU Edit satellites When a new satellite has been sent into orbit, or if you select a not preprogrammed satellite, you can add it to the existing satellite list. To add a new satellite • Select the line “New satellite”. • Press OK. • Enter the name of the new satellite. (How to enter a name is described on page 29.) • Enter the position (in degrees) with the numeric buttons on the remote control. (Use the left arrow button to erase digits.) • Select orientation; East or West.
MAIN MENU When your antenna is controlled by a motor: • Enter the “Channel search” menu. • Select “Manual” or “Advanced” search. • Select the new satellite name. • Enter the settings for Transponder frequency, Polarization etc. for the new satellite. • Select the last line, “Adjust motor”, from where you now, by pressing the buttons on the remote control, can move the antenna to the position for the new satellite.
MAIN MENU Antenna/Satellite configuration Set up and adjust motor The procedure is the same as performed during the First Time Installation. Please refer to page 20. East/West limit setup You only have to set one or both of these limits if the antenna is prevented from reaching its East/West limit positions. This could be the case e.g. if the antenna is mounted to close to a wall or in any similar situation. • To set these limits, select East or West limit setup and press OK.
MAIN MENU Position of the RGB output Adjust the horizontal position of the TV picture with the buttons. (The “TV signal,” see above, must be set to RGB for this function to work.) Time adjustment The time is adjusted by using the buttons, ± 1/2 an hour at a time. You can also adjust the minutes by using the buttons. Modem configuration The modem function is only working in the Scandinavian countries and Greece. The Mediamaster is equipped with a built in telephone modem.
MAIN MENU Receiver upgrade In order to keep the Mediamaster up-to-date, it will be possible to download new versions of the system software via satellite and from the Internet. New software may include new or improved features for existing menus. Enter this menu to check for new software. If new software is available you will get information in the menu on how to proceed.
MAIN MENU Parental control To open this menu you will be asked to enter your access code. From the factory the access code is set to 1234. The following settings can be altered from this menu. Receiver lock If you select “On,” you will have to enter the access code every time you start the Mediamaster from standby. Age rating control If you want everybody to have access to all available types of programmes, select “Off.” If you select “On,” you may block programmes unsuitable for children.
MAIN MENU Appearance preferences Banner time-out When you switch channels, an information banner will be shown for a few seconds. You can select for how long the banner will be shown. Volume bar Select whether or not you want the volume bar to appear on the screen when you change the volume. Volume bar time-out Select how long the banner will be visible on the screen. Subtitles Select whether or not subtitles will be visible on the screen.
MAIN MENU System information If you have to contact your service provider or a service center, they might ask for information available from this menu. Therefore, it is important that you first check the information in the following menus. System information This gives general information about which hardware and software version your Mediamaster is running on.
MAIN MENU Conditional Access This menu will only be activated if you have inserted a valid Smartcard in the slot behind the front lid. If more than one CA system is activated, select the one from which you want information. The Viaccess Conditional Access (CA) System is embedded in the Mediamaster. A Smartcard that supports this standard can be used in the left slot on the front panel.
MAIN MENU Timer settings Select Timer from the Main Menu. ☛ From this menu you first must select a not already occupied line before you press OK to go on with the Timer settings. If you have made earlier settings and any of those are marked, that setting will be replaced with the new one you are going to make! ☛ Select channel list and channel with the buttons. The channel can also be entered with the numeric buttons. The present date (month/day) will automatically be preselect.
GLOSSARY OF TERMS Access Authorisation to use the coding system to purchase / order TV programmes. AGC Automatic Gain Control. Parental control A feature that allows parents to ”lock” programmes that they consider unsuitable for children. A ”locked” channel or programme can only be ”unlocked” with the special parental access code. CA Conditional Access. A system to control subscriber access to services, programmes and events. Parental Access code A four-digit code stored in the Mediamaster.
PROBLEM SOLVING Problem Possible causes What to do The display on the front panel does not light up/is not lit. Mains cable is not connected. Check that the mains cable is plugged into the power socket. No sound or picture, but the front panel shows the time or - - : - -. The Mediamaster is in standby mode. Press the standby button or any number button to bring the Mediamaster out of standby mode. No sound or picture. The satellite dish is not pointing at the satellite. Adjust the dish.
PROBLEM SOLVING Problem Possible causes What to do The remote control is not working. Battery exhausted. Remote control is incorrectly aimed. Change the batteries (both). Aim the remote control at box. Check that nothing blocks the front panel. Check if (.) is flashing on the front panel display when you press a button. If not replace the batteries (both). The Mediamaster is in standby mode. You see the on-screen message. Viewing card error.
TECHNICAL SPECIFICATIONS Telephone (return channel on the phone line) Contact modular 6-pin jack Protocol V22, 1200 bits/sec LNB / Tuner input Security information Connector 1x F-type (LNB) The modem connection is made according to the TNV 3 circuit RF input frequency 920-2150 MHz type. All other connections are made according to the SELV RF input power level -20 to -70 dBm circuit type. Supply voltage 13,5 /18,5 V ± 5% Max. current 500 mA, overload protected Conditional Access system Embedded Viaccess.
Nokia is a registered trademark of Nokia Corporation www.nokia.