
Installation Guide


READ PRIOR TO ATTEMPTING INSTALLATION
ALWAYS TURN OFF MAIN POWER BEFORE INSTALLATION
INSTALLATION SHOULD BE CARRIED OUT BY YOUR LOCAL ELECTRICIAN
6505 Gayhart Street, Commerce, CA 90040
Tel 323.767.2600 | www.noralighting.com | e-mail: nora@noralighting.com
© 2020 Nora Lighting, Inc. All rights reserved. Instructions subject to change without notice.
Installation Instructions
NHIC Series
IC Air-Tight LED Dedicated New Construction Housing
031620P1
IS-NHICR02
Fixtures are listed for insulated ceilings—Type IC, airtight—AT and for suspended ceilings—Type
S. To insure safe and reliable operations, make sure the fixture corresponds to the proper
ceiling installation. Read the following material carefully before beginning installation.
In general these instructions apply to “round” housings. Drawings of “round” housings have been
used to illustrate installation procedures.
Before attempting installation of any recessed lighting fixture check your local electrical code.
This code sets the wiring standards for your locality and should be carefully studied before
starting work.
INSULATED CEILINGS - TYPE IC
Insulated Ceiling
The insulated ceiling or IC approved recessed
fixture is one that can be installed in direct
contact with insulation.
SUSPENDED CEILINGS - TYPE S
Fixture can be installed in suspended ceilings that
are not permanent or insulated.
AIRTIGHT INSTALLATION
Nora housings certified under ASTM E283 are supplied with a pre-installed gasket or supplied
with a ready-to-install self adhesive gasket.
Step 1. Lay gasket flat and peel protective paper backing from gasket to expose
adhesive side.
Step 2. Apply supplied gasket to ceiling lip and wrap gasket around inside of housing
to form seal of the ceiling opening or apply caulk per state/local code. When
properly installed, Nora housings provide compliance with restricted air-flow
regulations.
FIRE/ELECTRICAL HAZARD: INSTALL ACCORDING TO NATIONAL ELECTRIC
CODE AND ANY APPLICABLE MUNICIPAL CODE REQUIREMENTS.
This equipment is intended to be installed only by qualified personnel. The installation must be
made in accordance with the current edition to the National Electric Code and all applicable
state and local building codes. The final installation must be approved by the appropriate
qualified electrical/building inspector(s). Improper installation may result in a fire or electrical
hazard. Be sure the electrical power to the circuit has been disconnected before installing this
electrical system.
For additional details, contact technical support at 800.686.6672.
FEU / RISQUE ÉLECTRIQUE: INSTALLER SELON AU CODE ÉLECTRIQUE
NATIONAL ET LES EXIGENCES DE CODE MUNICIPAUX APPLICABLES.
Cet équipement est destiné à être installé par un personnel qualifié. L’installation doit être
faite conformément à l’édition actuelle du Code national de l’électricité et tous les codes d’état
et de construction locaux applicables. L’installation finale doit être approuvée par l’inspecteur
en électricité / bâtiment qualifié approprié (s). Une mauvaise installation peut provoquer un
incendie ou un risque électrique. Assurez-vous que l’alimentation électrique du circuit a été
coupée avant l’installation de ce système électrique. Pour plus de détails, contactez le support
technique au 800.686.6672.
IMPORTANT- RISK OF FIRE:
Most dwellings built before 1985 have supply wire rated 60ºC (thermal cutoffs in fixtures operate
at 90ºC); consult a qualified electrician prior to installation. If supply wires are located within
three inches of fixture, use wire rated for at least 90ºC. Contact technical support at 1-800-686-
6672 for additional details.
IMPORTANT-RISQUE D’INCENDIE:
La plupart des logements construits avant 1985 ont le fil d’alimentation nominale de 60ºC
(disjoncteurs thermiques dans les appareils fonctionnent à 90ºC); consultez un électricien
qualifié avant l’installation. Si les fils d’alimentation sont situés à moins de trois pouces de
appareil, l’utilisation de fil résister au moins à 90ºC. Contactez le support technique au 1-800-
686-6672 pour plus de détails.
Optional
Emergency
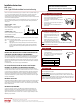
STANDARD “JOIST” CELING INSTALLATION:
1. Use bar hangers to attach fixture between ceiling
joists. Each end of the bar hanger is equipped with a
nail-in barbed tab. Additional hardware
such as screws or nails may be used if extra support
is necessary.
2. For steel studs, use steel piercing screws in place of
nails or barbed tabs.
3. Remove shipping screw from underneath side of
plaster frame.
T-BAR CELING INSTALLATION:
1. If mounting to a T-Bar type ceiling, mount
fixture onto grid by placing notches on the
bottom of each end of the bar hanger over
the grid.
2. Tie fixture to grid with structural wire
going through both the circular knockout
on the end of the bar hanger and nearest
accompanying knockout on the ceiling grid.
NOTE: It is imperative to tie down the fixture to prevent the fixture from being pushed
above the ceiling during reflector installation.
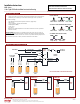
WIRING DIAGRAM:
Refer to wiring diagram on page 2.
NOTE ON GROUNDING: Many structures carry grounding via steel conduit. If this is the
case, if there is no grounding wire, simply leave green wire on fixture unattached. Fixture
will be grounded through attachment of conduit to junction box. However, if Romex or PVC
conduit is used, ground wire will always be present, and must be connected to green wire
on fixture junction box to avoid electrical shock hazard.
CUTTING A HOLE:
1. Locate the center of proposed opening on your tile
or ceiling and mark it.
2. Use a compass to draw a circle in diameter around
the center point. See chart for cut-out dimension.
3. Cut along this circular line.
Power Feed
Ground Wire
Cut-out dimension
NHIC-4LMRAT / NHIC-427LMRAT 4-3/8"
NHIC-5LMRAT / NHIC-527LMRAT 5-5/8"
NHIC-6LMRAT / NHIC-27LMRAT 6-3/8”