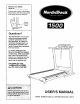
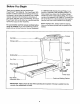
Model No. 831.298800 Serial No. Find the serial number in the location shown below. Write the serial number in the space above for reference. _ Number Decal Serial Questions? As a manufacturer, we are committed to providing complete customer satisfaction. If you have questions, or if there are missing or damaged parts, we will guarantee complete satisfaction through direct assistance from our factory. TO AVOID UNNECESSARY DELAYS, PLEASE CALL DIRECT TO OUR TOLL-FREE CUSTOMER HOT LINE.
Table of Contents Important Precautions ....................................................................... Before You Begin ........................................................................... Assembly ................................................................................. Treadmill Operation ......................................................................... How to Fold and Move the Treadmill ...........................................................
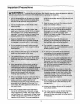
Important Precautions wearing onrystockings, or in sandals. 18. When folding or moving the treadmill, make 19. Inspect and tighten all parts of the treadmill every three months. 10. Use only a single-outlet surge suppressor that is UL 1449 listed as a transient voltage surge suppressor (TVSS). The surge suppressor must have a UL suppressed voltage rating of 400 volts or less and a minimum surge dis_ sipation of 450 joules. The surge suppressor 20.
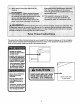
The decalshownbelowhasbeenplacedon yourtreadmill.If the decalis missing,or if it is not legible, pleasecallour CustomerServiceDepartmenttoll-freeto ordera free replacement decal (see the back cover of this manual). Apply the decal in the location shown. • Gardez les enfants dloignds du tapis roulant en tout temps. • Veuillez vous assurer que le Ioquet de rangement est compl_tement ferm6 avant de d0placer le tapls roulant ou de le ranger.
Before You Begin Thank you for selecting the new NordicTrack PowerTread TM 1500 treadmill. The PowerTread 1500 treadmill combines advanced technology with innovative design to let you enjoy an excellent form of cardiovascular exercise in the convenience and privacy of your home. And when you're not exercising, the unique PowerTread 1500 can be folded up, requiring less than half the floor space of other treadmills. at 1-888-825-2588, Monday through Friday. 6 a.m. until 6 p.m.
Assembly Assembly requires two people. Set the treadmill in a cleared area and remove all packing materials. Assembly requires a phillips screwdriver (_i_===_==_ (not included). 1. With the help of a second person, carefully raise the Uprights (70) until the Wheels (30) are resting flat on the floor. 3O 2. Remove the two indicated Screws (43) from the left Upright (70). Attach the Storage Latch (5) and the two Latch Spacers (93) to the left Upright (70) with the two Screws (43).
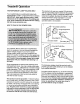
Treadmill Operation THE PERFORMANT LUBE TM WALKING BELT This product is for use on a nominal 120-volt circuit, and has a grounding plug that looks like the plug illustrated in drawing 1 below. A temporary adapter that looks like the adapter illustrated in drawing 2 may be used to connect the surge suppressor to a 2-pole receptacle as shown in drawing 2 if a properly grounded outlet is not available. Your treadmill features a walking belt coated with PERFORMANT LUBE TM, a high-performance lubricant.
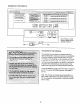
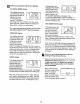
DIAGRAM OF THE CONSOLE ¢*u| gUTTam . m.*_ SM|=._ g,Jgg • pr... hAM lul¢_ ,Irl, m,r I N|s.l,t n&.tll .mTIWgl'ry tg =*g go gO ga 70 el &OI ,._ gt'AgT/|N_I= aplpATIOm =T_r,mT/I==lr [g 0_ |,'|mO_ / J E KEy IPI|O INCL;N| Note: If there is a thin sheet of plastic on the console, remove it. -- Key FEATURES OF THE CONSOLE The treadmill console offers an impressive array of features designed to make your workouts more effective.
B i] After the button is pressed, there will be a brief pause; the walking belt will then begin to move at 1.0 mph. Hold the handrails and begin walking. Plug in the power cord. Follow the instructions on page 7 to plug in the power cord. When the power cord is plugged in, the displays on the console will flash once. (Note: If the key is in the console when the power cord is plugged in, the letters "PO" will flash in the SPEED display. If this occurs, remove the key.
r,_ measurement, first hold down the START/." ENTER button while inserting the key into the console. An "E" for Follow your progress with the four displays. PULSE/CALORIES display This display shows the your heart rate* and the approximate number of calories you have burned during your workout. The display will change from one number to the other every seven seconds. Indicators below the display will show which number is currently shown.
As you exercise, the incline of the treadmill will periodically change as indicated by the graphs labeled P2, P3, and P4 on the console. The speed of the walking belt can be changed as desired during the program with the SPEED buttons. The TIME/PACE display will show the time remaining in the program. During the last three minutes of the program, the walking belt will slow to allow you to cool down. During the last ten seconds of the program, the incline will decrease to 1.5%.
Notes 12
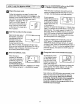
How to Fold and Move the Treadmill HOW TO FOLD THE TREADMILL FOR STORAGE Before folding the treadmill, adjust the incline to the lowest position. Next, unplug the power cord. Caution: You must be able to safely lift 45 pounds (20 kg) in order to raise, lower, or move the treadmill. 1. Hold the treadmill with your hands in the locations shown at the right. To decrease the possibility of injury, bend your legs and keep your back straight.
HOW TO LOWER THE TREADMILL FOR USE 1. Hord the upper end of the treadmill with your right hand as shown. Using your reft thumb, press the storage latch to the teft. Pivot the treadmill until the frame and |oot rails are past the storage latch. J Storage Latch ,t/ 2+Hold the treadmill firmly with both hands, and lower the treadmill to the floor. To decrease the possibility of injury, bend your legs and keep your back straight.
Maintenance and Trouble-shooting Most treadmill problems can be solved by following the simple steps below. Find the symptom that applies, and follow the steps listed. If further assistance is needed, call our Customer Service Department toll-free at 1-888-825-2588, Monday through Friday, 6 a.m, until 6 p.m. Mountain Time (excluding holidays). 1. SYMPTOM: THE POWER DOES NOT TURN ON a.
4. SYMPTOM: THE WALKING BELT IS OFF-CENTER WHEN WALKED ON a. If the walking belt has shifted to the left, first remove the key and UNPLUG THE POWER CORD. Using the included allen wrench, turn the left rear roller adjustment bolt clockwise, and the right bo_t counterctockwise, 1/4 of a turn each. Be careful not to overtighten the walking belt. Plug in the power cord, insert the key and run the treadmill for a few minutes. Repeat until the walking belt is centered. b.
6. SYMPTOM: THE DISPLAYS OF THE CONSOLE DO NOT FUNCTION PROPERLY a. Remove the screws from the hood. Carefully remove the hood. Locate the Reed Switch (74) and the Magnet (95) on the left side of the Pulley (17). Turn the Pulley until the Magnet is aligned with the Reed Switch. Make sure that there is a 1/8"gap between the Magnet and the Reed Switch. If necessary, loosen the Screw (90) and move the Reed Switch slightly. Retighten the Screw.
Conditioning Guidelines E! Determine your target heart rate. FACTORS IN A SENSIBLE DIET Your target heart rate (THR), is the rate at which you would like your heart to work during aerobic exercise. It is expressed as a percentage of your maximum heart rate (MHR). MHR is the maximum number of times that your heart can pump during one minute. To determine your approximate MHR, subtract your age (in years) from 220.
3. Hamstring Stretch--Sit with one leg extended. Bring the sole of the opposite foot toward you and rest it against the inner thigh of your extended leg. Reach toward your toes as far as possible. Hold for 15 to 30 seconds, then relax. Repeat 3 times for both legs. Stretches: Hamstrings, lower back, and groin. 4. Inner Thigh Stretch--Sit with the soles of your feet together and your knees outward. Pull your feet toward your groin area as far as possible. Hold for 15 to 30 seconds, then relax.
[] 'q" is for the time or duration of your workout. Beginning exercisers may wish to start with 5 to 10 minutes of aerobic activity. Those in average physical condition should exercise for 20 to 30 minutes. Highly fit people, or people who want to lose weight, should exercise for 30 to 60 minutes. The key to the time factor is that you maintain your target heart rate for the duration of the workout period.
Move on to the Fitness Level only when you feel ready and your heart rate has moved below your target heart rate zone. The Fitness level usually lasts 12 to 20 weeks. (It may last longer, depending on your fitness goals.) At this level you should strive to achieve your fitness goals. Set realistic short- and long-term goals for yourself. Frequently re-evaluate your fitness goals and reward yourself as you are successful.
Part List--Model No. 831.298800 R1208A To find the parts listed below, refer to the Exploded Drawing attached in the center of this owner's guide. Key No. Qty. Key No. Qty. Description 1 2 3 4 5 6 7 8 9 10 11 12 13 14 15 16 2 1 2 1 1 4 2 6 1 4 1 4 1 4 1 1 Rear Roller Adj. Bolt Front Roller Adj.
Key No. Qty. # # # # 1 I 1 1 Description Key No. Qty. 8" Slack Wire, 2 Female 4" Slack Wire, 2 Female 8" Wire Harness 14" White Wire, 2 Female # # # # 1 1 1 1 Description 8" Blue Wire, 2 Female 8" Green Wire, Ring/Female 8" Pulse Wire Owner's Guide # These parts are not illustrated. * Includes all parts shown in the box. Specifications are subject to change without notice.
Exploded DrawingmModel No. 831.298800 R1298A 10 o o o 86 43 J / 99 15 10 / 56 84 79 97 i i ' 66 56 90 52 24 75 37 43 _-.
Exploded Drawing--Model No. 831.298800 R1298A . 51_ 28 24: 90 9 25 8 22 0o 36 69 94 8 25 "_ 54 36 90 48 \ 62 83 99 _62 5O 58 98 24 -/ 51 35
l Limited Warranty WHAT IS COVERED--The material and workmanship. WHO IS COVERED--The entire NordicTrack PowerTread TM 1 1500 ("Product") is warranted to be free of all defects in original purchaser or any person receiving the Product as a gift from the original purchaser. HOW LONG IS IT COVERED--ICON Health & Fitness, Inc. ("ICON"), warrants the motor for three years after the date of purchase. All other pans are covered for two years after the date of purchase. Labor is covered for one year.