
Installation Guide


OPERATION
After installation, connect the water source and turn on the power supply, and the machine will come on and start working. Please confirm that
the machine is operating normally when you turn it on for the first time.
CONTROL PANEL AND DISPLAY
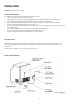
a. LED Display: Will give information regarding the ice making cycle or errors.
● INIT: Self-check. Display will show ini
● Prep: Display will count up in seconds while the unit prepares to start.
● Make: Shows progress of the ice making process. Will count the seconds up while the water temperature is decreased, and then count
down to show the ice making process.
● Ice Harvest: Counts the seconds for the ice harvesting.
● Cleaning: Will display “CLE” while cleaning and descaling, ‘STL’ during sterilization, and ‘rin’ for rinsing.
b. LED indicators show the current process the ice maker is in.
c. Ice Cube Thickness adjustment: During the ice making process, press and hold the “-” button for 3 seconds, then press “+” or “-” to change the
thickness of the ice being made.
NOTE: Pushing the “+” or “-” button extends or shortens the ice making time by 1.5 minutes.
d. Cleaning: During operation, press the cleaning button for 3 seconds to start the cleaning process. As the display shows the steps of the process,
cleaning agents and disinfectants will need to be added to the water trough. When the cleaning process is completed, the unit will return to the ice
making mode.
e. ON/OFF: When the unit is connected to a power supply, press the “ON/OFF” button to turn the unit on or off.
NOTE: ALWAYS turn the ice maker off and disconnect from the power supply for maintenance, or when not using for a
long period.
f. Error Codes: If there is a problem with the ice making process, the LED Display will show an error code indicating the issue. See chart in the
Troubleshooting section for additional information.
10