
Network Router User Manual


Creating and Configuring a SecurID User Group
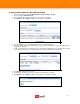
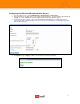
1. From the admin console, expand VPN Gateways > Group Settings > Groups.
2. Click on the button Add New Group.
3. Fill out the form with the desired group name, user type and description.
4. Click Update and then Apply to add the new group to the configuration.
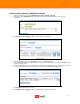
5. From the Groups menu on the administration console, select Access List.
6. Select the domain number your RSA SecurID user group resides in and then choose the RSA SecurID user
group from the group list.
7. Create an appropriate Access list based on your organizations configuration. In the example below you will
see we have created a generic rule allowing all access for authenticated RSA SecurID users.
8. Click Update to apply the Access rules.
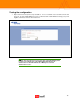
9. Configure the user group for any necessary links or VPN Settings as required.
10. Click Update and then Apply to add the new information to the IOS configuration.
6