Quick Start Guide BSG8ew and BSG12aw/ew/tw 1.0 Business Services Gateway Document Status:Standard Document Number:NN47928-105 Document Version: 01.
Copyright © 2008 Nortel Networks, All Rights Reserved All rights reserved. The information in this document is subject to change without notice. The statements, configurations, technical data, and recommendations in this document are believed to be accurate and reliable, but are presented without express or implied warranty. Users must take full responsibility for their applications of any products specified in this document. The information in this document is proprietary to Nortel Networks.
Quick Start Wizard Use this guide to complete the basic configuration of the Business Services Gateway (BSG) and to enable remote access configuration. You will need the following information from your ISP or network administrator to complete the Wizard: Login information Value IP address of the device default:192.168.1.
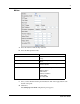
Gateway IP Address Primary DNS Secondary DNS LAN LAN IP address Do not change LAN subnet mask Do not change DHCP Setup Server Relay None DHCP Server configuration IP Pool Starting Address IP Pool End Address Wireless Country Code Wifi Security selection Open System WPA-PSK WPA2-PSK WEP select key size- 64, 128, 152 Security Key SIP Phone connection SIP host domain SIP central server Maximum Simultaneous calls per WAN link NN47928-105 WAN port number of permitted calls
Remote Access Remote Access Enable remote access Telnet SSH Procedure 1 Ensure that the BSG is powered up and connected to the Internet. 2 Connect a PC to the LAN port of the BSG. 3 Open a web browser. 4 In the address bar of the browser, enter the LAN IP address of BSG and press Enter.
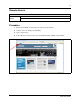
5 The BSG login page appears. 6 Enter the user name and password and click the login button to access the device. The system information panel appears.
7 In the navigation panel on the left, click on the Quick Start Wizard option. The Quick Start Wizard opens. 8 Click on the arrow in the middle of the page to continue. The Setting Up Your WAN configuration panel appears. The fields on your panel will be different depending on which model of BSG you are configuring.
BSGtw NN47928-105 a Select the interface from the drop down list. b Select the Framing. c Select the Clock Source. d Enter the Time Slot. e Select whether Authentication is Required. f If authentication is required enter the username and password. g Once you have finished entering the information click on the Apply button at the bottom of the panel. h Click Next. The Setting Up Your LAN configuration panel appears.
BSGew a Select the interface from the drop down list. b Select the Encapsulation mode. PPPoE Ethernet 1. Enter ISP name 1. Select whether to enable or disable the MAC Cloning. 2. Enter the user name 2. If MAC cloning is enabled enter the MAC address. 3. Enter the password 3. Select whether IP address assignment is manual or dynamic 4. Enter the Host Name. 4.
BSGaw 9 a Select the DSL Name. b Select the DSL Connection Type. c Enter the VPI/VCI. d Select whether Authentication is Required. e Enter the username. f Enter the password. g Once you have finished entering the information click on the Apply button at the bottom of the panel. h Click Next. The Setting Up Your LAN configuration panel appears. Enter all of the parameters identified by your administrator at the beginning of this guide.
11 Click the Next button at the bottom of the panel to advance to the next panel. The Setting up your Wireless configuration panel appears. 12 Select the Country Code. 13 Refer to the information at the beginning of this guide for the correct security settings to enter. 14 Click on Apply to save the configuration. 15 Click the Next button at the bottom of the panel to advance to the next panel. The Setting up Your SIP Phone Connection configuration panel appears. 16 Enter the SIP Host Domain.
21 You have successfully completed the BSG Quick Start Wizard. 22 Verify all of the information that you have entered is correct. If the information is correct, click Continue to save the information. If you want to make changes to the information, click on the Change button at the bottom of the page and you will run through the Wizard again.