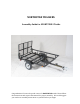
NORTHSTAR TRAILERS Assembly Guide for SPORTSTAR I Trailer Congratulations! You are the proud owner of a NORTHSTAR trailer. Please follow the instructions and steps in this manual for proper assembly. We would suggest you watch our assembly instructions on youtube before you begin.
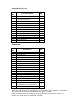
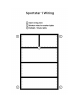
TRAILER PARTS LIST Part Part Description No. 1 Frame (deck) 2 Tongue (with wiring harness) and Coupler (hitch) 3 Side-Rail 4 Front-Rail 5 Rear Corner Bracket 6 Side-Rail Supports 7 Wheel and Hub Assembly 8 Leaf Spring 9 Axle 10 Fender 11 Front Rail Support (angled) 12 Wiring Harness 13 Rear Gate Qty. 1 1 2 1 2 6 2 2 1 2 3 1 1 HARDWARE Part No.
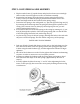
This trailer requires inverted assembly. (Assembled upside-down). Start by turning the trailer frame upside-down so the trailer deck is facing the ground. Use a table robust enough to support the weight of the trailer frame and high enough to elevate the frame to waist-height, or place the corners of the frame on buckets, or use sawhorses to elevate each end. CAUTION: This trailer is heavy. More than one person is required to flip the trailer frame and assembly this trailer.
STEP 1: LEAF SPRING & AXLE ASSEMBLY a. Flip the trailer frame (1) upside-down, and place the frame on a waist-high table or other elevated supports in order to facilitate assembly. b. Position the leaf-spring (8) on the frame’s spring casing (welded to the frame) so the eye in the leaf-spring is positioned toward the front of the trailer and aligns with the bolt eyehole in the spring casing. c.
Tip: It is easier to run the trailer’s wire before installing the wheels. You will install the wheels in STEP 3.
STEP 3: ATTACH WHEELS TO AXLE Note: the hub assembly comes attached to the wheels with washers and pre-lubricated bearings. Upon removing the dust caps, take special care to not drop the bearings or get them dirty. a. Carefully remove the dust-cap from the wheel (7) by gently prying around the edges of the cap with a small, flathead screwdriver, or by using a long bolt to gently drive through the backside of the hub and into the cap. b.
Note:. Grease the wheel bearings a minimum of 1x per year for normal use, and up to 3x per year for frequent use in order to ensure the longevity of the bearings. Adjust and re-grease the bearings after the first 100 miles. STEP 4: ATTACH TONGUE TO FRAME Remember: the trailer is still upside-down, so all components must be installed upsidedown. a. *Make sure that the tongue’s wiring harness extends through both the back and the front of the tongue. b.
ROTATE THE TRAILER TO AN UPRIGHT POSITION. Position the trailer so the tires are on the ground. More than one person is required to rotate the trailer; DO NOT ATTEMPT TO ROTATE THE TRAILER TO THIS POSTION ALONE. STEP 6: ASSEMBLE AND INSTALL LIGHTS INSTALL TAIL/BRAKE LIGHTS a. Fasten the taillight/brake light L-brackets (O) to the frame using two, 1” bolts (J), one small flat-washer (I) and one small lock-washer (H) for each bolt. b. Remove the nuts from the back of the taillight (M). c.
INSTALL RUNNING LIGHTS a. The white wire from the harness is not needed for ground on this light and can be capped off (with wiring connector (R)) or tied to other wires in the harness with a small zip-tie. b. Connect the brown wire from the running light (N) with the brown wire from the wiring harness by pushing the wires together. c. Position the brown wire under the silver tab, between the tab and the lens.
STEP 8: INSTALL SIDE RAILS & CORNER BRACKETS Note: fasten bolts to finger-tightness until the side-braces, brackets and side-rails are all in place—this will allow you to make alignment adjustments if needed. Once all parts are aligned and secured, securely tighten all bolts. INSTALL REAR CORNER BRACKETS & SIDE RAILS a. Attach the rear corner brackets (5) to the frame using 1” bolts (J), small flatwashers (I) and small lock-washers (H). b.
YOU ARE FINISHED! We hope that you enjoy your NORTHSTAR TRAILER. Please contact us at 1-855-375-3088 or email info@northstartrailer.com if you have any questions. Our business hours are Monday-Friday 9:00 a.m. to 5:00 p.m. MST. TRAILER SPECIFICATIONS Trailer Weight: 300 lbs Towing Capacity: 1000 lbs (GVWR) Length (w/ tongue): 121.5” Width: 121.5” Height: 50” Tire Size: 12x4.8 Note: The dealer that sold you this trailer will ship you the trailer’s Certificate of Origin.