
Manual

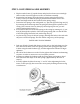


STEP 8: INSTALL SIDE RAILS & CORNER BRACKETS
Note: fasten bolts to finger-tightness until the side-braces, brackets and side-rails are
all in place—this will allow you to make alignment adjustments if needed. Once all
parts are aligned and secured, securely tighten all bolts.
INSTALL REAR CORNER BRACKETS & SIDE RAILS
a. Attach the rear corner brackets (5) to the frame using 1” bolts (J), small flat-
washers (I) and small lock-washers (H).
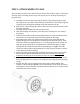
b. Install the side-rail supports (6) and front-rail supports (11) to the trailer
frame using 1” bolts (J), small lock-washers (H) and small flat-washers (I). Do
not fully tighten yet.
c. Fasten side-rails (3) to the top of the supports using 1” bolts (J) and small
locknuts (C).
d. Install the front-rail (4) to the side-rails by sliding the corners of the front-
rail into the ends of the side-rails. Use the small bolts and small locknuts to
fasten the front and side-rails together, and to fasten the front-rail to the
angled supports.
e. The back ends of the side-rails will fasten to the rear corner brackets. Use 1”
bolts (J), small flat-washers (I) and small locknuts (C).
Note: the rail supports fasten to the outside of the rails. Install the bolts from the
trailer-side of the rail, through the rail and into the rail support.
TIGHTEN AND SECURE ALL BOLTS! After all side-rails and supports are in
their proper positions, make sure to securely tighten all bolts.
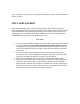
STEP 9: INSTALL REAR GATE
a. Connect the gate’s pin-slots with those on the trailer using the gate-pins (F).
b. Secure the gate-pins with the cotter-pins, and then secure the cotter-pins by
bending at least one leg to 90 degrees.