
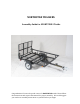
Manual


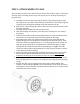

Note:. Grease the wheel bearings a minimum of 1x per year for normal use, and up to
3x per year for frequent use in order to ensure the longevity of the bearings. Adjust and
re-grease the bearings after the first 100 miles.
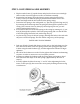
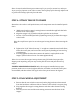
STEP 4: ATTACH TONGUE TO FRAME
Remember: the trailer is still upside-down, so all components must be installed upside-
down.
a. *Make sure that the tongue’s wiring harness extends through both the back
and the front of the tongue.
b. Align the tongue’s (2) eyeholes with the eyeholes on the frame.
c. Use the 3 5/8” threaded pin-bolts (E) and large nuts (G) to fasten the tongue
to the frame.
Note: Be careful not to pinch or cut the tongue’s wiring harness when inserting the
bolts.
d. Tighten the 3 5/8” bolts from step “c” as tight as a manual wrench will allow,
insert the cotter-pins, and secure the cotter-pins by bending at least one leg
to 90 degrees.
e. Securely tighten the bolts that connect the trailer’s coupler/hitch to the
tongue. (These bolts are loose. You must tighten them).
*Note: In rare cases the tongue’s wiring harness may fall inside the tongue after
shipping and unpacking, and you may need to fish the wires and pull them out of
tongue.
TIGHTEN AND SECURE ALL BOLTS! After the tongue is installed in its proper
position, make sure to securely tighten all bolts, and make sure that all cotter-pins
are installed, and that at least one leg of each cotter-pin is bent to 90 degrees.
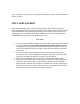
STEP 5: FINAL WIRING ADJUSTMENT
a. Ensure that the tow-vehicle connector (trailer plug) and wires that extend
from the hitch have sufficient slack to connect to the vehicle’s receptor plug.
b. Plug together the tongue’s wiring harness with the trailer frame’s wiring
harness.
c. Tuck any excess wire and the main wiring connector into the base of the
tongue.