M268176D.1 ITEM NUMBER: 268176 SERIAL NUMBER: _____________ Owner’s Manual Instructions for Assembly, Testing, Operation, and Servicing Trailer Kit: High speed upgrade kit used with Item# 268175 WARNING READ and UNDERSTAND the Owner’s Manual completely before using this trailer kit. Assemble, test, and use only in accordance with the Owner’s Manual instructions. EXERCISE CAUTION in vehicle handling when towing sprayer to avoid loss of control or rollover.
Hazard Signal Word Definitions 2
Table of Contents Summary of Important Safety Information ................................................................................4 During Assembly During Operation During Storage / Troubleshooting Unpacking Unpacking ................................................................................................................................................ 5 Unpacking the Manual Bag .................................................................................................................
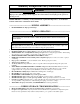
Summary of Important Safety Information WARNING Read and understand this owner’s manual completely before using the high speed trailer upgrade kit. Improper use of the high speed trailer upgrade kit could result in serious injury for the operator or nearby persons. LISTED BELOW is a summary of safety information of particular importance. See individual sections of this owner’s manual for more details.
Unpacking Closely inspect all contents in the shipping carton. If you have missing or damaged components: Contact NorthStar Product Support at 1-800-270-0810.
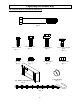
Unpacking the Manual Bag The following items are found in the manual bag. 1/2 x 4” Bolt Qty. 2 1/4 x 3/4” Bolt Qty. 1 1/4” Nut Qty. 1 5/16 x 3/4” Bolt Qty. 4 3/8 x 1” Bolt Qty. 2 5/16 x 3/4” Carriage Bolt Qty. 4 5/16” Nut Qty. 8 3/8” Nyloc Nut Qty. 2 1/2” Nyloc Nut Qty. 2 Cable Bushing Qty. 4 Side Marker Light Bracket Qty. 2 Safety Chain Qty.
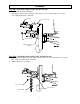
Assembly Step One: Attach the coupler to the A-frame tow bar. 1. Remove the hitch pin, if installed. 2. Attach the coupler to the A-frame tow bar using (2) 1/2 x 4” bolts and (2) 1/2” nyloc nuts. Tighten the bolts to 90 ft-lbs. Coupler 1/2 x 4” bolt 1/2” nyloc nut A-frame towbar Towbar Step Two: Attach the safety chains to the A-frame tow bar. 1. Attach the safety chains to the A-frame tow bar with (2) 3/8 x 1” bolts and (2) 3/8” nyloc nuts. Only one chain shown for clarity. 2.
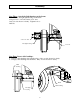
Assembly Step Three: Attach the light housings to the frame. Attach the left and right light housings to the frame using (4) 5/16 x 3/4” bolts and (4) 5/16” nuts. Only one side shown for clarity. Tighten bolts to 20 ft-lbs. 5/16 x 3/4” bolt Left light housing 5/16” nut Step Four: Insert cable bushings. 1. Snap (2) cable bushings into light housings. Only one side shown for clarity. 2. Snap (2) cable bushings into the frame. Only one side shown for clarity.
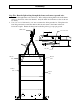
Assembly Step Five: Run the light wiring through the frame and connect ground wire. 1. Pull wires through frame as shown below. Wires will pass through the holes in the frame and sit on the inside of the side channels. Only the frame and A-frame tow bar are shown for clarity. 2. Use (1) 1/4 x 3/4” bolt and (1) 1/4” nut to connect the white ground wire. Wrap bare wire from the ground wire around the shaft of the bolt and secure to the frame in the hole below the coupler.
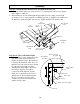
Assembly Step Six: Attach the side marker cover and light to the side rail. 1. Attach side marker light cover using (2) 5/16 x ¾” Carriage Bolts and (2) 5/16” Flange Nuts. Tighten to 20 ft-lbs. 2. Insert black wire on side marker light through either hole left or right of center light mount hole. Use (1) of the supplied 1/4”-20 Hex Nuts and (1) supplied lock washer from the light kit to attach the light to the side rail. Tighten until the lock washer is flat.
Assembly Step Eight: Wire and attach the other side marker. Repeat steps six (6) and seven (7) for the other side marker. Step Nine: Wire the taillights and attach to the light housings. 1. Cut off excess wire leaving 6 inches hanging out the back of both light housings. 2. For both taillights, connect the brown wire to the two black wires using a provided wire nut from the light kit. 3. For the left taillight, connect the yellow wire to the red wire using a provided wire nut.
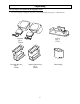
Machine Components 1. Coupler: Allows the trailer unit to be hooked up to a 2” ball hitch. 2. Wire Harness: Allows for the use of lights on the trailer. 3. Safety Chains: Secures trailer to vehicle in case of accidental disconnection of ball and coupler. 4. Side Marker Lights: Lights increase trailer visibility. 5. Taillight Assembly: Steel housings protect taillights. 6. Side Marker Cover: Protects side marker lights.
Operation – Important Safety Information Now that you have installed and tested your assembly, there is some important safety information you need to know with regard to vehicle handling with the sprayer attached. WARNING Carefully read and make sure you understand the following safety information before using the trailer kit. Before Towing Trailer prep. ALWAYS inspect and prepare the trailer kit before use according to the directions provided in this manual. Operator age.
Operation – Using the Trailer Kit Step One. Inspect/Repair If the trailer has been used previously, it must be prepared BEFORE EACH SUBSEQUENT USE. WARNING Read instructions below carefully for inspecting and preparing the trailer kit. Damaged or missing components could result in injury to the operator, bystanders, or property damage. Important safety rules: Replacement parts. If a part needs replacement, only use parts that meet the manufacturer’s specifications.
Operation – Using the Trailer Kit 3. Attach safety chains Attach safety chains. 1. Two safety chains must be used while towing. 4. Put jack up 2. Cross safety chains under the coupler allowing only enough slack for vehicle turns. Secure the jack in the up position before towing. 5. Transport It is recommended that the trailer sprayer be towed at speeds less than 45mph. Important safety instructions: Added length. Be aware of the added length of the sprayer. Rough terrain.
Exploded View – 268176 – Rev. D.
Limited Warranty Dear Valued Customer: The NorthStar Product you just purchased is built with the finest material and craftsmanship. Use this product properly and enjoy the benefits from its high performance. By purchasing a NorthStar product, you show a desire for quality and durability. Like all mechanical equipment this unit requires a due amount of care. Treat this unit like the high quality piece of machinery it is. Neglect and improper handling may impair its performance.
Manufactured by Northern Tool + Equipment Co., 2800 SouthCross Drive West P.O.