
Manual


Display
Preferred state of the output
Note
off
Inactive in case of an error
on
Active in case of an error
- Press button 1 to validate the selection. The display shows “ 1.Err“ again.
The configuration of the output function is now completed. Depending on the selected output
function you have to make the settings for switching / alarm points. See description in chapter
“Switching points / alarm-boundaries“ for further information.
Hint: The settings for the switching and alarm points can be made later in an extra menu
(see chapter 5).
5 Switching points / alarm-boundaries
Please note:
The storage of a configuration value will be done by switching to the next configuration value
(via button 1).
When configuration is active and no button is pressed for more than 60 seconds the
configuration will be cancelled. Stored changes will not be lost!
Hint:
The buttons 2 and 3 are featured with a ‘roll-function‘. When pressing the button once the value
will be raised (button 2) by one or lowered (button 3) by one.
When holding the button pressed for longer than 1 second the value starts counting up or
down, the counting speed
wi
ll be raised after a short period of time.
- When pressing button 1 for >2 seconds the menu to select the switching points and alarm-
boundaries will be called.
- Depending on the configuration you have made in the “output“ menu you will get dierent
display values. Please follow the specific chapter for further information.
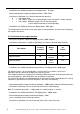
Description
to select
as output
Output
(out)
see
chapter
no output, device is used as display
no
off
--
2-point-controller
2P
switching function
5.1
3-point-controller
AL
min-/max-alarm,
inverse
5.2
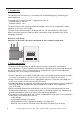
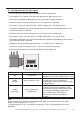
Button2
Button1
Button3
1010 West Bagley Road, Berea, Ohio 44017 P 440.243.0888 F 440.243.3472 www.noshok.com
10