
Instructions / Assembly

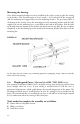


supports (shoulder). Mark this on the header board with an "A". (See Detail #3). Measure
over a minimum of 3" to either side of this mark and using the mounting bracket as a guide,
mark the hole locations. Important: If the arm supports are more than 12" from the end of
the awning, install the mounting brackets to the outside of the arm support. Drill 1/4" pilot
holes centered on the hole and then install the mounting brackets with the
3
/
8
" x 4" galvanized
lag bolts and washers provided. On wider awnings, center additional brackets.
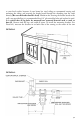
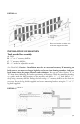
Option "B" (See Detail #4) Mounting brackets can be installed directly on the wall. It is
critical that all brackets be mounted level, plumb, and on the same surface plane. Brackets
that are out of alignment, or mounted on an uneven wall surface will cause the awning not
to function properly. To install, measure the entire length of the awning. Determine the
position (left to right) on the wall where the awning is to be located and mark both ends with
an "E" for end. Locate all studs between the two "E's" and mark the siding with an "S" over
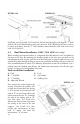
each stud. (See Detail #2) Measure the distance from each end of the awning to the center of
the arm supports, then transfer this measurement in from both "E" marks and mark this
measurement "A" for arms. Locate the "S" mark closest to each of the "A" marks, allowing at
least 3" for the arm support (shoulders). With the mounting bracket as a guide, mark the hole
locations centered on the stud and drill
1
/
4
" pilot holes. Attach the mounting brackets using
the
3
/
8
" x 4" galvanized lag bolts and washers provided. If possible, it may be necessary to
move the awning left or right on the wall to accommodate the stud locations. It is critical
that all lag bolts are mounted into the studs. On wider awnings center additional brackets
and secure to the studs.
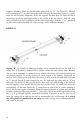
DETAIL #3
p.5