
Instructions / Assembly

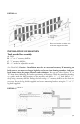
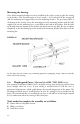


Mounting the Awning:
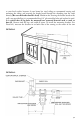
Once all the mounting brackets have been installed on the wall, it is time to place the awning
in the brackets. This step will require at least 2 people. ( See Detail #6) Lift the awning and
slide the mounting bar (support tube) into the mounting brackets. The gear loop will be at
the bottom of the awning. Secure the mounting bar to the mounting brackets with the bolts
supplied. Be sure the mounting bar is seated flush to the back of the bracket. Slide the bolts
up through from the bottom of the bracket and thread into the top hole. Be sure to tighten
completely so that the locking lip on the inside of the mounting bracket locks down over the
mounting bar.
At this time you can remove any remaining protective packaging, wraps, and ties from the
under side of the awning.
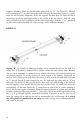
DETAIL #6
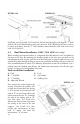
2-4 Weatherguard Cover: (Optional for 6000, 7000, 8000 series)
The optional Weatherguard Hood Cover is designed to keep your awning dry and free from
direct sunlight when not in use. If your awning is motorized than it will also serve as
protection from moisture, which could damage the internal components of the motor. The
Weatherguard Hood may be installed before or after the awning has been installed on the
home. We recommend that it is installed after because it will add less overall weight and will
be less cumbersome when the awning is lifted into place.
Tools needed to complete the assembly are as follows.
E. 13mm socket or adjustable wrench
F. Philips screwdriver
G. 5mm allen wrench
p.7