
Instructions / Assembly

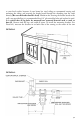


1. Attach a Weatherguard Hood Bracket next to each wall bracket (See Detail #7)
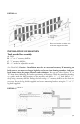
2. Slide the hood sections together
as shown in (Detail #8). For hood
covers with multiple sections,
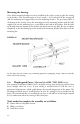
stagger the joints. (See Detail #9)
Slide 2 "T" bolts in the center track
placing one on either side of the
joint. Place a splice bar over the
bolts and fasten with nuts. Repeat
this process on the front portion of
the hood. For hood to perform
properly, joints must be staggered.
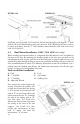
Next, count the number of hood-
mount brackets on the square tube.
From the end of the awning, measure
along the square tube the distances
from the end of the awning to the
position of each of the hood brackets
and transfer these measurements to
the Weatherguard Hood. Slide 1 "T"
bolt in the outer track for each hood
bracket and "T" bolt in the inner
track for each hood bracket. (See
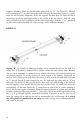
Detail #9) Install both end caps with
DETAIL #7
DETAIL #9
DETAIL #8
p.8