
Installation Guide
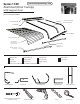

Assembly Instructions Series 1100 Aluminum Door Canopy with Support Arms
It is important that the Canopy Slats are assembled properly so that rain water
will not leak through the seams where the slats join.
The canopy is assembled upside down. Note that the Slat Sections are
packaged upside down (FIG. 1A). Assemble on a flat surface.
l
!
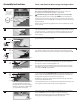
CAUTION: Canopy parts may have sharp edges. Use care in assembly.
Begin by laying the first slat out, curled edge DOWN on your left with ends
toward you. If your canopy is colored, place the colored side down. Slide each
subsequent slat into the curled UP edge on the right. Be sure the slats interlock
properly. (FIG. 1B)
When all slats are interlocked together, the Slat Section of the Canopy is ready
for the next step.
Slide the Top Trim onto Slat Section end with curl DOWN on the left and the
pre-punched holes of the Top Trim UP.
At the right end or end with the curl UP, slide the Front Gutter onto Slat Sec-
tion. Be sure to slide the Slat Sections correctly into the channel of the Front
Gutter as shown. Make sure the pre-punched holes of the Front Gutter are UP.
Slide the Top Trim out from Slat Section about 2 inches to provide clearance.
Next, slide the non-curved end of the Edge Rafter into Top Trim, making sure
the opposite, curved end of the Edge Rafter is up.
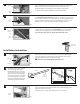
Next, slide both Top Trim and Edge Rafter back toward Slat Section and push
Edge Rafter onto slat section edge evenly until Slat Section and the Top Trim
are completely FLUSH into Edge Rafter.
Connect the Edge Rafter and Slat Section with the Front Gutter. Again, Slat
Section and Front Gutter MUST BE FLUSH in the Edge Rafter. With Slat Section
still secured flush in Edge Rafter, slide Front Gutter toward you and flush into
the Edge Rafter, aligning pre-punched holes. It will fit snug.
NOTE: Only the outside edge of the Front Gutter and the curled edge of the slat is
inserted into the Edge Rafter (FIG. 6).
Secure Edge Rafter in place. Secure Top Trim and Front Gutter with small screws
in the larger pre-punched holes at each end of the Edge Rafter.
Fasten small screws in the two larger pre-punched holes along Edge Rafter.
(Pairs of small holes are for the installation of optional Sidewings.)
NOTE: Support the underside of the Slats Section and apply pressure while
fastening screws. Repeat Edge Rafter assembly on the other side.
Slats have a slight
curve to them.
Keep them this
way for assembly.
Top Trim
Front
Gutter
Edge
Rafter
Front
Gutter
Curl
Up
Edge
Rafter
Curl
Down
NOTE: It is very important that both ends;
the top trim and the front gutter ends
along with the slat section are completely
flush in the edge rafter to be able to align
pre-punched holes for assembly.
Slight curve
Slat
TIP: Use the palm of your hand flat on
slats pulling toward you to help snug
them into Edge Rafter.
While keeping Slat Sections flush with each other, crimp slats together at
each seam interlock with a pair of channel lock pliers about 1/4 inch in from the
edge (not too much — only enough to secure them together). Be sure to keep
the plier teeth level with slats so that you do not accidentally bend them up
while crimping.
2
3
4
5
6
7
1
FIG. 2
FIG. 3
FIG. 4
FIG. 5
FIG. 6
FIG. 7
FIG. 1B
FIG. 1A