Nuraphone User Manual This user manual contains everything you need to know to set up and get the most from your nuraphones, use the nura app, and troubleshoot any issues you might experience.
Contents nuraphone safety information 3 Getting started nuraphone components Turning your nuraphones on/off Downloading the nura app Connecting your nuraphones with Bluetooth® Personalising your nuraphones Updating your nuraphones 5 5 5 5 6 6 7 Your nuraphones Charging your nuraphones Making and receiving voice calls with your nuraphones Connecting your nuraphones to other products Cleaning the nuraphone 8 8 8 9 11 The nura app nura app features Configuring your nuraphones’ touch button
nuraphone safety information Read this manual before using the nuraphone for the first time. Always use the nuraphone responsibly, particularly in Immersion Mode. Keep this manual handy for future reference. The nuraphone has been designed and tested for safety and comfort, but please note: exposure to any loud noise of 85 Decibels (dB) or above (approximately the same volume as a food blender) can cause gradual hearing loss.
Due to the noise isolating Inova ™ technology, don’t use the nuraphone at any time when an inability to hear may present a danger to yourself or others. For example, while driving, riding a bicycle, in a construction site, or in or near traffic. If you’re using the nuraphone for phone calls while driving, then use caution and follow applicable laws regarding mobile phone and headphone use. Some jurisdictions impose specific limitations such as using a single earpiece while driving.
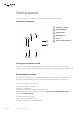
Getting started Following these steps to set up your nuraphones the first time you use them. nuraphone components 1 2 3 1 3 1 4 2 5 2 6 TeslaFlow™ valves Headband slider Touch button Charging port Inova™ Voice call microphones 3 6 5 4 Turning your nuraphones on/off • Turn on — your nuraphones automatically turn on when you place them on your head. • Turn off— your nuraphones automatically turn off to preserve battery when you take them off.
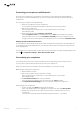
Connecting your nuraphones with Bluetooth® To set up your nuraphones, you need to connect them to your mobile device with Bluetooth. Once you’re connected with Bluetooth, you can connect to the nura app and personalise your nuraphones. To connect your nuraphones with Bluetooth: 1. Remove any cables from your nuraphones. Your nuraphones enter discoverable mode when you remove any cables. 2. Put on your nuraphones. When you place your nuraphones on your head, they turn on and enter discoverable mode. 3.
If you’re having trouble getting a good fit during personalisation: • Make sure you’re in a quiet place. • Don’t talk or move around too much. • Remove any earrings, or other jewellery, that sit near your ears. • If you wear glasses, then remove them for personalisation. • Make sure your nuraphones’ charging port is on your right side. • Check your nuraphones’ headband sliders are level on both sides. • Make sure your nuraphones’ ear tips are sitting comfortably in your ears.
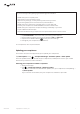
Your nuraphones This section contains everything you need to know about using your nuraphones. Charging your nuraphones Your nuraphones’ lithium-ion battery provides 20+ hours of wireless use. To charge your nuraphones’ battery: 1. Connect your nuraphones to: • a nura USB-A charging cable, which comes included with your nuraphones. • a nura USB-C cable, which can be purchased separately. 2. Connect the cable to: • a computer. • a wall charger. A tone announces that the battery is charging.
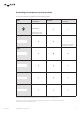
Connecting your nuraphones to other products You can connect your nuraphones in the following ways: Cable Quality Lossless Audio Voice Calls Control Touch Button Bluetooth Near Lossless (via Qualcomm® aptX™ audio / Qualcomm® aptX™ HD audio) Lightning (Control through in-line, not through your nuraphones’ touch buttons) USB–A USB–C Micro–USB Analog Please note: the nuraphone’s personalised sound works no matter how you connect — wireless or wired.
Computers Connect your nuraphones to a Mac with Bluetooth: 1. Remove any cables from your nuraphones. Your nuraphones enter discoverable mode when you remove any cables. 2. Put on your nuraphones. When you place your nuraphones on your head , they turn on and enter discoverable mode. 3. From your Mac menu bar, select > System Preferences > Bluetooth. 4. Select nuraphone XXX from the Devices list. XXX is your nuraphones’ unique pairing number. Connect your nuraphones to a Mac with a cable: 1.
nuraphones with a dongle, then chose a dongle that’s Qualcomm® aptX-HD™ compatible. Aeroplane adaptors Audio jack configurations on aeroplanes vary. If the aeroplane adaptor has a 3.5 mm jack, then use the nura analog cable. Cleaning the nuraphone Your nuraphones need cleaning from time to time. Please note: never use alcohols, cleaning solvents or strong detergents when cleaning the nuraphone. To clean the nuraphone: 1. Remove the nuraphone’s ear tips, and gently wash them with water and a mild detergent.
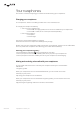
The nura app This section contains everything you need to know about using the nura app. nura app features 2 3 4 1 1 5 2 3 6 4 5 6 7 7 8 8 9 9 10 Menu Refer a friend Add new profile Share profile Battery Change profile Unique hearing profile Social Mode Personalised Mode Immersion 10 Configuring your nuraphones’ touch buttons The nuraphone has a touch-sensitive button on each ear cup that you can use to perform helpful functions.
Choosing your Immersion The nuraphone has a bass driver in each ear cup that you can adjust to create the feeling of a live performance. We call this Immersion mode. Always set Immersion mode to a comfortable, moderate level when you’re using your nuraphones for an extended period of time. To choose your Immersion: 1. Open the nura app. 2. Use the Immersion slider to adjust between low and front row.
The nura app and nuraphone voice are available in the following languages: • English • French • German • Chinese • Japanese • Spanish • Italian • Arabic Please note: additional languages might be available. Check https://help.nuraphone.com/hc/en-us/ articles/327222305751-changing-your-nuraphones-language for additional available languages. Please note: it takes approximately 10 minutes for the voice language to change. The nuraphone needs to install new software to change your language. 1.
Troubleshooting If you’re ever having trouble with your nuraphones, read through the following troubleshooting: Getting started troubleshooting Connecting to the nura app troubleshooting If your nuraphones won’t connect to the nura app: • Close and reopen the nura app. • Make sure you’ve put on your nuraphones and removed any cables. Your nuraphones turn on and enter discoverable mode when you place them on your head and remove any cables.
Bluetooth cutting in and out? Bluetooth is designed for short distances, so you might sometimes experience interference. To minimise Bluetooth interference, try the following: • Move your paired device closer to the nuraphone’s Bluetooth sensor, which is in the right-hand ear cup. • Move your nuraphones and device away from other Bluetooth devices, microwaves and wireless routers. • Make sure your nuraphones and paired device are updated to the latest software.
• Realign your nuraphones’ ear tips: 1. Check the base of the ear tip is pressing against the ear cup. 2. Check the ear tip is positioned correctly: i. There’s a faint line running across the bottom of the mesh part of your ear tip. Use that line to make sure the ear tip is in the correct upright position. ii. If you can’t see the line, then rotate the ear tip until the line appears. • Still not getting a good fit? Tap Continue on the nura app.
nuraphones aren’t making and receiving calls correctly Follow these steps if you’re having trouble making and receiving phone calls, or calls via Skype, FaceTime or other calling apps. • C heck your nuraphones are connected with Bluetooth or Lightning cable only. If you connect with any other cable, you’ll hear the caller but will have to use your device’s microphone to speak.
nura app issues Immersion Mode troubleshooting If your nuraphones’ Immersion Mode isn’t working correctly: 1. Close and reopen the nura app. 2. Check your Immersion Mode is set to a comfortable, moderate level. With Immersion, the nuraphone uses powerful bass drivers to create the feeling of a live performance, so please adjust to suit your music. 3. Reset your nuraphones. Resetting your nuraphones If you’re ever having trouble with your nuraphones and aren’t sure how to proceed: 1.
Need more help? Check our in-depth online help & support site https://help.nuraphone.com/ You can also contact us via email and live chat at www.nuraphone.com/contact Warranty Your nuraphones are covered by a one-year limited warranty. Find out more about the warranty at www.nuraphone.com/warranty User Manual Copyright © 2017 nura® Pty. Ltd.
Compliance nura ® adheres to the certification requirements for various regions around the world. For a full list of certifications please visit: www.nuraphone.com/compliance This equipment has been tested and found to comply with the limits for a Class B digital device, pursuant to Part 15 of the FCC Rules. These limits are designed to provide reasonable protection against harmful interference in a residential installation.
CAUTION the battery shall not be exposed to excessive heat such as sunshine, fire or the like DISPOSE OF USED BATTERIES ACCORDING TO THE INSTRUCTIONS This symbol means the product must not be discarded as household waste, and should be delivered to an appropriate collection facility for recycling. Proper disposal and recycling helps protect natural resources, human health and the environment.