
Installation Sheet


INSTALLATION
Internal Wiring Method
STEP 1: Remove diffuser from housing : Near one end of
housing, grasp edge of diffuser and carefully squeeze to release
diffuser from housing. Continue down length of diffuser to fully
disengage.
STEP 2: Remove xture components and parts pack(s). Check
that all parts are included.
STEP 3: Pull the reector
from one side to the middle. Note: Only
the side of the reector near the knockout can be pulled. (See Fig 4.)
STEP 4: Remove the wire compartment cover screw
from Wire
Compartment Cover
. Put the screw and Wire Compartment Cover
in a place to avoid missing.
STEP 5: Remove the knockout on the back of the xture in
relationship to incoming power supply. Place standard screwdriver
on center of slot and gently strike with hammer. Grip edge with pliers
and ex back and forth until removed.
STEP 6: Pull the xture wires (including the ground wire) of the
xture into the housing.
STEP 7: With the power turned off, pull the supply wires through the
knockout of the xture. Pull the wires through on the other side as
much as you can without pulling them tight.
STEP 8: Position the Housing 2 against the Mounting surface and
with a pencil, mark the screw hole locations to be located at the
narrow section of the keyholes. (See Fig 5.)
STEP 9: Using a drill with a 1/16" drill bit, make two small pilot holes
at the marked screw hole locations. If the xture is being mounted to
drywall , the drywall anchors
will need to be installed. To install the
drywall anchors, drill two 3/16-in. pilot holes into the drywall. Insert
the drywall anchors into the proper holes and tap the min to place
so they are ush with the surface of the drywall.
STEP 10: CEILING JOIST MOUNTING: While holding the xture
in line with the pilot holes, screw the wood screws
into the
wooden studs. Tighten until the xture has been secured to the
mounting surface.
DRYWALL MOUNTING: For mounting into drywall, hold your xture
in line with the drywall anchors that were installed, and screw all
wood screws into the drywall anchors. Tighten until the xture has
been secured to the mounting surface.
STEP 11: Connect the green ground wire from the xture to the bare
copper ground wire from tube using a Wire nut
. (If house wiring
does not include a ground wire, consult your local electrical code
for approved grounding methods).
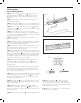
STEP 12: Use Wire nuts
to connect the black xture wire to the
black power supply wire, the white (neutral) xture wire to the white
power supply wire. (See Fig 3.)
STEP 13: Attach the wire compartment cover
to the xture
using the wire compartment cover screw
. Make sure none of the
wires are protruding out of the wire compartment cover before fully
tightening the screw.
STEP 14: Put the side of the reector
back to its original position.
STEP 15: To install diffuser
– starting at one end of
housing, insert diffuser slot onto edge of housing (See
Fig. 2). Carefully squeeze diffuser to engage opposite side
with housing. Continue this action down length of diffuser
until fully installed onto housing.
STEP 16: Turn on electricity at fuse or circuit breaker box
and verify success of installation.
Figure 3
Figure 4
Figure 5