
Instructions / Assembly


5
ASSEMBLY
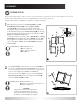
1
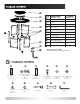
Hardware Used:
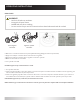
M Stud (8x30mm) x 4
N Washer/Spring Washer/Nut (8mm) x 4
T Plastic Cap (M8) x 4
PREPARATION
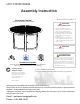
Before beginning assembly, empty contents of carton and make sure all parts are present. Place all parts on a soft, level
surface for assembly. NOTE: It is best to use TWO PEOPLE to assemble this gas fire pit.
Estimated Assembly Time: 60 Minutes | DO NOT over tighten hardware!
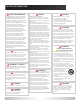
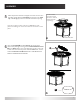
2
Hardware Used:
O Stud (6x40mm) x 12
Q Washer (M6) x 12
R Spring Washer (M6) x 12
S Nut (M6) x 12
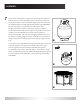
Place Table Top C so underside faces up. Screw 4 Studs M into
the holes on the Table Top with Screwdriver U. Then carefully
turn the assembled fire pit base upside-down and align the holes
in the top of the Legs with the Studs in the Table Top.
Place the holes over the Studs and secure each with Washer/
Spring Washer/Nut
N as illustrated. Tighten with Wrench V.
Then place Plastic Caps T over Nuts.
Assemble the fire pit base: Locate Door Panel D, three Side
Panels E, Door Frame Leg F, and two Support Legs G.
Screw Studs O into the holes in the sides of all four legs,
including the leg pre-assembled to the door. In the order shown
in the illustration, beginning with Door Frame Leg F, join the legs
and panels together by fitting the holes on the sides of the Side
Panels onto the Studs installed earlier.
To secure the Legs to the Panels, place a Washer Q then a Spring
Washer R onto each Stud, then thread a Nut S onto each Stud.
Do not tighten the hardware until the entire base is assembled.
Then, firmly tighten all Nuts with the Wrench V, but DO NOT
OVERTIGHTEN.
WARNING:
This fire pit is constructed of aluminum, a
relatively soft, flexible metal. Do not sit,
stand, or lean heavily on the top of the fire
pit, which can cause bending or warping.
E
E
E
D
F
G
G
Nut
Leg
Panel1/2/3
Spring
Washer
Washer
2
M
T
N