Education Services Guide Océ Operations 1.1.1.
Trademark Information • • • • • • • • • • • • • PRESCRIBE is a registered trademark of Kyocera Corporation. PRESCRIBE 2e and KPDL2 are trademarks of Kyocera Corporation. MS-DOS, Windows and Windows NT are trademarks of Microsoft Corporation. PCL and PJL are registered trademarks of Hewlett-Packard Company. PostScript is a registered trademark of Adobe Systems Incorporated. Ethernet is a registered trademark of Xerox Corporation. Novell and NetWare are registered trademarks of Novell, Inc.
IBM PROGRAM LICENSE AGREEMENT THE DEVICE YOU HAVE PURCHASED CONTAINS ONE OR MORE SOFTWARE PROGRAMS (“PROGRAMS”) WHICH BELONG TO INTERNATIONAL BUSINESS MACHINES CORPORATION (“IBM”). THIS DOCUMENT DEFINES THE TERMS AND CONDITIONS UNDER WHICH THE SOFTWARE IS BEING LICENSED TO YOU BY IBM. IF YOU DO NOT AGREE WITH THE TERMS AND CONDITIONS OF THIS LICENSE, THEN WITHIN 14 DAYS AFTER YOUR ACQUISITION OF THE DEVICE YOU MAY RETURN THE DEVICE FOR A FULL REFUND.
Typeface Trademark Acknowledgement All resident fonts in this printer are licensed from Agfa Corporation. Helvetica, Palatino and Times are registered trademarks of Linotype-Hell AG. ITC Avant Garde Gothic, ITC Bookman, ITC ZapfChancery and ITC Zapf Dingbats are registered trademarks of International Type-face Corporation. Agfa Japan License Agreement 1. “Software” shall mean the digitally encoded, machine readable, scalable outline data as encoded in a special format as well as the UFST Software. 2.
About this Instruction Handbook This Instruction Handbook is meant to be read when the Printer Board is installed in your copier and the copier is to be used mainly as a local printer. It contains explanations on set-up procedures for using the copier as a printer.
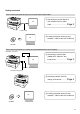
Getting connected When connecting the printer directly to your computer (with a parallel cable) ... 1 Connecting the printer directly to PC your computer with a parallel cable ...................................... Page 3 Parallel cable 2 Installing the printer driver into your PC computer... Refer to the On-Line Manual CD-ROM When connecting the printer to a network (the optional Network Card must be installed)… Hub 1 Connecting a network cable (100Base-TX, 10Base-T, etc.
Table of contents 1. Preparations ............................................................................................................. 1 1-1 Accessories ................................................................................................................................................ 1 1-2 Required items ........................................................................................................................................... 1 1-3 Name of parts (main body) ............
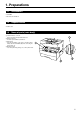
1. Preparations 1-1 Accessories • 1 CD-ROM • This Instruction Handbook 1-2 Required items • Parallel cable 1-3 Name of parts (main body) 1 Parallel interface connector Connect a bi-directional parallel cable here. 2 Memory Card slot Insert the optional Memory Card here. 3 Main switch Turn this switch ON ( | ) first, prior to using the printer. Always turn this switch OFF (O) when connecting the printer cable, etc. 4 Operation panel Use when performing settings, etc., at the printer itself.
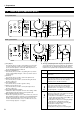
1. Preparations 1-4 Name of parts (operation panel) Inch specifications 8 Sort 2 in 1 4 in 1 AutoExp. Text&Photo Photo Text 7 Memory Overflow/ Add Data Error Toner Data/ On-line 200% 100% Full Size 78% Number of Copies(+) Number of Copies(-) Darker Start 129% Printer Lighter Stop/ Reset MAX. 50% MIN.
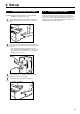
2. Set-up 2-1 Connecting the printer cable CAUTION: ALWAYS turn the main switch to the printer OFF (O) BEFORE connecting the printer cable. 1 Turn the main switch located on the right side of the printer OFF (O) and then turn the power off to your computer as well. 2 Remove the cover lacted at the back of the right side of the printer, and connect the printer cable to the parallel interface connector.
2. Set-up 2-3 Network (TCP/IP) settings 5 Use the (+) and (–) keys to select “2” (Off) and then press the Enter key. The selected setting will flash twice and will then be registered. 6 Use the (+) and (–) keys to select “25” and then press the Enter key. The display will change to “P25” (the IP address setting). 7 The (+) and (–) keys will be used to select the 12-digit IP address in blocks of 3 digits each: First, enter the appropriate 3 digits for the first block and then press the Enter key.
3. Troubleshooting 3-1 Canceling printing Perform the following procedure when you want to stop printing or you want to clear data. IMPORTANT! • By performing this operation you will be canceling ALL print jobs that are currently waiting in the printer’s memory to be printed. • Always cancel the print job at your computer first. If the print job is not canceled in your computer, the data will be sent once again to the printer. 1 Press the Printer key. The machine will switch to the printer mode.
3. Troubleshooting 3-2 When an error code or error messages appears… If an error code appear on the operation panel, first check the following tables for cause of the trouble and then perform the corresponding procedure. For more detailed information, refer to the Instruction Handbook for your copier as well as the Instruction Handbook for any optional equipment that is installed in your machine.
3. Troubleshooting Error code Procedure E60 A read- or write-error has occurred on the RAM disk. Press the Start [GO] key to erase the error indication. E70 A read- or write-error has occurred in the Memory Card. Press the Start [GO] key to erase the error indication. E71 The Memory Card was removed during operation under the menu for printer-related settings. Reinsert the Memory Card. * BE SURE to turn the main switch OFF (O) BEFORE inserting the Memory Card.
3. Troubleshooting 3-3 Basic troubleshooting chart If you experience trouble while you are using this machine as a printer, refer to the table below to perform minor adjustments. If trouble persists, contact your service representative or an authorized service center. * For information in regard to general mechanical trouble with the machine, refer to the Instruction Handbook for your copier.
4. Specifications CPU ................................................................... PowerPC 405 (200MHz) Printing Speed ................................................... 15, 18 ppm copier: 18 pages/min (A4 [8 1/2" x 11"]) Printing Resolution ............................................. With smoothing OFF: 600 dpi x 600 dpi With smoothing ON: interpolated 2400 dpi x 600 dpi Maximum Printing Size ...................................... Legal (8 1/2" x 14"). Folio RAM Memory Capacity ..................