OceanLED Support INSTALLATION AND OPERATION MANUAL INSTALL GUIDE X Series X4 / X8 / X16 Product kit includes: X Light / Bezel / Screws / Fuse Kit OceanLED reserve the right to change this document without notice. Please refer to www.oceanled.com for latest documentation. OceanLED INSTALL / X SERIES / 130217 / v7.
IMPORTANT: Please read the instructions completely before proceeding with the installation. These instructions supersede any other pre dated instructions if they differ. Chapter 1........................................................................................................................................................................................................4 An overview of the underwater light installation.
IMPORTANT PRECAUTIONS! ATTENTION INSTALLER: This manual contains important information about the installation, operation and safe use of this product. This information should be given to the owner and/ or operator of this equipment. C CAUTION: Risk Group 2 Possibly hazardous optical radiation emitted from this product. Do not stare at operating lamp. May be harmful to the eye. CLASS 3: This equipment is designed to operate at voltages of less than 50v DC.
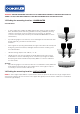
1 CHAPTER Chapter 1: Overview ONE This handbook provides instructions to assist you in the installation and set up of the X Series lights from OceanLED. 1.1 Identifying your model X4 X8 X16 1.2 DC power / fuse ratings The majority of installations will utilize onboard 12/24v DC power supply from a marine battery.
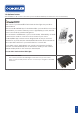
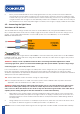
1.4 Optional extras (Not available in all countries. Contact your local OceanLED representative for more information) Take control of your OceanLED X DMX Series Colours lights via your iOS or Android device. With the new OceanDMX App for Android and iOS, you have all the control and customisation you need to create any scene or light display you wish, with full control over sensitivity, speed and brightness. Choose between standard static, cycle or strobe modes.
WARNING: ENSURE MOUNTING LOCATION IS FLAT AND CHECK INTERNALLY FOR EASE OF ACCESS IF THERE IS A RIB, STRUT OR OTHER HULL THAT MAY INTERFERE WITH THE INSTALLATION. 1.5 Finding the mounting location - UNDERWATER Considerations • X Series lights are suitable for GRP and wooden hulls, as well as carbon fibre, aluminum/steel hulls using suitable mounting hardware.
2 CHAPTER Chapter 2: Installation TWO Note: OceanLED makes every effort to protect our marine and fresh water environment as well as our natural resources. Please take care to keep packaging away from and out of the water by ensuring loose packaging materials are secured and not susceptible to being blown into the water. Please recycle all packaging materials as the sustainability of our environment is everyone's responsibility.
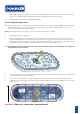
4. Place light fixture into position or use mounting template provided (inside of box sleeve). Mark the screw hole position and pilot drill using correct sized drill bit for included screws. 5. Always dry fit units before applying any sealant. 2.2 Installing the light fixture TIP: Use a suitable marine sealant such as 3M™ Marine Adhesive Sealant Fast Cure 4200FS.
5. Once you are satisfied that the unit is fully tightened to the hull, you will notice that sealant has squeezed out from around the perimeter of the light. Using a cloth wipe off excess sealant to leave a clean seal. If you do not see sealant squeeze out from the body, you have not used enough sealant or tightened the unit enough to the hull. Carefully examine the installation to make sure the seal you have installed on the unit is fully water-tight.
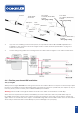
O RING BARE ENDS 8MM MAX CUT HERE 2>2.7MM (.079>.106”) CABLE cable gauge 14awg TERMINAL CUT HERE 1.5>1.9MM (.059>.075”) CABLE cable gauge 16awg FUSE 5X20MM TERMINAL SPRING TERMINAL SCREW TERMINAL SCREW CUT HERE 1>1.4mm (.040>.055”) CABLE cable gauge 18awg 3. If you are not installing a custom fuse panel, it is imperative that the OceanLED supplied fuse is installed on each power line from each light. Please consult electrical specification on page 4 to select the correct fuse. 4.
3 CHAPTER Chapter 3: Operation THREE NOTE: X Series lights have active thermal protection. This means that while underwater, they run at full power due to water cooling. Moderate dimming may be noticeable with above water installations when high ambient temperatures are reached to avoid damage. 3.1 - Single Colour Strobe To enter strobe mode, toggle the power on and off quickly twice. They should now strobe in a pseudo-random pattern. To reset from strobe mode, turn off then back on again. 3.
4 CHAPTER Chapter 4: Maintenance and troubleshooting FOUR 4.1 - Cleaning Instructions Sea growth can collect quickly on the light and this can reduce the performance in just a few weeks. To prevent the build-up of sea growth, all OceanLED lights have been coated with a specialized Tritonium coating which makes the surface of the lens a non-stick layer which helps ward off long term barnacle buildup.
4.3 - Troubleshooting problems and their solutions X Series Problem Check Result Fix Light does not look bright. Check that there is no marine growth on the lens. Sea life / barnacles present. Clean the lens as per instruction booklet. Check voltage supply to the light is between11v and 32v DC(The light will still work between 9 and 11 volts however at reduced brightness). Voltage is either too high or too low. See diagnostic LED section below for more information.
4.4 - Diagnostic LEDs The X series is fitted with an advanced diagnostic indicator system. There are two small indicator LEDs (one red, one orange) within the unit, visible through the front lens. When the unit is first turned on, both LED’s will flash briefly. This is normal operation and is part of the start-up procedure, to show that the LEDs are functioning. During normal operation the indicator LEDs should not be illuminated.
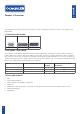
5 CHAPTER Chapter 5: Appendix FIVE SUPPLY CABLE CONDUCTOR SIZE CHART CABLE LENGTH (FEET) CIRCUIT CURRENT 2 AMP 4 AMP 6 AMP 8 AMP 10 AMP 12 AMP 14 AMP 16 AMP 0-5 18 AWG 18 AWG 16 AWG 16 AWG 16 AWG 14 AWG 14 AWG 14 AWG 10-15 18 AWG 18 AWG 16 AWG 16 AWG 14 AWG 14 AWG 14 AWG 14 AWG 15-20 18 AWG 18 AWG 16 AWG 14 AWG 14 AWG 14 AWG 12 AWG 12 AWG 20-25 18 AWG 16 AWG 14 AWG 14 AWG 12 AWG 12 AWG 12 AWG 10 AWG 25-30 18 AWG 16 AWG 14 AWG 12 AWG 12 AWG 10 AWG 10 AWG
Chapter 6: Warranty Statement: This warranty statement is for those products supplied to and sold from all territories internationally OceanLED stands by its products. In general terms, the company gives a full 2 year’s manufacturer’s warranty on all of its products from date of sale from OceanLED. Warranty replacements shall be covered for a period of 2 years from the date of the original product sale from OceanLED.
1.3.
of products purchased via the grey market through internet resellers. The following notice will be added to OceanLED’s warranty cards, website and all internet sellers will be required to post the same notice. WARRANTY NOTIFICATION: OceanLED products purchased by an end-user from a United States dealer via the Internet are covered by this warranty, only if the products are delivered and installed within the United States.
If you are located in either North, Central or South America please contact the Warranty Department at: OceanLED USA LLC 778 South Military Trail Deerfield Beach Florida FL 33442-3025 United States Tel:+1(954) 523-2250 Fax:+1(954) 523-2249 Email sales@oceanledusa.
Please remove this page and keep for your files For technical assistance: Europe: service@oceanled.com The Americas: warranty@oceanledusa.com Warranty Serial Code(s): © 2017 Ocean LED Marine LTD All Rights Reserved Specifications are subject to change without notice.