
Product Manual


8
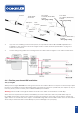
4. Place light fixture into position or use mounting template provided (inside of box sleeve). Mark the
screw hole position and pilot drill using correct sized drill bit for included screws.
5. Always dry fit units before applying any sealant.
2.2 Installing the light fixture
TIP: Use a suitable marine sealant such as 3M™ Marine Adhesive Sealant Fast Cure 4200FS. When applying
sealant to light fixture, be careful to protect the lens from any abrasive surface/floor so as not to
remove the protective Tritonium coating.
NOTE: If bottom painting your lights ensure lens is free of any paint / residue.
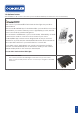
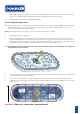
1. Fit desired bezel over light unit.
2. Once hull preparation is complete (see step 1), the light can be inserted into the hole previously
prepared. Apply generous amounts of the sealant you are using to the back perimeter of the light
body. Make sure to generously coat the cable of the light where it meets the back of the light. There
should be an unbroken bead of sealant around the perimeter of the light unit..
TIP: It is critical to cover the entire body and circle the mounting screw hole so that there is a continuous
and unbroken bead of sealant.
3. Insert the light on to the hull, feeding the cable through first and seat into place. Press the light hard
into the hull and ensure good adhesion.
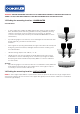
4. To ensure correct dispersion of light underwater, ensure all lights are mounted with the correct
orientation with text facing upwards. Tip: During/after fitting process, ensure cable is not under any
undue stress.
WARNING: Tighten the screws with a hand tool ONLY!