
Owner manual

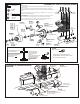
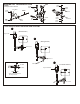
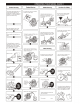

ASSEMBLY OF THE BRAKE SYSTEM
3X3mm
Set Screw
A-80B
2mm
Adjust Nut
Servo Mount
2x25mm
Screw
#30800
Brake System Plastic Parts Set
Adjust
Mount
3mm
Nut
Slider
3x12mm
Screw
2x8mm
Screw
2mm Nut
2mm
Tie-Rod End
2mm
Tie-Rod End
2x6mm
Washer
2x6mm
Washer
2x4mm
Screw
2x4mm
Screw
Screw
Cement
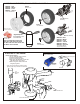
ALIGN THROTTLE SERVO AND BRAKE SAME AS SHOWN
Brake is not on
Engine at idle
( Neutral Position )
Brake is on
Brake Adjust Nut
( Braking Position )
Brake is not on
Engine at full throttle
( Full Throttle Position )
Less Brake
More Brake
Tighten
Loose
* Tighten or loose the adjuster nut
will change the brake.
STARTING OF THE ENGINE
How to start the engine:
1. Turn on transmitter and then receiver.
2. Fill fuel tank with fuel bottle.
3. Connect 1.2V glow plug starter.
4. Start engine with 12V starter or starter box
( Note the direction of the starter.)
5. After the engine be started, remove the
1.2V glow plug starter.
1.2V
Glow Plug
Starter
* Follow the engine manufacturer instruction manuals
regarding engine set-up, carburetor and maintenance.
Connect with 12V battery
* Note the direction of the
starter.
Rubber wheel turns engine
flywheel.
12V Starter
* To start the engine, use hand held starter
motor or starter box.
#10250
Starter Box
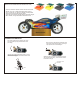
ASSEMBLY OF THE TIRES, FOAM INSERTS AND WHEELS
#86044 - Red
#86045 - White
#86046 - Lime
#86047 - Yellow
17mm 5-Star Wheels
#86091
Mini XX- Pin Tire
#15071
17mm Wheel Nuts
#15071
17mm Wheel Nuts
* Apply instant glue into
the groove of the wheel.
WE RECOMMEND CA GLUE
FOR RUBBER TIRES.
INSTANT
GLUE
IN
STAN
T
G
LUE
RR
Front Knuckle Arm
Assembly
Rear Hub Assembly
YOUR KIT COMES WITH PRE-GLUED
TIRES, BUT WHEN TIRES ARE WORN
YOU MUST REPLACE THEM. MAKE TIRE
AND WHEEL SET AS SHOWN
Always use tire foam
donut when building tires.
#81091 - Med/soft
#81092 - Med.
Foam
Foam
#86044 - Red
#86045 - White
#86046 - Lime
#86047 - Yellow
17mm 5-Star Wheels,
Two (2) Pairs per bag.
#86048 - Black
#86049 - Chrome