
User Manual
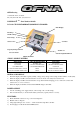
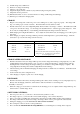
Table Of Contents

5) Variable charge rates; 200mA~5A
6) Functions of charge and discharge
7) Voltage booster to DC 28V
8) Large LCD display indicate voltmeter (volt), ammeter (amp) and capacity (mAh)
9) Output has car fuse protections
10) LED has three kind of colors to show the functions of charge, trickle charge and discharge
11) With beeper to indicate the charging status
CHARGE:
1. Plug the correct charger into a DC 12V power source, making sure (+) and (-) signs are properly. The charger will
beep once when proper connection is made. The LCD will show 28V, which is normal.
2. Push the select button once, the red light will quickly flash to indicate “fast charge” condition. The LCD readout will
correspond to the current /voltage. Use the charge rate adjustment knob to select the appropriate charge rate. After
30 seconds, the red light will stay on (not flashing), DO NOT adjust the charge rate knob in this state.
3. While charging, the red light will remain on. If you adjust the current in this state, the charging process will stop and
shut down.
4. When charging is complete, the charger will beep ten times and the light turns to green (trickle charge). Push the
start button to process the next charge action if necessary.
Ni-Cd Charge Current Ni-MH Charge Current
250mAH 250-350mAH 250-350mAH 250-350mAH
350mAH 750-1000mAH 600-1100mAH 700mAH
600mAH 1200-1500mAH 1100-2000mAH 1-2A
1300mAH 3-4A 2000-3000mAH 3-4A
1800mAH 4A and over Please note that all Tx and Rx cells should be charged at a
charge rate of 1A. Any higher and you run the risk of
seriously damaging the cells.
CHARGE AFTER DISCHARGE
1. Push the select button twice, the charger will beep twice, means charge after discharge (orange light stays on). (The
red light flash, it means that the charger is now on a mode of “charge after discharge”; when the battery packs are
discharged under constant voltage, the charger will beep once and turn to charge until charging is complete. The
orange light means discharge first and the red light flashes means waiting.)
2. After the battery packs is finished discharging, the charger advance to trickle mode for 2 minutes. It will then return
to fast charge.
3. Set the current ready before using this mode.
4. After charging is complete, re-peak once to check charging.
DISCHARGE:
1. Push the select button three times, the charger will beep three times, means “discharge” mode (orange light stays on).
Battery starts discharging at this time, switch Selector Switch to Ammeter to set discharge rate.
(Normally 1 cell : 0.9V)
2. When the voltage goes down under a constant level, the discharge process is complete and the charger will beep once
and then turns to “trickle charge” mode.
SAFETY PRECATUTIONS:
1. DC 12V power source (+) (-) cannot be connected inversely (will be no work).
2. The charger output (+) (-) must be well connected while charging, or the 7.5A fuse may blow.
3. If the power supply is insufficient (lower than 10V), the LCD screen will read Err? and the charger will beep.
4. The charge current must be adjusted according to the charge chart in order to prolong the life of the batteries.
5. During the charging process, DO NOT ADJUST THE CHARGE CURRENT.
6. The 7.5Amp fuse cannot be used for other specifications.
7. The 8 cell TX cells MUST BE SET AT 1Amp OR LESS to avoid burning the second chip in the computer.