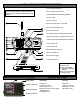
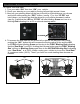
.4GHz RADIO SYSTEM OVERVIEW Transmitter 1.Transmitter Antenna *Carefully read the instruction manual of your radio controller before using and keep it in a safe place as a reference introduction in the future. 2.Servo Reverse Switches 3.TX RF Module And Binding Button 4.Power LED 5.Power Switch 1 6.Steering Dual Rate Trim LED 7.External Charging Jack 10 12 8.Fail Safe Button 14 9.Throttle End Point Adjustment Knob 2 10.Steering End Point Adjustment Knob 3 4 11.
CAUTION • To use your Radio with your models correctly and safely, read this manual carefully and keep it in a safe place for future reference. Warning: 1. This product is only equipped for radio controlled cars; 2. The usage of this product should be approved by local law or regulations; 3. We will not be responsible for the damages caused by unauthorized modification, adjustment or replacement of parts on this product; 4. The manual may be change without prior notice.
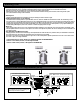
AUX Channel Function (CH3) •This switch control the transmitter’s third channel. A servo plugged in this Channel 3 will move to full travel in one direction when the switch is in the “AUX” position, then move the switch to the “OFF” position the servo will move in the opposite position . This channel can be use to turn on all sort of things in your vehicle. For example, lights, on board camera etc..... l Steering Dual Rates Setup INC ST.DR DEC ST.D/R SW •DEFINITION: Steering Dual Rate (ST.
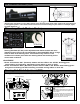
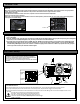
CHECKING YOUR DUAL RATE •To Check Your Dual Rate: 1. Turn your radio “ON” then turn “ON” your vehicle. 2. Check your steering on your radio by turning left and right several times. 3. Now turn your steering wheel all the way to the left or right whichever you choose and hold it while pushing the “DEC” button ( see fig. 1) on the “ST-DR” and hold it down, you should see that the wheel on your vehicle decrease in radius (see fig.
Steering Trim Please turn on your transmitter, plug in your battery and turn on your esc while making the adjustment of these settings. 1.Connect the receivers, servos, and other components and then turn on the power switches of the transmitter and receiver. 2.Be sure the steering trim and throttle trim on the transmitter are at their neutral position. 3.
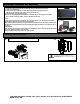
Throttle Trim •Throttle neutral adjustments can be made by moving the throttle trim to the left or the right. •Racers Tip When using a electronic speed control, please set the throttle trim to neutral and make adjustments to the speed control. On a gas powered model, set the trim to the point where carburetor is fully closed in accordance with the engine instruction manual.
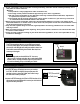
Handling Procedure For Batteries NOTICE THE DIRECTION OF BATTERY COVER •Battery Replacement 1) Remove the battery cover from the transmitter by sliding it in the direction of the arrow. 2) Remove the used batteries. 3) Load the new 8 AA size alkaline, or Nickel Metal Hydride (NimH) rechargeable batteries, and pay very close attention to the polarity marking on the batteries. 4) Slide the battery cover back onto the case.
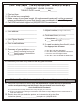
TO: OFNA TECHNICAL SUPPORT 7 VANDERBILT, IRVINE, CA 92618 TODAY’S DATE: month________day______ 1. Print out form. 2. Fill out the form completely. 3. Make a copy of purchase receipt. All replacements/repairs will not be processed, unless accompanied by proof that item(s) was purchased in the last 30 days. 4. Call OFNA technical support at (949)586-2910 for assistance. 1. Your name ____________________________ 2. Your address: ____________________________ ____________________________ 3.