50SWP26 26 cu ft LAWN SWEEPER U.S. Patent No.
Safety Rules This is the safety alert symbol. It is used to alert you to potential personal injury hazards. Obey all safety messages that follow this symbol to avoid possible injury or death. Read and understand all safety rules and operating instructions before using this tractor attachment. Follow all safety rules and operating instructions provided by your tractor's manufacturer when using attachment. Never allow children or untrained persons to operate tractor or attachment.
Warranty AttachReceipt Here: IF YOU ARE MISSING PARTS DO NOT RETURN TO STORE Email cs@ohiosteel.com or call 1-800-652-2321, ext. 212 Before you call, please email our customer service team at cs@ohiosteel.com with the following: 1. 2. 3. A description of the issue you are having Photos of the issue that include an overall view and detailed view from multiple angles If applicable, a short video showing the issue Replacement Parts: You can place your parts order online at ohiosteel.
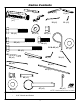
Carton Contents (x1) 20 (x4) 3 (x1) 4 (x1) 5 (x2) 6 (x2) 18 (x2) 19 (x2) 22 (x11) 21 (x10) 23 (x2) 24 (x2) 26 & 48 (x8) 27 (x4) 25 (x3) 36 (x2) 37 (x1) 38 (x2) 40 (x2) 41 (x1) 42 (x1) 44 (x2) 43 (x1) 45 (x2) 47 (x2) 46 (x2) TOOLS REQUIRED FOR ASSEMBLY: • 39 (x2) 9/16" Wrench and Socket 3 49 (x1) 51 (x1) NOTE: Hardware shown to scale
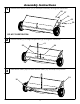
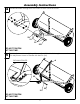
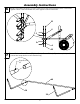
1 Assembly Instructions Attach Hitch Mount Tubes (19) to Sweeper Assembly and tighten hardware. 22 27 19 21 20 DO NOT OVERTIGHTEN. 2 Attach Handle (3) to Height Adjustment (2) and tighten hardware. 3 22 24 2 3 Insert Hitch Tubes (18) into Hitch Mount Tubes (19) and snap into position.
4 Assembly Instructions Install hardware through front two holes of Hitch Tubes as shown. 22 21 21 25 DO NOT TIGHTEN AT THIS TIME. 5 Hold Adjustment Lever (4) in position and install third bolt through Lever as shown. Pin Adjustment Lever to Handle with Hair Pin (26). 4 SHOWN INSTALLED 22 21 DO NOT TIGHTEN AT THIS TIME.
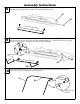
Assembly Instructions 6 Install Clevis Bars as shown (5 & 6); Clevis bolts (23) pass between Hitch Tube bolts. Tighten Hitch Tube hardware first, then tighten Clevis hardware. 23 6 5 5 6 22 7 Insert Bottom Frame Tubes (38) into Center Frame Tube (40) and snap into position.
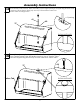
Assembly Instructions Unroll and flatten hopper bag (37) from shipping state. Then, slide Hopper Stop Bar (43) into pocket of Hopper Bag as shown. 37 43 Unroll 9 Hoppe r Bag First, place bottom frame assembly into bottom of Hopper Bag (37). Second, Install Clevis Pins (45) through Hopper Bag (37), Hopper Stop Bar (43), and Bottom Frame Tubes (38) then secure with Hairpins(48).
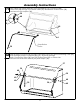
11 Assembly Instructions First, Place top frame assembly into Hopper Bag (37). Second, Install Clevis Pins (44) through Top Frame Tubes (39) and Bottom Frame Tubes (38) and secure with Hairpins (48). 39 48 44 38 48 Frame in to Hopp er 44 Snap Button Down 39 12 Slide Hopper Pivot Rod (42) through Top Frame Tube (39) and Connecting Tube (36), then through pocket of Hopper Bag (37), and then through both Connecting Tube (36) and Top Frame Tube (39) on other side.
13 Assembly Instructions First, unscrew Thumb Screw from Tension Tube Assembly (41). Next, Hold Hopper Bag (37) open and carefully insert Tension Tube Assembly (41) through opening in Hopper Bag and into hole in bottom Center Frame Tube (40). Pull top Center Frame Tube over tension tube and align holes. Opening 41 40 37 SHOWN INSTALLED 14 Insert thumb screw that came with Tension Tube Assembly through top Center Frame Tube (40) and screw into top of Tension Tube.
15 Assembly Instructions Insert Connecting Tubes (36) into Hitch Mount Tubes (19) and secure with Quick-Release Pins (47). Install Hitch Pin (49) and secure with Hairpin (48). 36 19 47 49 47 19 48 16 Tie Dump Rope (51) securely around exposed section of Center Frame Tube (40). 40 51 Do NOT fasten rope to any part of your body or clothing.
Operating Instructions Before Using Lawn Sweeper: 1. Read all Safety Rules found on page 1. How to Sweep Lawn: 1. Remove large debris from lawn. 2. Do not sweep if conditions are too wet or muddy. 3. Attach Lawn Sweeper to tractor using supplied hitch pin. The multi-pronged hitch allows the Lawn Sweeper to accomodate varying tractor hitch heights; choose the appropriate setting so that Lawn Sweeper hitch tubes are roughly level with the ground. 4.
Operating Instructions Storing Lawn Sweeper: 1. Empty hopper bag and thoroughly clean Lawn Sweeper before storing. 2. Store Lawn Sweeper away from excessive heat to prevent damage. 3. Brushes must not contact ground during storage to prevent damage. 4. Remove quick-release pins to separate hopper bag from Lawn Sweeper. 5. Carefully remove tension tube and collapse hopper bag for compact storage. 6.
Repair Parts 3 4 26 1 22 27 19 21 20 23 5 15 10 17 29 25 33 28 2 31 35 24 6 18 8 16 7 34 14 30 9 11 12 32 13 ITEM 1 2 3 4 5 6 7 8 9 10 11 12 13 14 15 16 17 18 PART NO.
Repair Parts 37 51 40 42 41 50 36 39 48 47 46 40 48 44 49 45 38 43 ITEM PART NO. 36 37 38 39 40 41 42 43 307032-B2 307332 DESCRIPTION CONNECTING TUBE HOPPER BAG BOTTOM FRAME TUBE TOP FRAME TUBE KIT 6004134-B2 CENTER FRAME TUBE TENSION TUBE ASSEMBLY 307053-B2 HOPPER PIVOT ROD 307062-B2 HOPPER STOP BAR ohiosteel.com/partstore QTY ITEM 2 1 2 2 2 1 1 1 44 45 46 47 48 49 50 51 14 PART NO.
7 16504 50261 1 www.OHIOSTEEL.