
User's Manual


3
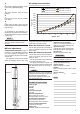
Each turn gives 1 mm in preload, maxi-
mum preload is 18 mm.
4
The best way to check the ”static sag”
is to put the bike on the ground in run-
ning condition.
Measure the distance between the bot-
tom of the outer tube to the fork bot-
tom.
Then lift the front end of the bike, so
the fork is fully extended.
Take the measurement again. The dif-
ference between those two figures is
”static sag”.
5
The ”clickers” are a ”bleed function”
separate for rebound and compression
damping.
Rebound is on the top centre of the fork
and compression at the bottom part of
the fork.
You start to count from fully closed
(clockwise) and set it to the recom-
mended ”click” (use tool 794-01).
For recommended start setting please
refer to the specification card.
Spring preload adjustment
Using a 12 mm wrench, turn the upper
adjustment screw.
Maximum adjustment range is 18 mm.
One turn on the adjustment screw will
cause 1 mm change in spring preload.
Adjust so the front forks lowers 25-30
mm from the top, unloaded position.
Rebound adjustment
Adjust the rebound rate on the adjust-
ment screws positioned at the top cen-
tre of the front forks.
Use a hex key with a spherical head
(use tool 794-01).
Adjustment range from closed valve
(clockwise) until maximum open valve
(anticlockwise) is 20 ”clicks”.
Recommended adjustment ”click”, from
closed position (see specification card).
Compression adjustment
Adjust the compression rate on the
lower part of the front forks (compres-
sion valve). Use a hex key with spheri-
cal head (use tool 794-01).
Adjustment range from closed valve
(clockwise) to maximum open valve
(anticlockwise) is 20 ”clicks”.
Recommended adjustment ”clicks”,
from closed position (see specification
card).
Changing springs
1
Loosen the screws that hold the fork
legs in the upper triple clamps.
2
Loosen the adjustment housings (pos
7, page 7) about two turns (use tool
797-01).
3
Remove the fork legs from the motor-
cycle.
4
Fasten a fork leg in a vice. Use soft
jaws.
5
Unload the spring completely by turn-
ing the adjustment screw completely
anticlockwise. Use a 12 mm wrench.
Remove the blue locking nuts.
6
CAUTION!
Do not damage the o-ring and do not
drop the flat key into the fork leg.
Carefully remove the adjustment hous-
ing.
7
Remove the preload tube and spring.
(The free spring length see page 5).
8
Install the new spring and check the
oil level.
Install the tool 1765-01 on top of the
preload adjustment screw.
Pull out the piston rod as far as possi-
ble and turn the compression adjust-
ment screw fully clockwise.
This will keep the piston rod in top po-
sition, which will make the continued
assembly easier.
9
Install the preload tube.
Install the tool 1766-01 on top of the
preload tube and fasten it below the
edge of the preload adjustment screw
(pos 18, page 7).
Remove the tool and continue the as-
sembling.
10
Install the adjustment housing.
CAUTION!
The flat key must be guided in the slot
of the adjustment housing.
The o-ring must be greased, or it
might be damaged.
11
Install the two blue nuts.
12
Loosen the preload tube, and bring it
to its correct position in the adjustment
housing.
Tighten the lower lock nut gently, and
then unscrew it 1/4 of a turn.
Tighten the upper gently against the
lower nut.
Fasten the adjustment housing in the
fork leg.
Make sure that the fork leg is fully ex-
tended when tighten the adjustment
housing.
13
Install the fork legs on the motorcycle
and adjust the preload, compression
and rebound according to the above
instructions.
Changing seals
Put the fork legs upright for 15 minutes.
1
Fasten the fork leg in a vice. Use soft
jaws.
2
Unload the spring preload completely by
turning the adjustment screw completely
anticlockwise. Use a 12 mm wrench.
Make a note of the number of turns.
Remove the two blue lock nuts.
3
Carefully remove the adjustment hous-
ing.
CAUTION!
Do not damage the o-ring and do not
drop the flat key into the fork leg.
4
Remove the preload tube.
5
Slide the outer fork leg up until the top
bushing is just above the inner leg.
(Approx. 140 mm from complete bot-
tom position.
This is to make sure there is no oil
above the top bushing).
6
Slide the outer tube completely down.
(Fork seal touching fork bottom).
7
Push the piston rod down so that it is
in level with the top of the outer tube.