Table of Contents 1 2 5 9 10 12 13 14 15 16 17 18 19 20 21 22 23 24 25 26 27 28 29 30 31 32 32 32 33 35 35 36 38 40 40 40 42 43 43 43 47 48 48 49 50 54 55 55 61 62 63 63 64 64 64 64 64 65 67 68 69 English Important Information Important Safety Precautions Introducing the OLEVIA TV Accessories TV Installation And Connection Guide Identifying Front Controls and Rear Panels - Descriptions of Connector Types - Turn the power on the TV Installation - Connecting to an Antenna or Video Equipment with Antenna Ou
Import ant Inform ation Caution Risk of electronic shock Do not open To reduce the risk of electronic shock, do not remove cover (or back). No user-serviceable parts inside. Refer service to qualified Repair Technician or Repair Center. Read the following context indicated by the following symbol to the left. It indicates important literature in operating the product. English Read the following context indicated by the following symbol to the left.
Import ant Safety Precautions Cleaning Stand Remember to unplug the AC cord from the AC outlet before cleaning the display unit. Then spray small amount original WINDEX window clearer (blue stuff), not Ammonia-added clearer, on cloth to clean the display. Remember to use only soft cotton cloth such as an old 100% cotton T-shirt, not sponges brillo abrasive material, to clean the display. No drips allowed. Do not place the display unit on an unstable place.
Important Safety Precautions Never insert objects or spill liquid into the display unit Precautions when transporting the display Never insert any object into the display unit through openings or spill liquid on the display unit. High voltage flows in the display unit, and inserting an object can cause electric shock and/or short internal parts. Carrying the display requires two or more people.
Important Safety Precautions Replacement parts Reference Grounding component In case the display unit needs replacement parts, make sure that the service technician uses replacement parts specified by the manufacturer, or those with the same characteristics and performance as the original parts. Use of unauthorized parts can result in fire, electric shock and/or other danger.
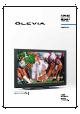
Introducing the OLEVIA TV Welcome! Thank you for purchasing a OLEVIA LCD HDTV. This manual is to be used with the following model: OLEVIA 2 Series This manual is designed to help you through setting up and operating your LCD HDTV as quickly as possible. The model and serial numbers are on the back cover of your TV. Write these numbers in the space provided in this manual for your records. Please read all the safety and operating instructions carefully, and keep this manual for future reference.
Introducing the Olevia TV OLEVIA LCD HDTV includes many features, you will enjoy throughout the usage of your TV. These highlighted features include: Fully Integrated HDTV (High Definition TV): HDTV delivers a stunning picture far beyond the quality of standard televisions. These programs offer crystal clear video with amazing detail played with enhanced audio quality of digital television programs.
Introducing the Olevia TV Technology Overview Congratulations! You've just purchased the most advanced video processing Television System available today. HQV represents an enormous leap in video processing performance with true flagship de-interlacing, cadence detection, noise reduction and scaling. Silicon Optix designed the HQV processing engine as a no-compromise solution.
Introducing the Olevia TV Detail Enhancement HQV Detail Enhancement avoids halo or ringing artifacts at even the highest setting. A key benefit of HQV Detail Enhancement is that, when used in conjunction with our 1024-tap scaler, standard-definition TV can be delivered at near high-definition quality. 1024-tap scaling HQV processing uses a scaler with an unprecedented 1024 taps.
Accessories Supplied Accessories Remote control & batteries (AAA x 2) English Power cord x 1 User manual x1 QSG x 1 Warranty Card x 1 These items are all you need to set up and operate the TV in its basic configuration. Note: Most components (VCRs, DVD players, etc.) come with the necessary cables to connect them. If you want to set up a complex system, you may need to buy extra cables, connectors, etc. Be sure to have these on hand before you start to connect your system.
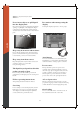
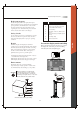
TV Installation and Connection Guide Identifying Front and Rear Panels Front Panel English IR Sensor IR SENSOR POWER ENTER MENU Contains Infra-red light for digital data transmission by the remote control. Please point remote control at IR Sensor for function. Turns display on/off. Press to enter to Sub-Menu, or select and confirm your setting. Displays the On Screen Display(OSD) menu. In OSD menu, press it to return to the previous screen or to exit. CH / CH Adjusts Channel.
TV Installation and Connection Guide Identifying Front and Rear Panels Rear Panel 1 Power Connections The power cord connects here. AC In 2 Computer / TV Signal Connections English RF Terminal To receive signals from VHF / UHF antennas or a cable system (For TV Models Only) Component 1/2 (5 RCA jacks) Used to connect A/V equipment with component video outputs, such as a DVD player, Digital Satellite Receiver, or compatible Video Game System.
TV Installation and Connection Guide Descriptions of Connector Types You may find it necessary to use some of the following cable types during setup. 75-ohm Coaxial Cable For TV/cable connection S-Video Cable Used for transferring video signal, which is split into two signals, brightness and color. Through this connection, you can view a better picture than AV (Composite Video) connection. Used for transferring audio and video signal.
TV Installation and Connection Guide Turn the power on the TV Please f ollow these steps to turn the power on to the TV. 1) Before connecting the Power cord, make sure all other connections are done first. 2) Connect the Power Cord from a Wall Outlet to the Power IN Port on the back of the TV as shown below. Back of TV Power IN Port Wall Outlet English Power Cord A red or blue light on the front of the TV may turn on. If so, then skip step 3 and step 4. If the light is NOT on, do Step 3.
TV Installation and Connection Guide Installation In the following pages, you will find directions on how to install your tv and choice of video equipment. The next few pages show examples of how to connect to video inputs on your Olevia TV. For more detailed information, see the user manual that came with your video equipment.
TV Installation and Connection Guide Connecting to an Antenna or Video Equipment with Antenna outlet (For TV and DTV Source) Disconnect all power sources before making any connection. 1. Connect a 75-ohm coaxial cable (or choice of Antenna Cable) from your cable or antenna to the TV's Antenna jack (RF Terminal). For 265 TFHD Model English (75-ohm coaxial cable) Rear of TV If connecting to Video Equipment with Antenna outlet 1.
TV Installation and Connection Guide Connecting to a Set-Top-Box with HDMI Cables (Preferred TV connection) Disconnect all power sources before making any connection. 1. Connect a 75-ohm coaxial cable (or choice of Antenna Cable) from your cable or antenna to the Set-Top-Box's Antenna jack (RF Terminal). 2. Connect a HDMI cable from the Set-Top-Box's HDMI OUT jacks to the TV's HDMI IN jacks.
TV Installation and Connection Guide Connecting to a Satellite Receiver or Cable Box with Component Connectors (Secondary Preferred after HDMI) Disconnect all power sources before making any connections. Use this method of connection if your Satellite Receiver or Cable Box has component (Y, Pb, Pr) jacks. 1.Using a component video cable, connect the Satellite Receiver or Cable Boxes' Y, Pb and Pr jacks to the Y, HDMI 1 Pb and Pr jacks on the TV.
TV Installation and Connection Guide Connecting to a DVD Player with A/V or S Video Cables HDMI 1 R L Disconnect all power sources before making any connections. HDMI 2 Use this method of connection if your DVD player does not have component (Y, Pb, Pr) jacks. Note: If your DVD player has component video output connectors, for best picture quality, use the connection described for Connecting to a DVD Player with Component Connectors.(See page.17) L R 1.
TV Installation and Connection Guide Connecting to a DVD Player with Component Cables Disconnect all power sources before making any connections. Use this method of connection if your DVD Player has component (Y, Pb, Pr) jacks. 1.Using a component video cable, connect the DVD Player's Y, Pb and Pr jacks to the Y, Pb and Pr jacks on the TV.
TV Installation and Connection Guide Connecting to a DVD Player with HDMI Cables Disconnect all power sources before making any connections. Use this method of connection if your DVD Player has HDMI jacks. 1.Using a HDMI cable, connect the DVD Player's HDMI output terminal to the TV's HDMI-HDCP input terminal.
TV Installation and Connection Guide Connecting to a Satellite Receiver or Cable Box with A/V Connectors Disconnect all power sources before making any connections. HDMI 1 1.Connect a 75-ohm coaxial cable from your Cable TV to the Satellite Receiver's or Cable Box's Ant (Antenna) jack. 2.Using Audio and S Video cables, connect the satellite receiver's Audio and S-Video OUT jacks to the TV Audio and S Video IN jacks.
HDMI 1 R L 2 TVHDMI Installation and Connection Guide L R Connecting to a VCR, PVR, or DV with A/V Cables Disconnect all power sources before making any connections. VGA / RS232C Component 3 Control Port R L 1.Using A/V cable and S-Video cables, connect the video equipment's Audio and S-Video OUT jacks to the TV's Audio and S-Video In jacks.
TV Installation and Connection Guide For 265 TFHD Model Connecting to a Blue-Ray DVD Player or HD-Receiver with HDMI Cables Disconnect all power sources before making any connections. Rear of TV 1.Using a HDMI cable, connect the DVD's HDMI output terminal to the TV's HDMI-HDCP input terminal. HDMI 1 English Note: HDCP is a copy protected digital connection that receives analog or digital video and audio signals from equipment with a HDMI output that features the HDCP function.
TV Installation and Connection Guide Connecting to a D-VHS with HDMI Cables Disconnect all power sources before making any connections. 1.Connect a 75-ohm coaxial cable from your cable or antenna to the Set-Top-Box's Antenna jack. 2.Using Audio and S-Video (YPbPr, or HDMI is strongly recommended) cables, connect the Set-Top-Box's Audio and S-Video OUT jacks to the TV's Audio and S-Video IN jacks. 3.Connect an I-Link cable from the Set-Top-Box to the D-VHS equipment for video transmission and record. 4.
TV Installation and Connection Guide Connecting to a D-VHS with Component Cables Disconnect all power sources before making any connections. Use this method of connection if your D-VHS has component (Y, Pb, Pr) jacks. 1.Connect a 75-ohm coaxial cable from your cable or antenna to the Set-Top-Box's Antenna jack. 2.Using Audio and S-Video (YPbPr, or HDMI is strongly recommended) cables, connect the Set-Top-Box's HDMI 1 Audio and S-Video OUT jacks to the TV's Audio and S-Video IN jacks. 3.
TV Installation and Connection Guide Connecting to an Audio Receiver Disconnect all power sources before making any connections. (For Analog Audio Source) 1.Using the R/L audio cable, connect the TV's audio OUT jack to the audio receiver's audio IN or AUX IN jacks. For 265 TFHD Model Audio Receiver Red Rear of TV (For Digital Audio Source) 1.Using the Coaxial or Optical audio cable, connect the TV's audio OUT jack to the audio receiver's Coaxial or Optical IN jacks.
TV Installation and Connection Guide Connecting to a Home Theater System or Earphone Set Disconnect all power sources before making any connections. For 265 TFHD Model Home Theater System Red English White Audio cable (R/L) Rear of TV Note: When connecting an Audio output signal, an external Audio amplifier is necessary to amplify the signal for external speakers. Note: If you connect a Home Theater Sound System, please disable the TV's speakers in the OSD by selecting off in audio section.
TV Installation and Connection Guide Instruction for Uploading New Firmware 1.Go to our website : www.olevia.com and register your TV. 2.Click FutureProofTM your TV. You will need the serial number of your Olevia TV and a USB flash drive. 3.Click on the instructions for your particular model of Olevia TV.
Remote Control Guide Remote Function Keys & Description 20 HotKeys Press to directly access certain SET Press to activate the "Device Programming" function. Shortcut TV functions. DEVICE BUTTONS Press to select the equipment item you want to program or operate. FREEZE Press to freeze the picture. Press again to unfreeze the picture. AUTO Press to adjust screen position automatically when the screen image is not centered under VGA mode.
Remote Control Guide Programming the Remote Control 3 Programming A Device If you have the other equipment you want to operate with the TV's remote control, do the following procedures to program the remote control. 2 1. Select the 5-digit code number for the equipment you want to operate from the lists on its user guide. 2. Press a device button (for example, DVD, SAT, or TV). 3. Press and hold the "SET" button until the LED indicator English blinks twice. 4.
Remote Control Guide Battery Installation 1.Push the tab and pull it out as illustrated below. 2.Insert two size AAA batteries (supplied) by matching the (+) and (-) on the batteries into the remote control's battery department. (Refer to Figure 1) 3.Replace the cover back and make sure the cover "snaps" into the remote control. (Refer to Figure 2) (Figure 1) (Figure 2) English 1 2 3 AAA AAA Note: 1.The display unit comes with two new AAA batteries as accessories.
On Screen Displays (OSD) Introduction After you have finished connecting your TV, you are now ready to choose and personalize your TV settings in the OSD (On Screen Display) menu. There are four main sections in the OSD Menu: Screen OSD Audio OSD Setup OSD English Picture OSD Operating in the OSD 1. Press " " button to enter OSD menu mode. 2. To select between four main sections, press the keys " " and " ". 3. To enter to Sub-Menu,press the keys " " ," " or " ". 4.
On Screen Displays (OSD) Initial Screen 1. 1. Selecting the OSD Language The first time you power on the TV, there are three language formats available for the OSD Menu. You may select it by doing ~ the following: English, Francais, Espanol. (To select the item) 2. Selecting Input Source English After the Power Up selection, the Input Source Screen will appear for your selection. 2.
OSD-Picture On Screen Displays (OSD) 2.2 HDMI : By selecting HDMI you may watch the video program with the HDMI audio input source from varied equipments. * HDMI Audio- input source from varied video device * External Audio- input source from PC device 2.2 HDMI Source (To select the item) (To confirm) * Computer- input source from PC device * Component-VGA- input source from varied video device 2.3 VGA Source (To select the item) (To confirm) 34 English 2.
OSD-Picture On Screen Displays (OSD) Picture OSD Adjusting TV Picture Settings Description of Settings Item Brightness Contrast Color temp Native Color Tint Sharpness Noise Reduction Mode Lighting Input Adjustment Low, Medium, High, Off English Power Up Idea Off Black Level Extender Function To adjust brightness contrast of the picture To adjust color contrast of the picture To adjust image color intensity To select the nature color tones of the picture To adjust the color intensity To decrease or in
OSD-Picture On Screen Displays (OSD) Selecting the Picture Mode Mode In this " Mode" Index, you can select one of the picture modes which is suitable for the program you are watching.
OSD-Picture On Screen Displays (OSD) Power Up : Selects the most appropriate setting for your TV. (Read carefully, modes effect TV performance.) Disable Showroom Mode and Enable Home Mode (Follow these 4 steps to activate Home Mode) * Showroom (Demo) : This mode is available for businesses that will use the TV to demonstrate in their stores. (Notes : This mode blocks Step 1. Press Menu and Scroll up/down to "Picture" and press the "Enter or Right Arrow key". most OSD settings.
OSD-Picture On Screen Displays (OSD) Adjusting the Video or Picture Quality In this Setup Index, you can adjust the video and picture settings to suit your personal preferences.
OSD-Picture On Screen Displays (OSD) Noise Reduction Select Low/Medium/High to reduce noise. Low : To reduce parts of noise (recommended) Medium : To reduce half of noise (To show the Main Menu) (To select the item) (To enter the sub-menu) High : To reduce most of noise Off : Dynamic Noise Reduction is disable.
OSD-Audio On Screen Displays (OSD) Audio OSD Adjusting Sound Quality Description of Settings Item Treble Bass Balance Language MTS (Multi-channel Television Sound) Mute Speaker Auto Align Wide Sound iDIVA HDMI Audio Lip Sync Function It allows to adjust higher pitched sounds. It allows to adjust lower pitched sounds. It allows to adjust volume balance of the R/L speakers for the best stereo reproduction. English, Francais, Espanol There are three language formats available for program broadcasting.
OSD-Audio On Screen Displays (OSD) Speaker Turns TV speakers On/Off when using Home Theater System. DeepBass (To show the Main Menu) It allows to delivers deep, rich bass beyond the range of the speaker's physical performance capability. (To select the item) (To enter the sub-menu) Audio Audio AutoAlign Lip Sysc It allows to elevate the audio image to the desired speaker height.
OSD-Audio On Screen Displays (OSD) MTS System for Stereo TV In this Setup Index, you can adjust the audio settings to suit your personal preferences. MTS Toggles audio through Stereo, SAP and Mono. (To show the Main Menu) (To select the item) (To enter the sub-menu) (To select the item) Mono : Selects Mono reception. (Uses to reduce noise during weak stereo broadcasts) (To enter the sub-menu) Stereo : Selects Stereo reception when viewing a program.
OSD-Screen On Screen Displays (OSD) Screen OSD Adjusting Screen Modes Description of Settings Item Adjustment H.Position V.Position Fine Tune Auto Sync Aspect Ratio Cropping View English PIP Position Adjustment Function It allows you to adjust the picture position horizontally. It allows you to adjust the picture position vertically. It allows you to enhance the picture quality.
OSD-Screen On Screen Displays (OSD) Aspect Ratio It allows you to select the aspect ratio of the picture you are watching. Aspect : Toggles picture between 16:9 / 4:3 aspect ratio. (To show the Main Menu) (To select the item) (To enter the sub-menu) (To select the item) (To enter the sub-menu) (To select the item) Panoramic : Enlarges a picture from 4:3 to 16:9 by stretching it horizontally. (To go back last OSD Menu or exit OSD Menu) Zoom 1 : Stretches the image both horizontally and vertically.
OSD-Screen On Screen Displays (OSD) Cropping Method 1 Crops 16 pixels on R/L edge of image,8 lines on top/bottom edge of image, and then enlarges it to fill the screen. (For All Sources except Tuner Source) On : (recommended) Off : (To select the item) (To show the Main Menu) (To enter the sub-menu) Cropping Method 2 Crops image, and then enlarges it to fill the screen.
OSD-Screen On Screen Displays (OSD) PIP Position Changes the position of Picture 2 (small screen view). Low Right : Pic1 Pic2 (To show the Main Menu) (To select the item) (To enter the sub-menu) Pic1 Low Left : Screen Pic2 Pic2 (To select the item) Upper Right : Pic1 English (To enter the sub-menu) Pic2 Upper Left : Pic1 (To select the item) PIP Position PIP Size PIP Size Changes the size of Picture 2 (small screen view) by scrolling through Small, Medium, Large.
OSD-Screen On Screen Displays (OSD) Selecting the Picture or Video Source In this Setup Index, you can select the input source of the picture or video you want to view. (To show the Main Menu) (To select the item) (To enter the sub-menu) Main Picture Source (To select the item) It allows you to select and view the main picture or video source from optional video equipment connected to this unit by selecting the appropriate input source.
OSD-Setup On Screen Displays (OSD) Setup OSD Adjusting Personal TV Settings Description of Settings Item TV Channel Setup Auto Channel Search Channel Add Closed Caption Analog Type Digital Type Font Size Background Color Parental Control Enter Password Rating MPAA Rating Block Unrating TV Rating Function Favorite, Skip, Name Cable, Air It allows you to set up Channel functions. It can auto scan the available channels of the TV or CATV. It allows you to add channels to your favorite channel list.
OSD-Setup On Screen Displays (OSD) Searching the TV Channels In this Setup Index, you can pre-search all channels before watching the programs. Auto Channel Search (To show the Main Menu) (To select the item) (To enter the sub-menu) Will scan and preset all receivable channels automatically. (To select the item) Cable : Selects cable if using tuner as the input. English * * * * Auto Standard HRC IRC (To enter the sub-menu) (To select the item) Air : Selects air if using antenna.
OSD-Setup On Screen Displays (OSD) Editing Channels In this Setup Index, you can edit channels to suit your personal preferences. Channel Setup Will scan and preset all receivable channels automatically. (To show the Main Menu) (To select the item) (To enter the sub-menu) (To select the item) Favorite : Selects and stores a list of favorite channels.
OSD-Setup On Screen Displays (OSD) Skip : Skips channels from viewing. (NOTE: Once this function is set, the skipped channels will not be displayed after searching. If you wish to view later, enter the channel number by pressing the numeric keys on the remote control.
OSD-Setup On Screen Displays (OSD) Name : Creates a personal name for each channel. (Analog TV Channel Only) Name will appear in the upper-right corner of the screen.
OSD-Setup On Screen Displays (OSD) Channel Add : Adds channel currently on display to the FAVORITE channel list.
OSD-Setup On Screen Displays (OSD) Closed Caption Options Displays the audio portion of a television signal as text on the television screen. Analog Type (To show the Main Menu) (To select the item) (To enter the sub-menu) (To select the item) CC1 : is used for most programs CC2 : may be used for alternate languages CC3 : CC4 : T1~T4 : is used for network and station information, such as channel guides, schedules, or bulletin board, for Closed Caption programs.
OSD-Setup On Screen Displays (OSD) Setting up Parental Control Password This function allows programs to be restricted and controlled by parents. (To show the Main Menu) Enter Password (To select the item) (To enter the sub-menu) Password is necessary to enter and re-enter the Parental Control Menu screen. (To select the item) (NOTE: The Factory Default password is 999999 or 314159.
OSD-Setup On Screen Displays (OSD) MPAA Rating Motion Picture Association of America provide movie ratings, including those shown on TV. G : (General Audience) No restriction. (To show the Main Menu) (To select the item) (To enter the sub-menu) PG : (Parental guidance suggestion) Children under 13 should be accompanied by an adult. (To select the item) PG-13 : (Parents strongly cautioned) Children under 13 should be accompanied by an adult.
OSD-Setup On Screen Displays (OSD) TV Rating U.S. TV ratings are for TV programs rated according to the U.S. Television Parental Guidelines.
OSD-Setup On Screen Displays (OSD) Canada English Rating It is available for TV programs in English broadcast in Canada.
OSD-Setup On Screen Displays (OSD) Canada French Rating It is available for TV programs in French broadcast in Canada.
OSD-Setup On Screen Displays (OSD) Channel Block In this Setup Index, you may select the blocked ratings to suit your personal preferences.
OSD-Setup On Screen Displays (OSD) Resetting the Password Change Password You may change to a new preferred password by pressing the numeric key within 6 numbers. (To show the Main Menu) (To select the item) (To enter the sub-menu) (NOTE: The Factory Default password is 999999 or 314159).
OSD-Setup On Screen Displays (OSD) Setting the Date and Time Date and Time In this Setup Index, you can setup the Date, Week, Time Zone, and Current Time on the TV. (To show the Main Menu) (To select the item) (To enter the sub-menu) Date : Date is set automatically when NTSC source is used. (Manual adjustment is necessary however, if not used) (To select the item) (To enter the sub-menu) Time Zone : You can select available time zone where you live.
OSD-Setup On Screen Displays (OSD) Setting the TV Timer Timers In this Setup Index, you can setup the Sleep Time, Start Time, and Stop Time on the TV. (To show the Main Menu) (To select the item) Sleep : Shuts off TV after a preset period of time has passed by scrolling through 30, 60, 90, 120 minutes.
Specifications TFT LCD Panel Others 65" Power (Voltage) 100~240 VAC / 50-60 Hz (Power Consumption) 540W Stand-by < 1W Dimensions (W x D x H) 61.89 in x 16.73i n x 39.53 in Carton Dimensions (W x D x H) 65.94 in x 20.75 in x 44.88 in Weight w/o stand 156.56 lbs Weight w/ stand 200.66 lbs Gross Weight 231.53 lbs English Dimensional Drawing F A E C B Size Model 65" D A B C D E F 38.11 in 61.89 in 35.35 in 16.73 in 39.53 in 6.
Timing Mode for VGA and HDMI(PC) Source Resolution Vertical frequency (Hz) YPbPr 480p 59.
Pixels Policy SyntaxBrillian's D.O.A. Policy for LCD HDTVs for Defective Pixels on LCD Panels (Applicable to the LCD HDTV sold within USA & Canada only) Customers are required to check their LCD panel immediately after purchase. To identify defective pixels, the LCD panel should be examined under normal operating conditions as mentioned above, preferably in its native display resolution, and with a 90 degrees viewing angle. A LCD HDTV will be considered dead on arrival (D.O.A.
Glossary 3:2 pull down - Process of converting 24 frames per second film to video by repeating one film frame as three fields, then the next film frame as two fields. 1 1 1 2 2 1 1 1 2 2 480I - 480 lines of display every 1/60 of a second; image is displayed by interlace scanning. See also Interlaced 480P - 480 lines of display every 1/60 of a second; image is displayed by progressive scanning. See also Progressive.
Glossary Color - The term refers to the amount of color present. This varies between each user, as each person perceives colors differently. Color Temperature - Feature on the OSD for the Olevia models that enables warm,normal or cool color settings. Warm emphasizes red, cool emphasizes blue, and normal doesn't emphasize any of the primary colors. This setting may affect each person individually depending on how color is perceived.
Glossary Interlaced - Images are the result of lines of data reassembled. Interlaced refers to the process of an image's odd lines reassembled from top to bottom taking about 1/60 of a second, before reassembling the even lines which results in a full picture. Antonym: Progressive Language - Feature on the OSD for the SyntaxBrillian Olevia models that enables the OSD to be read in different languages.
Glossary Swap - Button featured on the Olevia remote. Used in the POP3 or PIP12 views to swap the sub viewable boxes with the main viewable box. Tint - Adjusts the whiteness level within the color. Similar to Hue. Under- scanning Term used where the image displayed is smaller than the display area. Up convert - Process of converting a 480P/I signals to 720P or 1080I. V-Chip - Chip that controls access to forbidden content specified by an adult. VGA - 1. Video Graphics Array (DB15) 2.