
All in One Printer User Manual


Basic Operation
OPERATION GUIDE 3-27
6
Upon completion of
all entries, press
[Connection Test] to
check the
connection.
NOTE: Connected appears when connection to the destination is
correctly established. If Cannot connect appears, review the entry.
If you wish to specify another destination, go to the next step. If the
destination is only one, go to the step 8.
7
Press [Next Dest.] and repeat the steps 5 to 7 to specify the destination.
Up to 10 folders (total number of SMB and FTP folders) can be specified.
NOTE: When [Add to Addr Book] is displayed, the entry is registered in
the address book.
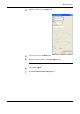
8
Press [OK] to register the entry in the destination list.
9
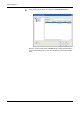
Check the destination list.
Select a destination and press [Detail/Edit] to check and edit it. Edit it, if
necessary, referring to the steps 4 to 6.
Select a destination
and press [Delete] to
remove the
destination from the
list.
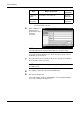
10
Change the original size, scan resolution, etc. if necessary.
Status 10/5/2006 10:10
Place original.
Ready to send.
Destination
Cancel OKNext Dest.Add to Addr Book
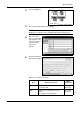
Executing TX job .
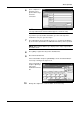
1
Connection
Test
Host Name
Path
Login
User Name
Login
Password
SMB
FTP
Folder Path Entry
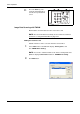
Status 10/5/2006 10:10
Place original.
Ready to send.
Destination
Type of Original/
Transmission
Quick SetupDestination Color/Image Advanced
Setup
Destination Detail
ABC SCANDATA
No.
1/10
Chain Detail/Edit Delete Recall
1/1
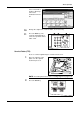
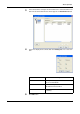
Executing TX job .
1
To:
Address
Book
Folder Path
Entry
E-mail
Addr Entry
AAA BBB CCC DDD EEE
FFF GGG HHH III JJJ
004003 005001 002
006 007 008 009 010