
Instructions / Assembly

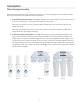

9
Mounting the Faucet
Note
If an existing hole in the sink is available, there is no need to drill a hole for the system faucet. If drilling a hole is necessary,
be sure to clean up all debris from drilling before installing the faucet.
If drilling a hole in the sink or counterop is required to install the faucet, professional installa-
tion by a plumber is highly recommended. Olympia Water Systems is not responsible for any
damage resulting from faucet installation.
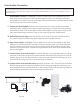
I. Faucet Location: If drilling a hole is required to install the the faucet, be sure to choose
a location in the sink or countertop that is convienent for dispening water and has a
sucient at surface for the faucet to be installed properly. Ensure that the threaded
shank of the faucet can be easily accessed from below.
II. For Stainless Steel Sinks: Wear safety glasses to protect your eyes. Ensure location for
hole is clean and dry. A pilot hole or indent with a center punch is recommended be-
fore using the 1/2” drill bit on a stainless steel sink.
For Porcelain Sinks: Wear safety glasses to protect your eyes. Before starting the drill,
apply rm downward pressure on the drill bit until it breaks through the slick surface.
Proceed with caution as porcelain sinks and tile countertops are easily chipped without
applying proper pressure before starting the drill or if the drill bit gets hot.
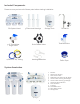
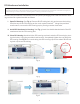
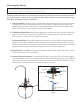
III. Mount Faucet: See Fig. 12. Using the provided washers, nuts, insert and sleeve; mount
the faucet in the sink or countertop.
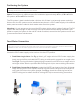
IV. Connect Faucet to System: Locate the BLUE cap insert on the left side of the Stage 5
post carbon lter on the main system bracket. Remove BLUE tubing lock clip and BLUE
cap insert from the post carbon lter. Insert the free end of the BLUE tubing and re-at-
tach the BLUE tubing lock clip to secure tubing connection.
Sink or
Countertop
Rubber Gasket
Chrome Base
Black Locating Washer
Lock Washer
Lock Nut
Insert
Sleeve
Compression Nut
Fig. 12