
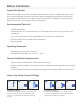
Instructions / Assembly


12
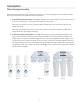
System Start-Up
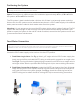
I. Turn on Feed Water: Turn cold water supply to ON position. See Fig. 17 on page 11. Turn
feed water angle valve to ON position to allow water to enter the RO system.
II. Open Tank Valve: See Fig. 18 on page 11. Turn tank ball valve to ON position.
III. Check for Leaks: Check valves, ttings, tubing connections and housings to ensure
there are no leaks.
IV. Wait for Tank to Fill: Allow the RO system to run for approximately 3 hours to ll the
tank. When the tank is lled, the RO system will automatically shut-o. The tank is full
when you can no longer hear water running through the lters, or water owing into the
drain pipe.
V. Clean-Up: While RO system is lling the tank for the rst time, clean-up all of the used
tools and work area. Be sure to keep all provided tools in a safe place so they can be
used for future RO system maintenance.
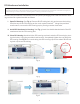
VI. Flushing the Tank: To ush the tank, turn the RO system faucet ON and drain the wa-
ter from the tank. The tank is empty when the pressure from the faucet drops from a
steady stream to a slow trickle. Once the tank is empty, turn the system faucet OFF.
Upon startup of the system, you may initially notice the water stream has a black tint.
This is caused by the manufacturing of the carbon lters. You may also notice the smell
of chlorine in the water from the sanitization of the rubber bladder in the water tank.
To ush out the carbon and chlorine, you may need to ll and empty the storage tank
up to 5 times, where the water will be clear and you cannot taste the chlorine.
Congratulations, you have successfully completed the installation of your
Olympia Water Systems Reverse Osmosis water lter system!