PT-EP03_JP-COVER.fm 1 ページ 2010年10月13日 水曜日 午前11時58分 PT-EP03 PT-EP03 Instruction Manual http://www.olympus.
PT-EP03_EN.Book Page 1 Wednesday, October 13, 2010 11:28 AM Thank you for buying the Underwater Case PT-EP03 (hereinafter Case). Please read this instruction manual carefully and use the product safely and correctly. Please keep this instruction manual for reference after reading it. Wrong usage may cause damage to the camera inside the Case due to water leakage, and repair may not be possible. Before use, perform an advance check as described in this manual.
PT-EP03_EN.Book Page 2 Wednesday, October 13, 2010 11:28 AM WARNING 1 Keep this product out of the reach of babies, infants, and children. There is the possibility of occurrence of the following types of accidents. • Injury by dropping onto the body from heights. • Injury from parts of the body getting caught in parts which open and close. • Swallowing of small parts, O-ring, silicone grease and silica gel. Please consult a physician immediately if any parts have been swallowed.
PT-EP03_EN.Book Page 3 Wednesday, October 13, 2010 11:28 AM 6 Jumping into the water with the Case in your hand, throwing the Case from a boat or ship into the water, and other rough handling may cause water leakage. Please handle with sufficient care, when handing it over from hand to hand etc. 7 If the camera on the inside should become wet because of water leakage etc., immediately wipe off all moisture and confirm the operation. 8 Be careful not to apply excessive force to the zoom dial or tripod seat.
PT-EP03_EN.Book Page 4 Wednesday, October 13, 2010 11:28 AM Contents Introduction ............................................................................................................................ 1 Please read the following items before use ........................................................................... 1 For safe use ........................................................................................................................... 1 1.Preparations ..........................
PT-EP03_EN.Book Page 5 Wednesday, October 13, 2010 11:28 AM Supplied accessories for PT-EP03 ................................................................................ 22 Optional accessories......................................................................................................
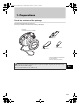
PT-EP03_EN.Book Page 6 Wednesday, October 13, 2010 11:28 AM 1. Preparations Check the contents of the package Check that all accessories are in the box. Contact your dealer if accessories are missing or damaged. • Case body (Check that the O-ring is installed.) • Silica gel (1g) • Silicone grease • O-ring remover • Hand strap • Authorized distributors list/Authorized service centres list • Instruction manual (this manual) CAUTION: After purchase, be sure to do maintenance even in brand-new condition.
PT-EP03_EN.
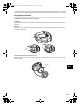
PT-EP03_EN.Book Page 8 Wednesday, October 13, 2010 11:28 AM Using the accesories Installation and removal of the LCD hood Installation Fit the LCD hood as shown in the figure into the rails above and below the LCD monitor window one after the other. Removal Remove the LCD hood from the rails above and below the LCD monitor window one after the other by widening the LCD hood.
PT-EP03_EN.Book Page 9 Wednesday, October 13, 2010 11:28 AM 2. Advance check of the Case Advance check before use This Case has been the subject of thorough quality control for the parts during the manufacturing process and thorough function inspections during the assembly. In addition, a water pressure test is performed with a water pressure tester for all products to confirm that the performance conforms to the specifications.
PT-EP03_EN.Book Page 10 Wednesday, October 13, 2010 11:28 AM 3. Installing the digital camera Check the digital camera Check the digital camera before loading it in the Case. 1. Battery Confirmation It is impossible to change the batteries when using the Case. Make sure that you have sufficient remaining battery capacity before use. 2. Check the remaining number of pictures Check that the image storage medium has enough room for the number of pictures you want to take. 3.
PT-EP03_EN.Book Page 11 Wednesday, October 13, 2010 11:28 AM Open the Case 1 Slide and hold the slide lock towards the arrow direction (1) and turn the open/close dial clockwise (2). 2 Open the rear lid of the Case gently. 1 2 Slide lock CAUTION: Do not exert too much force while turning the open/close dial. Doing so may damage the dial. Pop up the flash The camera’s built-in flash cannot be used when the camera is in the Case. Be sure to pop up the flash to use the underwater flash.
PT-EP03_EN.Book Page 12 Wednesday, October 13, 2010 11:28 AM Load the digital camera 1 Confirm that the digital camera is OFF. 2 Gently insert the digital camera into the Case. 3 Insert a silica gel bag (1g) between the bottom of the digital camera and the Case. The silica gel bag provided for prevention of fogging. 2 3 CAUTION: • The silica gel bag will be caught when the Case is sealed and water leakage will occur. • Once silica gel has been used, the moisture absorption performance will be impaired.
PT-EP03_EN.Book Page 13 Wednesday, October 13, 2010 11:28 AM Seal the Case 1 Close the Case gently while aligning the mounting projection of the rear lid and groove. 2 Turn the open/close dial counter clockwise. • The Case is sealed. Close CAUTION: • If the open/close dial is not fully turned, the Case will not be sealed. This will cause water leakage. • Close the rear lid of the Case so that the lens cap or LCD hood strap doesn’t catch. If it catches, water leaks may result.
PT-EP03_EN.Book Page 14 Wednesday, October 13, 2010 11:28 AM Water Leakage Test The final test after loading the camera is explained below. Always perform this test. It can be performed easily in a water tank or a bathtub. The required time is about five minutes. • At first, immerse the Case for only three seconds and check that no water drop etc. to the Case. • Next, immerse the Case for 30 seconds and check that no water drop etc. to the Case. • Furthermore, immerse the Case for three minutes.
PT-EP03_EN.Book Page 15 Wednesday, October 13, 2010 11:28 AM 4. How to connect the underwater flash Connecting the underwater optical fiber cable To connect the UFL-2 underwater flash (optional) to the Case using an underwater optical fiber cable (optional: PTCB-E02), follow the procedures below. How to connect the underwater optical fiber cable 1 Remove the cap of the optical fiber cable insertion slot.
PT-EP03_EN.Book Page 16 Wednesday, October 13, 2010 11:28 AM 5. Taking Pictures Under Water How to select the shooting modes You can easily set the underwater mode to assign to an Fn button of the digital camera. Select [ / ] in [Fn Button Function] in [ ] of [ ] in [MENU], then press the OK button. *[ menu display] of [ ] in [MENU] must be set to ON. Note: • Press the Fn button to switch between Underwater Wide-Angle and Underwater Macro modes.
PT-EP03_EN.Book Page 17 Wednesday, October 13, 2010 11:28 AM 6. Handling After Shooting Wipe off any waterdrop After underwater shooting, remove any drops of water from the case. Use pressurized air or a soft, lintfree cloth to carefully wipe away any moisture from the hinge between the front and rear lids, the shutter release lever and the open/close dial. CAUTION: Water left between the front and rear lids can get inside the case once it is opened. Please dry these areas carefully.
PT-EP03_EN.Book Page 18 Wednesday, October 13, 2010 11:28 AM Dry the Case After washing with pure water, use a lint-free soft cloth without any salt on it to wipe off any waterdrop and dry the Case completely at a well ventilated location in the shade. CAUTION: Do not use hot air from a hair drier or the like for drying and do not expose the Case to direct sunlight, as this may accelerate deterioration and deformation of the Case and deterioration of the O-ring, leading to leakage of water.
PT-EP03_EN.Book Page 19 Wednesday, October 13, 2010 11:28 AM 7. Maintaining the Waterproof Function The O-ring is a consumable product. Before each use, perform proper maintenance. Always be sure to perform the O-ring maintenance operation as described below. Neglecting this maintenance may become the cause of water leakage. Perform at the location without sand or dust, after washing and drying your hands. Remove the O-ring Open the Case and remove the O-ring.
PT-EP03_EN.Book Page 20 Wednesday, October 13, 2010 11:28 AM How to Apply Grease to the O-ring 1 Apply only Olympus exclusive lubricant to each O-ring. Make sure that your fingers and the O-ring are free of dirt, and squeeze about 5 mm of lubricant onto a finger. (5 mm is the most appropriate amount.) 2 Spread the lubricant onto the entire circumference of the O-ring. Spread the grease onto the entire circumference of the O-ring using 3 fingers.
PT-EP03_EN.Book Page 21 Wednesday, October 13, 2010 11:28 AM Replace consumable products • The O-ring is a consumable product. Independent of the number of times the Case is used, it is recommended that the O-ring should be replaced by a new piece at least once a year. • Deterioration of the O-ring is accelerated by the usage conditions and the storage conditions. Replace the O-ring even before a year has passed if it shows signs of damage, cracking or loss of elasticity.
PT-EP03_EN.Book Page 22 Wednesday, October 13, 2010 11:28 AM 8. Appendix Specifications Available models Olympus Digital Camera E-PL2 Pressure resistance Depth of down to 40 m (130 feet) Main materials Main body: Polycarbonate. Tripod seat: Brass. Axis of operation buttons: Brass. Body cap: Polycarbonate. O-rings: Silicone rubber. LCD inner hood: EPDM rubber. LCD hood: EPDM rubber. Dimensions Width 180.0 mm x height 135.5 mm x depth 166.
PT-EP03_EN.