
Use and Care Manual


OPERATION
1. Lift the vehicle with appropriate means.
2. Position Car Dolly below each wheel.
3. Slowly lower the vehicle onto the dolly.
4. Repeat for each wheel.
NOTE: The Car Dolly is meant to be used in identical pairs on either end of the vehicle. These products are not intended
to be used on sides or adjacent corners of the vehicle.
WARNING Never position any part of your body below the vehicle while using this device. This device is for
positioning vehicles in a garage setting.
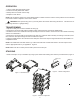
TRANSFORMING
1. Flip the car dolly over so that its wheels are facing up.
2. Remove the clevis pins that hold the saddle in place and set both the pins and the saddle aside.
3. Rotate the arms to the outside and then ip the dolly back onto its wheels. Ensure remain to the outside of the dolly
and are not underneath it.
4. Remove the clevis pins that are stored above the arm pivot, rotate the arms until they are resting on the frame, and
then insert the clevis pins through the arms to hold them in place.
5. Align the saddle with the arms and insert the clevis pins removed in step 2 through both arms and the saddle so to
complete the stand.
NOTE: The saddle has a at side meant to go under frame rails and a slotted side meant to be used a pinch weld.
Use the appropriate side for you application. Figure 2
NOTE: Make sure all four clevis pins are held in place with a cotter pin.
STACKING
1. Stack Car Dolly's on top of eachother by lining up the casters and inserting them into the provided section, Figure 3.
3
Figure 2 - Saddle Congurationt
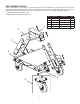
!
Figure 1 - Assembled Unit
Figure 3 - Stacked Conguration
6DGGOH3LQFK:HOG
6LGH
6DGGOH)UDPH
6LGH