
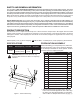
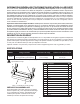
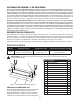
Specification

3
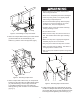
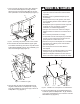
Figure2-Assemblingtooltrayandcasters
Figure3-AttachingCreeperSeat
•Read,understand,andfollowallinstructions
before using this device.
•Neveruseacreeper/stepstoolthatisdamaged.
•Cleananymud,grease,oilorslipperyliquids
beforeusingcreeper/stepstool.
•Donotexceedratedcapacity.Ratedcapacity
is350lbs.asaseat,and400lbs.asastool.
(includesuser,tools,andequipment).
•Sitdowngently.Avoidshockloadscausedby
jumpingorfallingonseat.
•Donotstandonseat.
•Whenusedasastepstool,devicemustbeon
rm,levelsurfacewithallfourlegscontacting
ground.
•Makesurestepstoolisappropriateheightfor
intendedpurpose.Donotoverreach.
•Onlyonepersonshallusestepstoolatatime.
•Keepoutofthereachofchildren.Thisdeviceis
not appropriate for children’s use.
•Useonhard,levelsurfacescapableofsupporting
the load.
2.AttachtwocreeperSideFrames(D)toCasterFrame
(F)withtwoM8x60HexHeadBolts(K),two
washers(L)andtwoacornnuts(M)each(Fig2).
3.AttachcreeperSeatCushionAssy.tocreeperSide
Frames(D)usingtwoM6x40PhillipsHeadScrews
(O),withwashers(P),andnuts(Q),andtwoM6
x16PhillipsHeadScrews(N).Thenattachthe
WarningPlate(I)withfourM6x12HexHeadBolts
(J)(Fig.3).
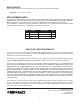
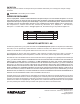
4.FastenCreeperStep(G)toSideFrames(D)using
fourM6x16PhillipsHeadScrews(N).Ensurethat
theCreeperStep(G)sitsecurelybetweentheSide
Frames(D)beforetighteningthescrews
(Fig.4)
.
D
E
F
K
L
M
Figure4-AttachingSteptoSideFrames
G
N
D
WARNING
!
J
I
P
Q
N O
D