INSTRUCTION MANUAL Wrist Blood Pressure Monitor ENGLISH ESPAÑOL Model BP629
TABLE OF CONTENTS Before using the monitor Introduction........................................................................................3 Safety information .............................................................................4 Intended use .............................................................................4 Operating the device ................................................................4 Care and maintenance ..............................................................
INTRODUCTION Thank you for purchasing the OMRON BP629 Wrist Blood Pressure Monitor. Fill in for future reference. DATE PURCHASED: __________________ SERIAL NUMBER: ____________________ • Staple your purchase receipt here • Register your product on-line at www.register-omron.com The monitor is compact and easy-to-use at home, at work, and during travel. Perfect for people who frequently monitor their own blood pressure.
SAFETY INFORMATION INTENDED USE This device is a digital monitor intended for use in measuring blood pressure and pulse rate in adult patient population with wrist circumference ranging from 5 1/4 inches to 8 1/2 inches (13.5 cm to 21.5 cm). The device detects the appearance of irregular heartbeats during measurement and gives a warning signal with reading.
SAFETY INFORMATION Do not use the device with other medical electrical (ME) equipment simultaneously. Do not use the device in the area the HF surgical equipment, MRI, or CT scanner exists, or in the oxygen rich environment. Consult your physician before using the device for any of the following conditions: • If you have had a mastectomy. • People with severe blood flow problems or blood disorders as cuff inflation can cause bruising. Do not take measurements more than necessary.
SAFETY INFORMATION CARE AND MAINTENANCE Do not subject the monitor to strong shocks, such as dropping the device on the floor. Do not submerge the device or any of the components in water. Do not subject the device to extreme hot or cold temperatures, humidity or direct sunlight. Store the device and the components in a clean, safe location. Changes or modification not approved by the manufacturer will void the user warranty. Do not disassemble or attempt to repair the device or components.
BEFORE TAKING A MEASUREMENT To ensure a reliable reading, follow these recommendations: 1. Avoid eating, drinking alcohol, smoking, exercising, and bathing for 30 minutes before taking a measurement. Rest for at least 5 minutes before taking the measurement. 2. Stress raises blood pressure. Avoid taking measurements during stressful times. 3. The cuff can be applied to your left or right wrist. 4. Measurements should be taken in a quiet place. 5. Position the unit at heart level throughout the measurement.
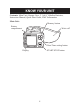
KNOW YOUR UNIT Contents: Main Unit, Storage Case, 2 “AAA” Alkaline Batteries, Instruction Manual, Quick Start Guide, EMC Information Main Unit: Memory button Battery compartment Wrist cuff Date/Time setting button START/STOP button Display 8
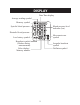
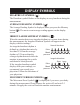
DISPLAY Date/Time display Average reading symbol Memory symbol Systolic blood pressure Blood pressure level indicator (bar) Diastolic blood pressure Movement error symbol Low battery symbol Heartbeat symbol (Flashes during measurement) Irregular heartbeat symbol Deflation symbol Pulse display / Memory number 9
DISPLAY SYMBOLS HEARTBEAT SYMBOL ( ) The Heartbeat symbol flashes on the display at every heartbeat during the measurement. AVERAGE READING SYMBOL ( ) The Average Reading Symbol is displayed when you press the Memory button ( ). The most recent average reading appears on the display screen. IRREGULAR HEARTBEAT SYMBOL ( ) When the monitor detects an irregular rhythm two or more times during the measurement, the Irregular Heartbeat Symbol will appear on the display with the readings.
DISPLAY SYMBOLS 2013 ESH/ESC Guidelines for the management of arterial hypertension Definitions of hypertension by office and home blood pressure levels Office Home Systolic Blood Pressure ≥ 140 mmHg ≥ 135 mmHg Diastolic Blood Pressure ≥ 90 mmHg ≥ 85 mmHg These are from statistical values for blood pressure. WARNING Consult your physician for specific information about your blood pressure. Self-diagnosis and treatment using readings may be dangerous.
BATTERY INSTALLATION CAUTION Use only 1.5V “AAA” alkaline batteries with this device. 1. Remove the battery cover. 2. Install 2 “AAA” size batteries so the + (positive) and - (negative) polarities match the polarities of the battery compartment as indicated, then replace the battery cover. NOTES: • Make sure that the battery cover is securely in position. • Do not touch the battery terminals when you install or remove the batteries.
BATTERY INSTALLATION NOTES: • Turn the monitor off before replacing the batteries. If the batteries are removed while the monitor is still on, the date and time will be reset to that of the previous use. The readings are not deleted. • When the batteries are replaced, you may need to reset the date and time. If the “-:--” appears on the display, refer to “Setting the Date and Time”. • The batteries included with the device may have a shorter life.
SETTING THE DATE AND TIME Set the monitor to the current date and time before taking a measurement for the first time or after replacing the batteries. 1. TO START THE SETTING Press and hold the Date/Time Setting button ( ) until the year flashes on the display. 2. SETTING THE YEAR Press the Memory button ( ) to advance by one year. Press the Date/Time Setting button ( to set the current year. ) The month flashes on the display. NOTES: • The year can be set between 2015 and 2040.
SETTING THE DATE AND TIME 4. SETTING THE DAY Press the Memory button ( ) to advance by one day. Press the Date/Time Setting button ( to set the current day. ) The hour flashes on the display. 5. SETTING THE HOUR The time is set using AM or PM. Press the Memory button ( ) to advance by one hour. Press the Date/Time Setting button ( to set the current hour. ) The minute flashes on the display. 6. SETTING THE MINUTE Press the Memory button ( ) to advance by one minute.
APPLYING THE WRIST CUFF CAUTION Read all of the information in the instruction manual and any other literature in the box before operating the device. CAUTION This device is intended for use in measuring blood pressure and pulse rate in the adult population. Do not use this device on infants or persons who cannot express their intentions. APPLYING THE CUFF ON THE LEFT WRIST 1. Roll up sleeve. Make sure your sleeve is not rolled up too tightly on your arm. This may constrict the flow of blood in your arm.
APPLYING THE WRIST CUFF NOTES: • Wrap the wrist cuff securely around the wrist for taking accurate measurements. • Make sure the wrist cuff does not cover the protruding part of the wrist bone on the outside of the wrist. APPLYING THE CUFF ON THE RIGHT WRIST When taking a measurement using the right wrist position the cuff as shown in the illustration.
TAKING A MEASUREMENT 1. Sit comfortably on a chair with your legs uncrossed and your feet flat on the floor and place your elbow on a table in order to relax before starting blood pressure measurement. NOTES: • The distance from the top of your seat measuring to the top of the table you are sitting at, should be 12±2 inches (30±5 cm). If the distance measured between the top of your seat and table do not fall within this parameter, please correct your seat or table height.
TAKING A MEASUREMENT 2. Press the START/STOP button. All symbols appear on the display. The wrist cuff will start to inflate automatically. As the cuff inflates, the monitor automatically determines your ideal inflation level. This monitor detects your blood pressure and pulse rate during inflation. The Heartbeat Symbol ( ) flashes at every heartbeat. Remain still and do not move until the entire measurement process is completed. NOTE: To stop the inflation or measurement, push the START/STOP button.
TAKING A MEASUREMENT 4. Press the START/STOP button to turn the monitor off. NOTES: • The monitor will automatically turn off after two minutes. • Wait 2-3 minutes between measurements. The wait time allows the arteries to return to the condition prior to taking the blood pressure measurement. You may need to increase the wait time depending on your individual physiological characteristics. WARNING Consult your physician for specific information about your blood pressure.
USING THE MEMORY FUNCTION Every time you complete a measurement, the monitor stores the blood pressure and pulse rate in the memory. The monitor automatically stores up to 60 readings (blood pressure and pulse rate). When 60 readings are stored, the oldest record is deleted to save the most recent readings. AVERAGING FUNCTION The monitor calculates the average reading based on up to the 3 most recent readings taken within 10 minutes.
USING THE MEMORY FUNCTION NOTES: • The Memory number appears for a second before the pulse rate is displayed. The newest set is number “1”. • The date and time are alternately displayed with the readings. • Press the Memory button ( ) repeatedly to display the next readings. • Press and hold the Memory button ( ) to display the readings faster. 3. Press the START/STOP button to turn the monitor off. TO DELETE ALL READINGS STORED IN THE MEMORY You cannot partially delete readings stored in the memory.
CARE AND MAINTENANCE To keep your digital blood pressure monitor in the best condition and protect the device from damage, follow the directions listed below: Do not forcefully bend the cuff. Do not fold tightly. Clean the device with a soft dry cloth. Do not use any abrasive or volatile cleaners. Wipe clean on the surface of the cuff with a soft, moistened cloth with a dilution of neutral detergent. Do not allow any liquids inside the cuff. If a liquid gets in the cuff, dry the inside well.
ERROR INDICATORS SYMBOL CAUSE CORRECTION Wrist cuff not applied correctly. Apply the wrist cuff correctly. Refer to “Applying the Wrist Cuff”. Movement during measurement. Do not hold the wrist cuff. Remain still and do not talk during measurement. Refer to “Taking a Measurement”. Wrist cuff not applied correctly or movement during measurement. Apply the wrist cuff correctly. Refer to “Applying the Wrist Cuff”. Remain still and do not talk during measurement. Refer to “Taking a Measurement”.
TROUBLESHOOTING TIPS PROBLEM No power. No display appears on the monitor. Readings appear too high or too low. CAUSES AND SOLUTIONS Replace both batteries with new ones at the same time. Check the battery installation for proper placement of the battery polarities. Review the section “Battery Installation”. Blood pressure varies constantly. Many factors including stress, time of day, how you wrap the cuff, where you position your wrist, may affect your blood pressure.
FCC STATEMENT FCC CAUTION Changes or modifications not expressly approved by the party responsible for compliance could void the user’s authority to operate the equipment. Note: This equipment has been tested and found to comply with the limits for a Class B digital device, pursuant to part 15 of the FCC Rules. These limits are designed to provide reasonable protection against harmful interference in a residential installation.
LIMITED WARRANTY Your BP629N Wrist Blood Pressure Monitor, excluding the batteries, is warranted to be free from defects in materials and workmanship appearing within 2 years from the date of purchase, when used in accordance with the instructions provided with the monitor. The above warranty extends only to the original retail purchaser. We will, at our option, replace without charge any monitor covered by the above warranty.
SPECIFICATIONS Model: Display: Measurement Range: Accuracy: Inflation: Deflation: Measurement Method: Rating: Power Source: Battery Life: BP629N HEM-6130-Z LCD Digital Display Pressure: 0 to 299 mmHg, Pulse: 40 to 180 beats/min. Pressure: ±3mmHg or 2% of reading Pulse: ±5% of reading Automatic by electric pump Automatic rapid deflation Oscillometric method DC3V 1.5W 2 “AAA” alkaline batteries 1.5V Approx.
SPECIFICATIONS NOTES: • These specifications are subject to change without notice. • In the clinical validation study, the 5th phase was used on 85 subjects for determination of diastolic blood pressure. • This device has not been validated for use on pregnant patients.
Manufactured for : OMRON HEALTHCARE Co., Ltd. 53, Kunotsubo, Terado-cho, Muko, Kyoto, 617-0002 JAPAN Distributed by : OMRON HEALTHCARE, INC. 1925 West Field Court, Lake Forest, IL 60045 U.S.A. www.omronhealthcare.com © 2015 OMRON HEALTHCARE, INC.