FREEZER 125 FA INSTRUCTION BOOK 1347177 A/O/9-3. (02.
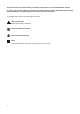
This instruction book contains safety precautions, information on use and helpful hints and tips. To ensure you use this appliance effectively and safely, please read this instruction book carefully before installing or using the appliance and retain it for future reference. The symbols below help you to find things more easily: Safety precautions Warnings and safety information. Hints and useful information Environmental information Ideas This symbol indicates information regarding food and its storage.
IMPOR TANT S AFET Y INF ORMATION These warnings are provided in the interest of your safety. Ensure that you understand them all fully before installing or using the appliance. Your safety is of paramount importance. If you are unsure about any of the meanings or these warnings contact the Customer Care Department. Prior to installation Check the appliance for transport damage. Under no circumstances should a damaged appliance be installed. In the event of damage please contact your retailer.
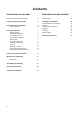
Cont ents Instructions for the User Instructions for the Installer Guide to use the Instruction Book 2 Technical data 14 Important Safety Information 3 Description of the Appliance Control Panel 5 6 Using the Appliance Before first use To start the appliance Thermostat control Compartment Storage Freezer Tray Freezing Fresh Food Frozen Food Storage Thawing Making Ice Cubes Normal Operating Sounds In the Event of a Power Failure 7 7 7 7 7 7 7 8 8 8 8 8 Installing the appliance Transportation and
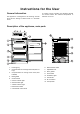
Ins tr uctions f or the User General information This appliance is designed for the freezing of fresh food and the storage of frozen food in a domestic home. To ensure correct operation, the appliance should be located where the ambient temperature is between 10-32 °C. Description of the appliance, main parts 1. Freezing tray 2. Compartment for freezing fresh food (with ice tray) 3. Compartments for storing frozen food (wire baskets) 4. Rating Plate 5. Control Panel a. Green indicator light b.
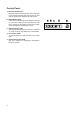
Control Panel a) Green indicator light When the appliance is switched on at the mains the green indicator light will glow and continue to glow until the appliance is switched off at the mains b) Red indicator light A few hours after starting up the appliance this will go out to show that the correct temperature has been reached for the setting chosen and will stay out to indicate that everything is in order. c) Yellow indicator light This light illuminates when fast freeze is switched on.
Using the appliance Before first use - position of the appliance Remove all securing tapes. Wash the inside of the appliance with lukewarm water to which a little bicarbonate of soda has been added (5 ml to 0.5 litre of water). Do not use soap or detergent as the smell may linger. Dry the appliance thoroughly. During prolonged periods of abnormally hot weather, if the thermostat is set on too high a number, the cooling system may operate continuously and the fridge cooling plate may not defrost.
Frozen food storage When first starting the freezer or if it has been out of use for some time, we advise you to run the appliance for at least 4 hours in the 'fast freeze' mode before storing frozen food. Do not exceed the storage period indicated by the manufacturer. Do not open the door frequently or leave it open longer than necessary. Important Do not put carbonated liquids in the freezer. Ice lollies, if consumed immediately after removal from the freezer can cause low temperature skin burns.
Useful inf or mation and advice Hints for storage To obtain the best performance from your freezer: Do not store warm food or evaporating liquid. Avoid buying frozen food if you cannot store it straight away. The use of an insulated container is advisable. When you arrive home, place the frozen food in the freezer immediately. Do not push food together too much, try to allow air to circulate around each item. Do not store food uncovered.
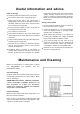
When the appliance is not in use When the appliance is not in use for long periods, disconnect from the electricity supply, empty all foods and clean the appliance, leaving the door ajar to prevent the build up of unpleasant odours. Defrosting The freezer will become progressively covered with frost. This should be removed with the special plastic scraper provided whenever the thickness of frost exceeds ¼.
Some thing N o t Wor king? Before contacting your local Service Force Centre, please check the following points. Symptom No power to the appliance. The light does not come on. The temperature in the appliance is too high. Possible Cause No power at the socket. There is a power cut. The fuse has blown. Thermostat control is set at 0. The bulb is not fitted correctly. The bulb has blown. The appliance is located in an unsuitable position. The thermostat control is set too low.
Ser vice & Spar e P ar ts If your appliance requires servicing or you wish to purchase spare parts please contact your local Electrolux Service Force Centre by telephoning: 08705 929929 Your telephone call will be automatically routed to the Service Force Centre which covers your post code area. For the address of your local Service Force Centre and further information about Service Force, please visit the website at www.serviceforce.co.
Guar ant ee Conditions Standard guarantee conditions We, Onyx, undertake that if within 12 months of the date of purchase this Onyx appliance or any part thereof is proved to be defective by reason only of faulty workmanship or materials, we will, at our option repair or replace the same FREE OF CHARGE for labour, materials or carriage on condition that: The appliance has been correctly installed and used only on the electricity supply sated on the rating plate.
INS TR UCTIONS FOR THE INS TALLER TECHNICAL DATA DIMENSIONS WEIGHT GROSS CAPACITY: NET CAPACITY: POWER SUPPLY VOLTAGE & FREQUENCY TOTAL POWER ABSORBED ENERGY CONSUMPTION: PER DAY PER YEAR ENERGY CLASS (According to EU standards) FREEZING CAPACITY (kg/24h) RISING TIME INSTALLING THE APPLIANCE Height 850 mm Width 550 mm Depth 600 mm 39 KG 117 l 110 l 220-240 V / 50 Hz 120 W 0.
VENTILATION REQUIREMENTS The appliance must have adequate ventilation to ensure correct operation. The diagram shows the ventilation requirements when installed: A* Under a worktop or cupboard B freestanding * The clearance space of 10 cm above the appliance may be reduced to 5 cm providing a clearance space of 2.5 cm is left either side of the appliance. LEVELLING The appliance MUST be level. Level the appliance by adjusting the two adjustable feet (1) at the front of the appliance.
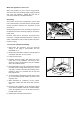
To reverse the top hinge assembly proceed as follows: Remove the 2 worktop retaining screws from the back of the appliance. Slide the worktop towards the rear and lift it clear of the appliance. Remove the 2 upper hinge plate retaining screws. Remove the hinge plate from the top of the door. Unscrew the hinge pin from the hinge plate and insert it on the opposite side of the plate. Rotate the hinge assembly 180° and insert the hinge assembly into the opposite location.
Electrical Connection Any electrical work required to install this appliance should be carried out by a qualified electrician or competent person. This appliance must be earthed. The manufacturer declines any liability should these safety measures not be observed. Electrical Requirements Before switching on, make sure the electricity supply voltage is the same as that indicated on the appliance rating plate. The appliance is supplied with a 13 amp plug fitted.
Printed by Xerox Hungary Ltd. © Electrolux Household Appliances Limited 2000 Rev.: 2002. 02. 27.