ATC5K_manual-GE0827 9/2/08 10:06 AM Page 1
ATC5K_manual_UK0827.qxd 9/2/08 10:09 AM Page 1 I . Quick Start Dear Customer, ••••••••••••••••••••••••••••••••••••••••••••••••••••••••••••••••••••••••••••••••••••••••••••••••••••••••••••••••••••• II . Camera Precautions ••••••••••••••••••••••••••••••••••••••••••••••••••••••••••••••••••••••••••••••••••••••••••••••••••• III . Technical Specifications ••••••••••••••••••••••••••••••••••••••••••••••••••••••••••••••••••••••••••••••••••••••••••• IV .
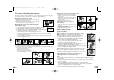
9/2/08 10:09 AM Page 3 I) Quick Start Turning the Camera On Press and hold the On/Off button for 2 seconds (one beeping sound). The LCD screen will show the remaining time and the LED will be green. Taking Video Footage 1. Aim at what you want to record. 2. Press and hold the 'Movie shutter button' for 2 seconds to start recording (one beeping sound). The time elapsed will be shown on the LCD screen and the LED will go from green to red. 3.
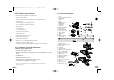
ATC5K_manual_UK0827.qxd 9/2/08 10:09 AM Page 4 V) Camera Description • Sensor resolution 640x480 VGA CMOS sensor 1. Lens 2. 2 colour LED and IR receiver 3. Camera grip 4. Screw 5. Nut 6. Handlebar grip 7. Helmet grip 8. USB cable 2 1 9. AV cable 10. Rubberised patch 11. Velcro patch 12. Short velcro strap 6 13. Long velcro strap 14. Silicon rubber head strap 7 15. Bolt 16.
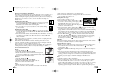
9/2/08 10:09 AM Page 5 VI) Camera Mounting Description Mounting the camera using the handlebar grip: The camera can be mounted in a number of ways using the straps and the velcro patch provided. Please follow the methods of mounting as suggested below: Fixing the position of the camera a) With the base of the camera facing you, turn the clip clockwise to tighten its position. b) With the base of the camera facing you, turn the clip counter clockwise to loosen its position.
9/2/08 10:09 AM Page 6 Remote Control Battery Installation The battery compartment is located on the underside of the controller. Use a coin to twist the cap lock anti-clockwise then lift the cover off. Insert the battery ensuring the negative polarity direction is placed on the metal prong. Replace the cover and use a coin to screw it clockwise ensuring it is firmly closed. Turning the Camera On 1. Press and hold the On/Off Button for 2 seconds (one beeping sound).
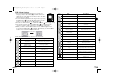
ATC5K_manual_UK0827.qxd 9/2/08 10:09 AM Page 7 VIII) Menu Settings Icon Press Menu button 6. The different mode icons are shown in the table below.
9/2/08 10:09 AM Page 8 Playback on LCD Press the Menu button , the first icon is the icon. Press the “Confirm” button to enter this menu mode or press Menu again to move onto the next mode, Resolution . This mode allows the user to review files stored in the memory. Press "Menu" to go onto the next menu mode - Resolution . Or, press "Confirm" to enter Playback Mode . There are 2 options in Playback Mode, review photos and review videos .
/2/08 10:09 AM Page 9 Setting the Date When adjusting the date, “DD” will be shown. Press the “Menu button” adjust the date. Press the 'Confirm' button to verify, after which you would be able to proceed to setting the time. to Setting the Time Press the “Menu button” to adjust the hour. Press the “Confirm” button to verify the hour, after which you would be able to proceed to setting the minute. Press the “Menu button” to adjust the minute.
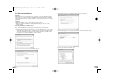
ATC5K_manual_UK0827.qxd 9/2/08 10:09 AM Page 10 X) Webcam installation 3. Next select “Browse my computer for driver software (advanced)”. EN Warning: This hardware has not passed Windows Logo testing. Users may install the webcam feature but do so at their own risk. By installing the webcam feature users indemnify Oregon Scientific from any software, hardware or virus problems caused as a result of installation. Attention: *Webcam Installation does not work with Vista 64 bit versions.
9/2/08 10:09 AM Page 11 6. Select WinVista_32bit then click “OK”. Webcam Installation Guide on Windows XP Note: Before installing the software please ensure the CD is in the CD drive. 1. With the USB cable inserted and camera on, press the “Menu” button - “Cam” will be shown on the LCD screen - then press the “Confirm” button. A pop-up window will appear, select “Install from a list or specific location (Advanced)” then click “Next”. EN ATC5K_manual_UK0827.qxd 7.
ATC5K_manual_UK0827.qxd 9/2/08 10:09 AM Page 12 7. Your OS Digital Camera is now installed, click “Finish” and wait for the next pop up window. EN 4. On the next window select “WinXP” then click “OK”. 5. Ensure the path name is correct and then click “Next”. 8. The pop up window should be the same as in step 1. Please follow steps 1-9 again. Once this is complete your OS Video Camera will be installed and your ATC5K webcam will be ready to use. Webcam Installation on Windows 2000 6.
ATC5K_manual_UK0827.qxd 9/2/08 10:09 AM Page 13 5. Select Win2000 from the CD drive then select the icon named “OSUsb” before clicking “Open”. EN 2. Select “Display a list of the known drivers for this device so that I can choose a specific driver”. 6. Ensure the path name is correct then click “OK”. 3. On the next window select “Other devices” then click “Next”. 7. Select “OS Digital Camera” then click “Next”. 4. On the next window click “Have Disk” then select the CD drive. 8.
ATC5K_manual_UK0827.qxd 9/2/08 10:09 AM Page 14 13. Click “Next” after selecting the OS Video Camera. EN 9. At this window click the “Yes” button. 10. Your hardware is now installed. Click “Finish”. 14. Once you have finished installation your camera will be ready to use as a webcam. XI) Webcam / USB mode 1. To use the Webcam function, whilst the mode is in File , press “Menu” . This will change the mode to Cam . Press “Confirm” to select.
9/2/08 10:09 AM Page 15 6. Open the “100ATC5K” folder in the [DCIM] folder to start selecting your desired video files. Copy the desired video to your MAC. 7. While in either mode, to change to the other, users must disconnect from their MAC and reconnect going through the entire selection procedure again. 8. The camera will use power from the computer. XIII) Troubleshooting Note: The ATC5K comes with a webcam stand. Please use this when using your ATC5K as a webcam.
ATC5K_manual_UK0827.qxd 9/2/08 10:09 AM Page 16 Further Help We make every effort to ensure the accuracy and appropriateness of the information provided on our products. We encourage you to contact our Technical Support Team at atc@oregonscientific.com with any problems and/or suggestions, or, call our Customer Service Department at 0871 222 1966. Our service representatives will be happy to help you. Please note that the Technical Support Team cannot issue or authorise any RMA's or replacements.