COFFEE BURR MILL User Manual Model 6389-33 QUESTIONS? COMMENTS? IN CANADA: 1 800 667-8623 www.oster.com P.N.
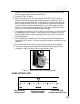
introduction Introduction Thank you for selecting an Oster® Burr Mill, the finest coffee burr mill in its class on the market. Your new burr mill presents an innovative 12 cup flexible, auto-off timer. The mill has 16 different settings – from fine to coarse – for the freshest coffee ever, a translucent, 4.5 oz. or 8 oz. whole bean hopper, a translucent, removable ground coffee chamber with capacity for 12 5 oz. cups of medium grind coffee grounds, and hidden cord storage.
IMPORTANT SAFEGUARDS safety To reduce the risk of fire, electric shock and/or injury to persons, basic safety precautions should always be followed when using electrical appliances, including the following: 1. READ ALL INSTRUCTIONS BEFORE USING THE MACHINE 2. To protect against electric shock, do not immerse cord, plugs or machine in water or in any other liquid. 3. Close adult supervision is necessary when this appliance is used by or near children. 4.
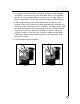
use This appliance has a polarized plug (one blade is wider than the other). To reduce the risk of electric shock, this plug will fit in a polarized outlet only one way. If the plug does not fit fully in the outlet, reverse the plug. If it still doesn’t fit, contact a qualified electrician. Do not modify the plug in any way.
use 3. 4. 5. 6. 7. 8. number of cups indicated for an automatic drip coffee maker using a medium grind, unless otherwise indicated. Press the START button. While the machine is ON, rotate the GRIND SETTING KNOB to select your preferred coffee grind setting (see Grind Setting Chart). If you turn the grind setting knob to the right, the grind will be progressively coarser at each point. As you familiarize yourself with the mill, you will discover which settings best suit your coffee-making preferences.
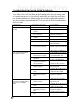
COFFEE MEASUREMENT CHART use MEDIUM GROUND COFFEE CUPS OF COFFEE (5 OZ. EACH) BEAN QUANTITY/TABLESPOONS 12 Cups 9 Tbsp 10 Cups 7.5 Tbsp 8 Cups 6 Tbsp 6 Cups 4.5 Tbsp 4 Cups 3 Tbsp 2 Cups 1.5 Tbsp 1. The amount of whole coffee beans required is about the same as the specified quantity of medium ground tablespoons. 2. The unit will work for about 1 minute if you have selected the 12 cups setting. 3. The unit may be stopped during grinding by: a.
use 3. If a finer setting is required to brew espresso or cappuccino, please grind the amount of coffee grounds recommended by your product manufacturer. a. For Oster® Espresso products: 1) Set the burr mill to Fine grind 2) For 2 oz. of espresso coffee, 2 tsp (0.6 tbsp) of fine grind are required. Set the Timer to 3 cups, this will keep the unit ON enough time to grind the finer grounds required. 3) For 4 oz. of espresso coffee, 4 tsp (1.3 tsp) of fine grind are required.
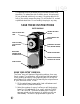
use FOR BEST RESULTS 1. Use only coffee beans in this appliance. 2. Select grind setting while the mill is running or when the hopper is empty. 3. The ground coffee chamber and its lid should always be in place when using this appliance. 4. Do not leave the appliance unattended when grinding. The ground coffee chamber cannot hold the full contents of the whole bean hopper. Be sure to shut the appliance off if the ground coffee chamber is full. 5.
use 5. The ground coffee chamber and lid can be washed in mild detergent and water. They both are top rack dishwasher safe. Do not immerse the mill or the whole bean hopper in water or in any other liquid, or place in dishwasher. Use only non-abrasive cleaners to remove stains. 6. After completely drying the whole bean hopper and top burr mill, replace the burr mill in position by aligning snaps with receptacle and rotating counterclockwise to lock it in position.
troubleshooting TROUBLESHOOTING YOUR OSTER® BURR MILL Your Oster® Burr Mill has been carefully designed to give you many years of trouble-free service. In the unlikely event that your new burr mill does not operate satisfactorily, please review the following potential problems and try the steps recommended BEFORE you call an Authorized Sunbeam® Service Center. PROBLEM POSSIBLE CAUSE SOLUTION THE UNIT DOES NOT GRIND 1. Timer has not been set SET TIMER 2.
troubleshooting PROBLEM POSSIBLE CAUSE SOLUTION THE UNIT STOPS GRINDING 1. Timer setting is incorrect SET TIMER CORRECTLY 2. Timer was inadvertently rotated to OFF SET TIMER CORRECTLY 3. Hopper lid has been opened CLOSE HOPPER LID 4. Ground coffee chamber is not in correct position PLACE CHAMBER IN PROPER POSITION 5. Cancel button has been pressed PRESS START BUTTON AGAIN 6. The unit has been unplugged PLUG UNIT IN 7. There’s a power outage WAIT FOR POWER TO BE RESTORED 8.
One Year Limited Warranty Sunbeam Products, Inc., or if in Canada, Sunbeam Corporation (Canada) Limited (collectively “Sunbeam”) warrants that for a period of one year from the date of purchase, this product will be free from defects in material and workmanship. Sunbeam, at its option, will repair or replace this product or any component of the product found to be defective during the warranty period. Replacement will be made with a new or remanufactured product or component.