
Lakewood Baluster Top Install Guide


©2017 Universal Forest Products, Inc. All rights reserved.
68956 U.S. Hwy 131, White Pigeon, MI 49099 616.365.4201 9607_10/17
www.ufpi.com
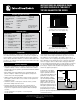
Assembling the panel
STEP 1
Install first post with concrete (See “Digging postholes” and fig. 1).
STEP 2
Slide the bottom rail into place at the bottom of the routed
post (fig. 2).
STEP 3
Install the second post into the ground and temporarily secure
into place. Set the bottom rail into the second post and level (fig 3).
(You will secure the second post with concrete in Step 9.)
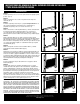
STEP 4
Slide one U-channel onto the first picket and center it vertically.
Place the bottom of the first picket (with U-channel attached)
securely into the channel of the bottom rail and slide against the
first post. The U-channel should be between the post and the
picket (fig. 4).
STEP 5
Continue installing each picket. The pickets feature a tongue-and-
groove design so that each picket fits securely into the one next
to it. Repeat with each picket until there is one picket left (fig. 5).
STEP 6
Slide the second U-channel onto the last picket and center it
vertically. Install the last picket (fig. 6).
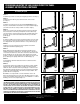
STEP 7
When all pickets have been placed, insert the mid rail into the
middle routed hole in the first post. The mid rail has a channel on
one side and routed holes on the other. Insert the rail channel-side
down. Working from one side to the other, slide the rail over the
pickets. In order to insert the rail into the routed hole in the second
post, shift the post slightly until the rail can be fitted (fig. 7).
STEP 8
Insert the black aluminum balusters into the routed holes in the
mid rail (fig. 8).
STEP 9
Insert the top rail into the routed hole in the first post and carefully
place the top rail over the balusters, making sure each baluster
slides into each routed hole in the top rail (fig. 9). In order to insert
the rail into the routed hole in the second post, shift the post slightly
until the rail can be fitted. Once the rail is securely locked in, the
pickets will form a solid panel.
Backfill the second post with concrete and make sure it’s set
before moving down the fence line. This will always allow one post
to be anchored while each panel section is assembled. To continue
building your fence line, repeat Steps 1-9.
WoodbridgeStep2.ai
WoodbridgeBalStep3.ai
fig. 2
fig. 3
PRO SERIES BALUSTER TOP AND CLOSED PICKET TOP PANEL
ASSEMBLY INSTRUCTIONS, CONTINUED
WoodbridgeBalStep4.ai
WoodbridgeBalStep6.ai
WoodbridgeStep6.ai
WoodbridgeStep5.ai
WoodbridgeStep8a.ai
fig. 4
fig. 6 fig. 7
fig. 5
fig. 8
fig. 9
WoodbridgeStep7.ai
THE DIAGRAMS AND INSTRUCTIONS IN THIS BROCHURE ARE FOR ILLUSTRATION PURPOSES
ONLY AND ARE NOT MEANT TO REPLACE A LICENSED PROFESSIONAL. ANY CONSTRUCTION OR
USE OF THE PRODUCT MUST BE IN ACCORDANCE WITH ALL LOCAL ZONING AND/OR BUILD-
ING CODES. THE CONSUMER ASSUMES ALL RISKS AND LIABILITY ASSOCIATED WITH THE
CONSTRUCTION OR USE OF THIS PRODUCT. THE CONSUMER OR CONTRACTOR SHOULD TAKE
ALL NECESSARY STEPS TO ENSURE THE SAFETY OF EVERYONE INVOLVED IN THE PROJECT,
INCLUDING, BUT NOT LIMITED TO, WEARING THE APPROPRIATE SAFETY EQUIPMENT.
EXCEPT AS CONTAINED IN THE WRITTEN LIMITED WARRANTY, THE WARRANTOR DOES NOT
PROVIDE ANY OTHER WARRANTY, EITHER EXPRESS OR IMPLIED, AND SHALL NOT BE LIABLE
FOR ANY DAMAGES, INCLUDING CONSEQUENTIAL DAMAGES.