
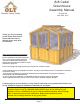
Full Product Manual


Selecting a Location for Your Greenhouse
Walk around your property and make notes of the following:
sunny spots
slope of the land
light blocking trees and high buildings.
Don’t hide your greenhouse away in a dark corner of the garden. Make it an attractive feature.
Ensure it has easy access to it and around it, to enable essential glass cleaning and general maintenance.
Place the Greenhouse on a level piece of land with good drainage. Take into account existing paths and utilities such
as electricity and water.
Having a water supply at hand avoids carrying heavy watering cans from the tap to the plant.
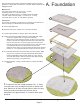
Choosing a Foundation & Flooring Material
Dirt - A dirt floor is the most inexpensive flooring option but it will be messy! Water will be absorbed easily and you
can benefit from the natural heat.
Sand & Gravel - A sand and small gravel floor is also an inexpensive foundation option. Provides excellent drainage
and easy to keep clean.
Concrete - When considering using a concrete floor, seek out a professional to pour the concrete and be sure to add
water drains. Concrete floors also are great for holding heat and easy to clean and maintain. The downside of having a
concrete foundation is that it is permanent and more costly.
Brick/Stone - Brick or stone floors are also a good option providing you leave adequate spacing between the
bricks/stones to will allow water to drain and absorb into the ground. Bricks and stones also hold heat and are a good
choice if cold weather is going to be an issue for your greenhouse.
After you have decided on the proper greenhouse foundation/flooring, it's important to take your time and install it
properly. Be sure to remove any sod, grass, weeds, etc.. Always start with a packed and leveled dirt floor. By building
your foundation as square and solid as possible, your greenhouse should bring years of enjoyment to you.
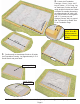
Cleaning and Maintanance an Outdoor Living Today Greenhouse
Polygal - polycarbonate sheets– Simple cleaning will give longer and better service life. Rinse sheet with water. Use
warm soapy (mild liquid dish soap) water to clean sheets. If any dirt remains, gently wipe off with a soft cloth.
Apply final rinse and dry with soft cloth to prevent water spotting.
DO NOT use sponges, squeegees, brushes or sharp instruments as they may damage the UV protective coating.
Western Red Cedar Wood- Can be left to naturally weather to a silvery grey color or you can apply an exterior wood
finish to keep the look of the original wood color. If choosing a finish, let the wood acclimatize under cover for two weeks
and seal according to the paint manufacturer’s specifications.
Types of Finishes:
Opaque Coatings & Semi-Transparent Stains. Opaque Coatings provide the most surface protection against weathering
but will conceal the wood’s natural characteristics. Semi-Transparent Stains may be latex or oil-based and will show the
woods natural characteristics better. Semi’s generally have a shorter service life of between 2-4 years.
We recommend applying any sealants to individual pieces first before assembly and letting them dry to the
paint manufacturer’s directions.
Dirt is the most benign cause of discoloration and not usually a problem. A periodic cleaning with a mild detergent
solution will usually restore the surface finish. Mildew is a common cause of discoloration of paint, solid-colour stains
and natural finishes. Restaining does not solve a mildew problem. When it is time to refinish, clean off the mildew with a
commercial mildew-remover then refinish with a coating that contains an effective mildewcide.
Toll Free 1-888-658-1658 www.outdoorlivingtoday.com sales@outdoorlivingtoday.com
Page 4