
Installation Sheet

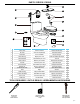


p. 4
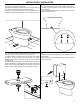
6. Using an adjustabble key, reach beside the toilet and tightly screw
the nut to the xing bolts. Cover the hole with the provided cover.
6. À l’aide d’une clé ajustable, visser fortement les érous des
boulons de xation.
6. Con una llave ajustable, enrosque y apriete la tuerca en el perno
de jación detrás del inodoro.
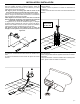
5. Position the toilet onto the oor ange, making sure the xing
bolts are aligned with the toilet’s holes.
5. Positionner la toilette sur la bride du plancher en s’assurant que
les boulons soient allignés avec les trous de la toilette.
5. Coloque el inodoro sobre la brida de piso, asegurándose que
los tornillos de jación estén alineados con los oricios del inodoro.
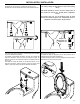
8. Install the rubber ring under the tank. Install the tank on the toilet
body.
8. Installez la bague d’étanchéité sous la cuve. Installez la cuve sur
le bol de toilette.
8. Instale el anillo de caucho debajo del tanque. Instale el tanque en
el cuerpo del inodoro.
7. Install the ush button on the toilet tank cover. Adjust the lenght
of the push rods to allow for smooth ushing. Turn the lock-nut and
then the rod: turning couterclockwise will lenghten the rod.
7. Installer le botton à chasse sur le couvercle de la cuve. Ajuster
la longueur des tiges poussoirs an de permettre une chasse
adéquate. Tourner l’écou, puis la tige: tourner du côté anti-horaire
allongera la tige.
7. Instale el botón de descarga en la tapa del tanque del inodoro.
Ajuste la longitud de las varillas rígidas para permitir una descarga
suave. Gire la tuerca de seguridad y luego la varilla: Al girar en el
sentido contrario a las manecillas de reloj se alargará la varilla.
INSTALLATION / INSTALACIÓN