FELIX INSTALLATION MANUAL | MANUEL D’INSTALLATION | MANUAL DE INSTALACIÓN Flush | Chasse | Descarga 1 & 1.
TABLE OF CONTENT TABLE DES MATIÈRES TABLA DE CONTENIDOS TABLE OF CONTENT.........................................2 TABLE DES MATIÈRES......................................2 TABLA DE CONTENIDOS...................................2 SAFETY INFORMATION.....................................3 INFORMATION SUR LA SÉCURITÉ...................3 INFORMACIÓN DE SEGURIDAD.......................3 POWER OUTLET.................................................4 PRISE DE COURANT..........................................
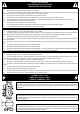
SAFETY INFORMATION INFORMATION SUR LA SÉCURITÉ INFORMACIÓN DE SEGURIDAD CAUTION 1. Do not disassemble toilet by yourself. 2. Ensure that there is proper air flow in the room to avoid humidity buildups. 3. Ensure that the product is set more than 0.6 meter away from the bathtub. 4. Ensure electric power is AC 120V. 5. Ensure the electrical socket can bare a load of 1800W power (or else it can cause fire or electrical shock). 6. Ensure the electrical source is well grounded. 7.
SAFETY INFORMATION INFORMATION SUR LA SÉCURITÉ INFORMACIÓN DE SEGURIDAD CAUTION 10. Keep any flame or flammable products away from the toilet. 11. Do not step on the toilet seat, the seat cover, the ceramic body, or put anything heavy on the product. Otherwise, the product may break and may cause injury or the product may break and may cause indoor flooding. 12. Do not put your finger or anything else into the outlet of the drying blower. 13.
PART LIST LISTE DES PIÈCES LISTA DE PIEZAS A G B H C D I E J K F L W M U Y P R N V Q S AX O T Z TOOLS REQUIRED (not supplied) OUTILS REQUIS (non fournis) HERRAMIENTAS NECESARIAS (no incluido) PAGE 5
PART LIST LISTE DES PIÈCES LISTA DE PIEZAS PART # # DE PIÈCE PARTE # DESCRIPTION DESCRIPTION DESCRIPCIÓN QUANTITY QUANTITÉ CANTIDAD CODE CODE CÓDIO A Flush valve Valve de chasse Válvula de descarga 1 99TOI0196-OU B Fill valve Valve de remplissage Válvula de llenado 1 99TOI0184-OU C Toilet Tank Réservoir de toilette Tanque de inodoro 1 99TOI0185-OU D Flush Tank seal ring Joint d’étanchéité du reservoir Anillo de sellado 1 99TOI0186-OU E Tank hardware Quincaillerie pour cuve Tuercas 1 9
PART LIST LISTE DES PIÈCES LISTA DE PIEZAS PART # # DE PIÈCE PARTE # DESCRIPTION DESCRIPTION DESCRIPCIÓN QUANTITY QUANTITÉ CANTIDAD CODE CODE CÓDIO M LED Indicator Témoin LED Indicador LED 1 -- N Bidet Seat Water Inlet (90° Elbow Push-Connect) Entrée d’eau du bidet (Coude 90° Push-Connect) Entrada de agua (Codo 90° Push-Connect) 1 O Water tube (1/4” Push Connect) Tuyau flexible (1/4” Push connect) Manguera de suministro de agua (1/4” Push connect) 1 P 1/2”-G to 1/2”-G Bushing Adapter Raccord
INSTALLATION INSTALLATION INSTALACIÓN 1 1.1- Ensure that your shut-off valve and your floor discharge drain are installed according to below drawing. These are minimum measurements, the toilet can be installed if your actual measurements are longer than below. TIP: Align 2 pieces of masking tape with the center of the drain, this will help you position the toilet in future steps. 1.2- Install the toilet flange according to the manufacturer’s recommendations. 1.
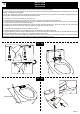
2 INSTALLATION INSTALLATION INSTALACIÓN 2.1. Position the toilet onto the floor flange, making sure the fixing bolts are aligned with the toilet’s holes. 2.2. Using an adjustable wrench, reach beside the toilet and tightly screw the nut to the fixing bolts. Cover the hole with the provided cover. TIP: Soak the plastic cover in hot water (40°C) for 1min before installing it. It will soften the plastic and ease the installation. 2.3. Install the flush button on the toilet tank cover.
3 INSTALLATION INSTALLATION INSTALACIÓN 3.1- Install the 3 nuts under the toilet to fix the tank. 3.2- Loosely install the mounting plate with the plastic anchors, washers, and guides provided. 3.3- Before tightening the mounting plate, ensure that the distance between the back of plate and front edge of the toilet bowl is set to 19-11/16” (500mm). Then tightly secure the plate. 3.4- Press the release button located on the left of the seat and push the seat onto the mounting plate.
4 INSTALLATION INSTALLATION INSTALACIÓN 4.1- If the provided seat rim bumpers do not touch your toilet bowl edge and there is a gap in between the two, change the pre-installed seat rim bumpers to the thicker ones provided (X). 4.2- Insert the washer into the 1/2” to 1/2” adapter (P) and then screw the valve (Q) onto the toilet. 4.3- This toilet is designed to fit with a 1/2” water inlet fitting. If you require a 7/8” fitting, simply use the 7/8” to 1/2” adaptor (R) on top of the existing fitting. 4.
5 INSTALLATION INSTALLATION INSTALACIÓN 5.1- Connect the toilet to your water Shut-off valve (not supplied), using the 3/8”-comp end of your supply line (not supplied). Then connect the 7/8”-Ballcock end of your supply line to the 7/8”-Ballcock Bushing Adapter at the back of the toilet. 5.2- Pull-out the snap ring from the connector. Connect the water tube to the toilet’s water outlet and re-insert the snap ring. 5.
6 WATER TANK LEVEL ADJUSTMENT AJUSTEMENT DU NIVEAU D’EAU AJUSTE DEL NIVEL DE AGUA 6.1- Pull-out the locking bar attached to the floater. Pull-out the side button of the floater to free it. Move it up (more water), or down (less water). Push back the button and locking bar. 6.1- Retirer la barre de blocage attachée au flotteur. Tirer le bouton du flotteur afin de le libérer. Bouger le flotteur vers le haut ou le bas afin d’ajuster le niveau d’eau. 6.1- Saque la barra de bloqueo que está unida al flotador.
BATTERY USAGE SAFETY GUIDELINES CONSIGNES DE SÉCURITÉ POUR L’UTILISATION DE LA BATTERIE PAUTAS DE SEGURIDAD PARA EL USO DE LA BATERÍA • • • • • • • Always purchase the correct size and grade of battery most suitable for the intended use. Clean the battery contacts and also those of the device prior to battery installation. Remove batteries from equipment which is not to be used for an extended period of time. Remove batteries if consumed or if product is to be left unused for a long time.
FIRST TIME USE GUIDELINES DIRECTIVES D’UTILISATION POUR LA PREMIÈRE FOIS PAUTAS PARA EL USO POR PRIMERA VEZ 8 8.1- Open the shut-off valve. 8.2- Plug the toilet in the power socket. 8.3- The toilet’s blue light will start blinking. The blinking light indicates that the wash tank is filling with water, a sensor in the toilet will stop the filling process automatically after around 3 minutes when the tank is full of water. After the wash tank is filled with water, the indicator light will stop blinking. 8.
9 REMOTE CONTROL PAIRING COUPLAGE À DISTANCE EMPAREJAMIENTO DEL MANDO A DISTANCIA NOTICE: To ensure good function, the remote has to be paired to the toilet after the first start-up. 9.1- Ensure the toilet is powered off (press the POWER button on the side keypad of the toilet once so that the LED Light Indicator turns off). Then, press for 3 seconds on the STOP button on the side keypad. The toilet will emit a beeping sound. 9.
10 SIDE KEYPAD CONTROLS DESCRIPTION DESCRIPTION DES COMMANDES DU CLAVIER LATÉRAL DESCRIPCIÓN DE LOS CONTROLES DEL TECLADO LATERAL POWER: Press 1 time, it will turn the toilet ON. Press 2 times, it will turn the toilet OFF. MARCHE: Appuyez 1 fois, la toilette se met en marche. Appuyez 2 fois, la toilette s’arrête. ENCENDIDO: Presione 1 vez, se encenderá el inodoro. Presione 2 veces, se apagará el inodoro.
11 SIDE KEYPAD CONTROLS DESCRIPTION DESCRIPTION DES COMMANDES DU CLAVIER LATÉRAL DESCRIPCIÓN DE LOS CONTROLES DEL TECLADO LATERAL DRYING / DEGERMING: When user is NOT sitting on the toilet, pressing this button will turn off the Ozone degerming function. Press it again will turn on this function. When user sitting on the toilet, pressing this button will initiate the drying function. Pressing again can change the air drying speed. *The drying refers to 2 drying speed.
12 LIGHT INDICATOR PANEL DESCRIPTION DESCRIPTION DU PANNEAU INDICATEUR LUMINEUX DESCRIPCIÓN DEL PANEL INDICADOR DE LUZ POWER INDICATOR: The light will turn RED when the toilet is powered ON. The light will turn off when the toilet is powered OFF. INDICATEUR DE LA MISE EN MARCHE: Lors de la mise en marche, la lumière devient rouge. La lumière s’éteint lorsqu’on procède à la mise en Arrêt de la toilette. INDICADOR DE ENCENDIDO: La luz se volverá de color ROJO cuando el inodoro está encendido [ON].
13 REMOTE CONTROL DESCRIPTION DESCRIPTION DE LA TÉLÉCOMMANDE DESCRIPCIÓN DEL MANDO A DISTANCIA REAR BIDET / MOVE: Pressing this button will initiate the Static Rear Bidet Cleaning function. Press it again to change to the Back-&-Forth Rear Bidet Cleaning function. *The REAR BIDET refers the 1 water jet function of the nozzle. RÉGLAGE BIDET ARRIÈRE: En appuyant sur ce bouton, la fonction de nettoyage statique du bidet Bidet Arrière est activée.
14 REMOTE CONTROL DESCRIPTION DESCRIPTION DE LA TÉLÉCOMMANDE DESCRIPCIÓN DEL MANDO A DISTANCIA WATER PRESSURE INDICATOR: 1 light ON = minimum pressure. 5 lights ON = maximum pressure. INDICATEUR DE PRESSION D’EAU : 1 voyant allumé = pression minimale. 5 voyants allumés = pression maximale. INDICADOR DE PRESIÓN DE AGUA: 1 luz encendida = presión mínima.
15 REMOTE CONTROL DESCRIPTION DESCRIPTION DE LA TÉLÉCOMMANDE DESCRIPCIÓN DEL MANDO A DISTANCIA AIR TEMPERATURE BUTTON & INDICATOR: Pressing this button will cycle through the 4 possible temperatures settings for the air drying function. LIGHT OFF = Room temp / GREEN = Low / ORANGE = Medium / RED = High BOUTON ET INDICATEUR DE TEMPÉRATURE DE L’AIR : En appuyant sur ce bouton, vous obtenez 4 réglages de températures possible pour la fonction SÉCHAGE.
16 AUDIO SIGNALS SIGNAUX AUDIO SEÑALES DE AUDIO BEEPING SOUNDS DIRECTIONS 1X BEEP = The toilet will give out one beeping sound every time it successfully receives a command from the Remote Control. 2x BEEP = The toilet will give out two beeping sounds every time it has successfully received a command, but cannot execute it. The toilet might not be able to execute a given commant because the function is currently unavailable, or because a given function has reached its maximum or minimum setting.
FEATURES CARACTÉRISTIQUES CARACTERÍSTICAS 17 REAR BIDET CLEANING (1 WATER JET) This function will only work if the user is sitting on the toilet. Press the REAR BIDET/MOVE button for a rear bidet cleaning. Water will spray and clean the user. Press the button again and the nozzle will move back & forth to insure the cleanest result. You can use this key feature to get the best cleaning effect.
18 FEATURES CARACTÉRISTIQUES CARACTERÍSTICAS AIR DRYING This function will only work if the user is sitting on the toilet. Press the DRYING button for air drying. The air will dry the user. Pressing again will change the air drying speed. *The drying refers 2 drying speed. SÉCHAGE À AIR CHAUD Cette fonction se met en marche uniquement lorsque l’usager est assis. Appuyez sur le bouton SÉCHAGE et la séance séchage à air chaud débutera. Une nouvelle pression peut modifier la vitesse de séchage de l’air.
19 CLEANING THE FILTER NETTOYAGE DU FILTRE LIMPIEZA DEL FILTRO 19.1- Close shut-off valve on your wall, and the ball valve at the back of the toilet. Unscrew the supply line and the 7/8” adapter at the back of the toilet. 19.2- The water filter is located inside the 7/8” adapter. Gently remove it and gently brush it with a toothbrush to remove any residue. Place the filter back inside the adapter. 19.3- Reconnect the 7/8” adapter and the water supply line to the toilet’s water inlet.
20 LONG TERM STORAGE ENTREPOSAGE À LONG TERME ALMACENAMIENTO PROLONGADO NOTICE: When leaving for a long time without using this toilet, ensure to drain all the water from the toilet. 20.1- Close shut-off valve. 20.2- Press in the mounting plate release button. 20.3- Pull out the seat. 20.4- Set the seat upright and unscrew the drain bolt, let the water drain entirely. 20.5- Re-install the seat to the toilet.
SPECIFICATION SHEET FEUILLE DE SPÉCIFICATIONS GARANTÍA LIMITADA DEL PRODUCTO Item Electric Load Electric Cord Cleaning System Rear Bidet (1 jet) Lady Bidet (4 jets) Water Temp Heater Capacity Bidet Tank Capacity Overheating Safety Anti-Reflux Drying System Drying Air Temp Air Speed Heater Capacity Overheating Safety Heating Seat Seat Temp Heater Capacity Overheating Safety Deodorization System Deodorizer Limitations Water Supply Pressure Water Supply Temp Ambiant Temp AC 120V / 1300W / 60HZ 1.
INSTALLATION PICTURE IMAGE DE MONTAGE IMAGEN DE INSTALACIÓN PAGE 29
MAINTENANCE AND CARE For general cleaning, use mild, nonabrasive soap and warm water. Do not use abrasive cleaners (such cleaners contain sand or silica that will scratch the ceramic finish). Common bowl cleaners may be used on the ceramic surface. Do not use “in-tank” bowl cleaners because they contain corrosive chemicals that attack the tank’s components.
ENTRETIEN ET NETTOYAGE Pour le nettoyage général, utiliser un savon doux, non abrasif et de l’eau tiède. Ne pas utiliser de nettoyants abrasifs (tels les nettoyants contenant du sable ou de la silice qui rayeront la surface en porcelaine). Les nettoyants de toilette ordinaires peuvent être utilisés sur la surface de la cuvette en porcelaine. Ne pas utiliser de nettoyants placés à l’intérieur du réservoir, car ils peuvent contenir des produits chimiques agressifs qui attaquent les composants du réservoir.
MANTENIMIENTO Y CUIDADO Para limpieza general, utilice un detergente suave no abrasivo y agua tibia. No utilice limpiadores abrasivos (esos limpiadores contienen arena y sílice que rayarán el acabado de cerámica). Los limpiadores corrientes de taza de baño pueden ser usados en la taza de baño. No utilice limpiadores de taza colocados “dentro del tanque” porque contienen químicos corrosivos que atacan los componentes del tanque.