Operating instructions HD receiver „Europe“ Innovative Mobile Technology Version: 03/2013 Language: english
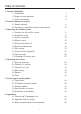
Table of contents 1. General information 1.1 Introduction 1.2 Proper use and operation 1.3 Safety information 2. Control elements at receiver 2.1 Remote controls 2.2 Sat-mouse - operation without remote control 3. Operating the satellite system 3.1 Functions of the satellite system 3.2 Automatic search 3.3 Search via location 3.4 Manual search 3.5 Retract and switch off 3.6 Retract and deactivate 3.7 Edit settings 3.8 Internet Service (optional) 3.9 Fault messages 3.10 Reception in remote areas 4.
1.1 Introduction Your ten Haaft® HDTV digital satellite reception system is a smart and fully automatic system. It does not require any of the manual adjustments associated with conventional systems. Unlike normal television antennas for terrestrial reception, a satellite antenna always must be precisely aimed southward into the satellite‘s signal beam. This signal beam must not be interrupted by trees or other obstacles, as this will prevent reception.
Our HDTV satellite systems stand for exceptional operating convenience and a multitude of channels. At the touch of a button, the system folds out and starts scanning for receivable satellites. The micro-processor controlled fine-tuning and the digital receiver technology ensure the best possible picture quality. Using the remote control, you can then enjoy the full range of TV and radio programmes transmitted by satellites using the new digital standard.
1.2 Proper use and operation Your satellite receiver has been designed for use on mobile homes, camper trailers or other vehicles for the reception of standard satellite signals of the Ku band frequency range. It is designed to automatically aim an antenna mounted on a stationary vehicle at one of the geostationary and directly transmitting television satellites commonly used to cover Europe. The power to the system is supplied by a vehicle electric system with a rated voltage of 12 or 24 Volt.
1.3 Safety information To avoid the risk of fire or damage to the device, the receiver must never be exposed to moisture or rain. Should an item or liquid get into the housing, immediately disconnect the device from the power supply and have it checked by a qualified professional before further usage. Place the receiver in a place with sufficient air circulation and away from any heat sources. This will prevent heat accumulation inside the receiver and ensures a longer lifecycle.
Ensure that the opening motion of the antenna is not obstructed e.g. by a tree or sign before folding out the antenna. The driver of the vehicle must inspect the top-box before driving off to ensure that the antenna is fully retracted. The antenna may need up to 30 seconds to retract after the ignition is switched on or the engine is started.
2.
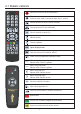
Selects sound options Reverse Forward Starts playback Interrupts playback Starts the timeshift function Stops playback Starts the recording of a programme Moves 5 minutes backward within the recorded programme Moves 5 minutes forward within the recorded programme Displays the recordings overview Displays the timer list Selects the video resolution of the HDMI output CARO MA HDTV: Starts the satellite search menu Oyster HDTV + I: Starts the satellite search / Starts the Internet satellite search Activates th
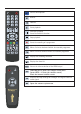
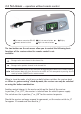
2.2 Sat-mouse - operation without remote control 1 2 3 4 1 Sat-mouse connector (RJ-45) 2 Left sat-mouse button 4 Remote control receiver 5 3 Display 5 Right sat-mouse button The two buttons on the sat-mouse allow you to control the following basic functions of the receiver when the remote control is not available: Changes to the next channel in the channel list. Changes to the previous channel in the channel list. Press both buttons briefly at the same time to toggle between RADIO and TV mode.
3.1 Functions of the satellite system The menu branch with the system controls can be opened directly by pressing the ANT button on the remote control.
3.1 Functions of the satellite system To select the individual menu items, use the cursor buttons (menu navigation buttons) and confirm with OK as usual. All search functions and the required settings are controlled via the Oyster / CARO / Cosmo HDTV … menu. To enhance your operating convenience, many functions are performed automatically. For example, the antenna is automatically opened and moved into the previous reception position any time you switch on the system.
3.2 Automatic search Selecting this menu item will directly start the automatic search. Otherwise, the automatic search will start when switching the system on if no signals are received in the last reception position, e. g. after the vehicle has been moved. Oyster HDTV > Automatic search Satellite: State: Astra 1 search active The mentioned satellite is being searched. Please be patient for some seconds. If you want to abort, press EXIT.
3.2 Automatic search If the selected programme cannot be found on the new satellite (e.g. due to an interruption of transmission or your location being out of range), the antenna will return to the position of the satellite from which the search was started and will switch back to one of the programmes from this satellite. The time required for such a change depends on how far the two satellite positions are apart.
3.3 Search via location Menu item „Search via location“ opens a sub-menu with a selection of countries and regions. Use the cursor buttons (menu navigation buttons up/ down) to select an entry and confirm with OK to active it. Search via location Germany (North) Germany (South) Austria Switzerland Netherlands Belgium Danmark Poland Czech Republic Frace (North) Frace (South) England ...
3.4 Manual search This menu item opens a sub-menu that allows the manual control and adjustment of your satellite system. Before selecting this menu item, switch to a programme that is receivable at your current location, as otherwise no picture can be received. Oyster HDTV > Manual search Azimut Elevation Azimuth step size Elevation step size Last position Store position Retract Signal level Signal quality C/N 10,0° -72.
3.4 Manual search If you wish to move the antenna over a greater range, the increments can be increased. Select item Store position to store the current position and then press OK. The current position is stored immediately. If you switch off the system now or retract the antenna, it will return to this position the next time the system is switched on.
3.5 Retract and switch off This function retracts the antenna and switches the receiver into stand-by. Retract and switch off Azimuth: Elevation: 0,0 0,0 This function can also be activated by pressing the red stand-by button on the remote control or by simultaneously holding down both buttons of The dish is retracting, afterwards the receiver will switch to standby. Press EXIT if you want to abort. the sat-mouse.
3.7 Edit settings This menu contains several settings for the operation of the satellite system. Here, all settings concerning the automatic search are made. Settings concerning general functions of the receiver are made in Menu -> Edit settings. The following settings of your satellite system can be edited: Stand-by mode When the system is set to „Convenient“, it can be re-activated from stand-by mode by pressing the red button on the remote control.
3.7 Edit settings Activate top box When the system is switched on, the top box (antenna unit) is usually activated immediately, aiming the antenna at the satellite. To prevent this, set this menu item to „Off“. This may be useful if you are in a location where no satellites can be received but you do wish to use the PVR or +T (optional) functions. This function can also be used for operating an external satellite antenna.
3.7 Edit settings Sleeptimer When in stand-by mode, the antenna will be retracted and switched off when the sleep-timer is activated. When set to sleep mode, the system is switched into the sleep mode by the sleep timer without retracting the antenna. The regular timer programmes are only executed in sleep mode and are inactive in stand-by mode.
3.7 Edit settings Internet-service satellite This option allows you to enable the Internet data service in an Oyster Digital system fitted with the „Internet“ option. In the default settings, this function is already pre-set for the satellite modem included in the supply. Test limits and Test power supply Menu items Test limits and Test power supply are intended for the technician installing the system and are not relevant for normal operation.
3.8 Internet service (optional) If you own an Oyster 85 Digital CI system fitted with the „Internet“ option, then you can access the Internet directly via satellite. (The Internet option is not available for other models.) Using the Internet requires a service agreement with an Internet provider and a specific satellite modem as well as an iLNB capable of transmitting data. If you have purchased the Oyster 85 with the Internet option, the modem and iLNB are included in the supply.
3.8 Internet service (optional) The yellow „Warning“ LED in the modem goes off when the modem has successfully logged into the network. Your PC is now connected to the Internet. Please note: Your PC is assigned an IP address by the modem or by the satellite network via DHCP. Please be sure to enable the function „Obtain IP address automatically“! To switch back from Internet mode to normal TV mode, press the „AV“ button on your remote control.
3.9 Fault messages Malfunctions of the top box may occur if e. g. the antenna‘s motion is obstructed by branches or snow. Such malfunctions are automatically detected and will be displayed by the satmouse as fault codes. Message E 01 E 02 E 03 E 04 E 05 E 06 E 07 E 09 E 08 E 10 E 11 E 12 Fault description Remedial action The search did not yield the reception of a satellite. Change your location.
3.9 Fault messages Message E14 E 15 Fault description Remedial action Incorrect feedback from top box. E 16 Incorrect model configuration E 17 Re-Init activated. E 18 Limit switch/mechanical fault E 19 Hardware failure (possibly in conjunction with OSD message) An incompatible top box is connected. The power-supply relay of the top-box oscillates between open and closed position or the contact is soiled or burned (relay is defective).
3.10 Reception in remote areas This section describes how to fine-tune the LNB to optimise reception in the fringe of a TV satellite‘s footprint. This requires loosening the antenna bolts and turning the antenna to a different angle. Such optimisation is only required in the fringe areas of a satellite‘s footprint. It should be performed by expert users only. State-of-the art digital technology can considerably enlarge the area in which a satellite can be received.
3.10 Reception in remote areas Einstellung des LNBs in unterschiedlichen Gegenden: Country Astra I 19.2° E Astra II 28.2° E Astra III 23.
4.
4.
4.
4.2 Edit channel list Your digital CI receiver provides 10 freely programmable favourite channels lists. A favourite channels list is a selection of channels from the list of all channels. Service list editor TV services 123 Favorites 1 0001 Das Erste HD 0002 ZDF HD 0003 SAT.
4.2 Edit channel list Creating a favourite list Press the blue button to select a favourite list (list 1 is preselected). Highlight a program in list „TV programs“ and press [OK] to add it to the current favourites list. If you wish to also add the subsequent program, press [OK] again. Repeat this process to add all your favourite programs to the list. Editing program or favourites list Use the [SWAP] button to select list „TV programs“ or a „Favourites list“ for editing. Highlight the program to be edited.
4.3 Channel list / Scan First select the satellite to be scanned (e.g. „ASTRA“), then the type of scan: Auto for a complete scan of the satellite, or Channel to scan only one of the satellite‘s transponders.
4.
4.5 Options 1. Signal strength Extras Once the antenna is adjusted, you can view the signal level at any time via sub-menu „Options / Tuner info“. The signal level is then indicated as a vertical bar. File manager Web radio Calendar Software update The C/N value will indicate the same value in dB. The higher the number, the better the reception quality will be. In satellite mode, and depending on the channel, a satisfactory TV picture should be received with any value above approx. 8.
4.5 Options 2. System info: System info Bootloader: Firmware: MAC address: Brand ten Haaft Serial: ten Haaft Build: PSU-Firmware: Motor-Revision: MENU : Back 2012-04-21 23:47 V1.0.0.0 2013-03-05 08:00 02:00:00:00:06:B3 Oyster HDTV *4294967295* EU/3.00 Mar 5 2013 08:59:55 1.000 00404 EXIT Open sub-menu „Options / System info“ to view the software version and serial number of your receiver. This information is required for service purposes or software updates.
4.6 TIMER The timer is used to conveniently record programs on the hard disk at pre-set times. The timer function is also available on devices without optional hard disk. This function is particularly helpful if you want to be sure not to miss a program on a certain channel. The receiver will then switch over to the channel programed in the timer.
5.1 Connections A B C D E F COMMON INTERFACE OFF max.7A 3A USB SDHC CARD 10A A Master switch OFF/ON B Switch contact (max. 7A / 30V DC) C USB 2.0 port for PVR functions 1 E U R OP E ON 2 4 6 5 CVBS 8 10 12 7 9 L-Audio-R 11 13 S/PDIF CTRL OUT SAT1 DVB-T/C D Slot for CI modules E headphone output (3.
5.2 Common Interface module Common interface Slot: No module MENU : Back EXIT : Close menu At the front of the device there are is one slot for modules decoding encrypted programs. To prevent damage, only modules with the „PC Card“ logo must be inserted. Any other module may damage the receiver beyond repair. Do not use excessive force to insert the module. Rather pull the module back out of the slot and try inserting it again. Ensure that you insert the module with the correct side up.
5.3 Software update Software and channel lists can be updated using the USB port via menu item Options / Software update. Software update Update from file Update over Internet Current software version is: V0.0.0.2 2013-01-23 08:23 Please refer to: www.ten-haaft.
5.4 Specifications of receiver SAT tuner Input frequency range 950…2150 MHz Input impedance 75 Ω Input level range -60 … -25 dBm 2 input sockets F-standard, female LNB control signal 22kHz - 13V/18V DVB-T2/C tuner Frequency range VHF (174MHz … 230MHz) UHF (470MHz … 790MHz) Video Video decoder H.
5.5 Declaration of conformity Konformitätserklärung Declaration of Confirmity Déclaration de Conformité Wir, der Hersteller, ten Haaft GmbH , Oberer Strietweg 8, D-75245 Neulingen, GERMANY / ALLEMAGNE erklären hiermit, dass folgende Produkte den wesentlichen Anforderungen der folgenden Vorschriften entsprechen und somit ein CE-Zeichen in Übereinstimmung mit der EMV-Richtlinie 89/336/EWG und der KFZ-Richtlinie 72/245/EWG (i.d.F. 2006/38/EG) tragen.
6.1 Channel and TV program list Appendix Channel list: In the original (TV) channel list, the programs are allocated to the individual satellites as follows: Satellite Position Channel CH Astra 1 19,2°E 001 - 499 Hotbird 13°E 500 - 999 Astra 2 28,2°E 1000 - 1269 Eutelsat W2 16°E 1270 - 1439 Atlantic Bird 3 5°W 1440 - 1499 Astra 3 23,5°E 1500 - 1599 Thor / Intelsat 10-02 1°W 1600 - 1839 Sirius 5°E 1840 - 1969 Hispasat 30°E 1970 - 2249 Astra 1 (Iber.
6.1 Channel and TV program list You can re-sort the channel list of your receiver to your personal requirements at any time. New channel lists that are available for download at www.ten-haaft.com may be sorted and formatted in a different manner than the list originally stored in the receiver. Such changes may be required in the future to allow the update of the list with new satellites.
6.1 Channel and TV program list Appendix TV channels: At the factory, your digital CI receiver has been programmed with the country typical channels.
6.2 Appendix Search satellites ASTRA 1: Astra I features more than 50 free-to-air programs in German language, including all major privately owned channels, channels under public law, their „third channels“ and numerous radio programs. Reception in Turkey, the Eastern Mediterranean and Eastern Europe is however poor or unavailable. ASTRA 2: Astra 2 primarily covers the English-speaking regions of Europe. It transmits the popular English-language news channels. Its footprint is split into different zones.
6.2 Appendix Search satellites HISPASAT: Hispasat covers mainly the Iberian Peninsula and the Canary Islands, but can also be received in Italy, France, Benelux etc. in good quality. The range of programs is focused on the Spanish region. EUTELSAT W3A: This satellite has the largest footprint of all. It covers the whole of Europe and the Middle East region. However, the signals are significantly weaker than those of the other satellites.
6.3 Notes on the protection of the environment At the end of its lifecycle, this product must not be disposed of with your normal waste, but instead must be returned to a recycling facility for electric and electronic devices. This is indicated by the symbol on the product, the operating manual or the packaging. The materials can be reused in accordance with their identification.
ten Haaft GmbH Oberer Strietweg 8 75245 Neulingen-Göbrichen GERMANY Phone + 49 (0) 72 37 / 48 55– 0 Fax + 49 (0) 72 37 / 48 55– 50 E-mail: info@ten-haaft.com Office hours: Monday – Friday 8:00 am – 12:00 am 1.00 pm – 4.30 pm www.ten-haaft.