
Owner's manual


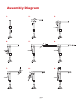
5. Insert the small telescoping boom section into the larger boom section. Align holes at desired extension
and insert the remaining clevis pin #1. Secure with lynch pin.
NOTE: Refer to the load rating diagram when choosing an extension. Load capacity must be determined in
order to ensure safe use.
6. Slide the boom cap over the end of the telescoping boom section. Align the holes on the
cap with the holes on the telescoping boom section. The rounded edge should be facing down. If this is not
the case, the telescoping boom section has been installed upside down. Remove the telescoping boom
section, invert and reassemble as described in step 5.
7. Slide the sheave pulley into in the boom cap from either the top or the bottom. Align the holes on the
sheave pulley with those on the boom cap and telescoping boom section. Insert clevis pin #3 and secure
with lynch pin.
8. Install the crane handle at either the top or bottom of the ratchet jack. To install at the top, remove lynch
pin from clevis pin #2. Partially remove clevis pin #2 until the mounting plate of the handle can be inserted
between the ratchet jack and boom. Align the holes and reinsert clevis pin #2. Secure with lynch pin. To
install at the bottom, remove the lynch pin. Slide the handle mounting plate over clevis pin #1. Secure once
again with lynch pin.
9. Center the winch over the mounting holes on the top of the boom. The drum should be facing toward the
sheave pulley. Secure the winch to the boom in the frontmost mounting position, or the set of three holes
closest to the sheave. There are two bolt patterns on the boom. The smaller bolt pattern is for the manual
winch.
NOTE: Disassembly is the reverse of the assembly. It is not necessary to full disassemble the crane to
transport it.
Installing the Cable
The OZ Lifting Products LLC
®
cable assembly that can be ordered with the CompOZite Davit Crane will
come with a swaged ball on one end to facilitate easy assembly. Standard bare end cable can also be
used. The hardware for bare end cable installation is included. Please refer to the accompanying winch
owner’s manual for instructions on installing a bare end cable.
To install the OZ Lifting Products LLC
®
supplied cable:
1. Lay the cable out on a at surface to ensure it is not knotted or looped.
2. Locate the ball end of the cable.
3. Locate the “keyhole” in the winch drum that accepts the ball end of the cable.
4. Thread the ball end of the cable over the load sheave pulley and towards the winch.
5. Insert the ball end tting of the cable into the “keyhole” feature in the winch.
6. Ensure that the ball end of the cable slides into the slot in the “keyhole” and cannot be pulled out.
7. Manually spool at least 4 full wraps of cable onto the winch drum. There must be at least 4 full anchor
wraps of cable on the winch drum at all times.
NOTE: To ensure the maximum amount of cable can be spooled onto the winch, the cable must be neatly
spooled onto the winch drum. If the cable is not spooled neatly onto the winch drum, the cable capacity
will be reduced and handle effort may increase. Cable that is not spooled neatly can consume 30% more
space on the winch drum, reducing cable capacity.
pg.8