
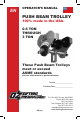
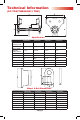
Product Manual


Pre-Installation
Check for damage during shipment. Do not install or use a damaged product. Ensure that the threads
on the main load bar are not damaged.
Trolley ships fully assembled.
Maintain records of all accompanying product information.
Contact your OZ Lifting Products LLC® dealer if there are any problems.
Read and comply with all instructions and warnings furnished with or attached to the product
as applicable.
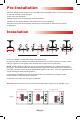
Installation
1. Prior to installation, measure the width of the beam ange.
2. Adjust one side of the trolley to the ange measurement (e.g. If beam measures 6 inches, set the
trolley to 6 inches on ruler guide). Open opposite side of trolley to t over the beam.
NOTE: To adjust trolley into place on beam, pull out spring loaded lock pin on either side and twist
90 degrees. This position allows the adjustment knob to spin freely until desired width is achieved. To
lock trolley into place, twist lock pin an additional 90 degrees until it clicks. Then spin adjustment knob
counterclockwise to nearest locking position.
3. Once trolley is installed, verify that the bail is centered on the beam by checking for equal
measurements on both sides of the ruler guide.
4. Removal of the trolley is the reverse of installation.
WARNING: Ensure that lock pins are fully extended and locked in place prior to operation. Fig.1A
EN pg.6
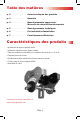
Fig.1A
How to unlock pin How to lock pin Pin fully locked
1. 2. 3.