
Product Manual


EN pg.7
Pre-Installation
Check for damage during shipment. Do not install or use a damaged product. Contact your OZ Lifting
Products LLC® dealer if there are any problems.
Maintain records of all accompanying product information.
Before initial operation:
NOTE: Read and comply with all instructions and warnings furnished with or attached to the product, if
applicable.
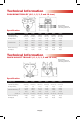
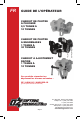
Push Beam and Geared Beam Trolley Installation
Measure the width of the beam that the trolley will be mounted on. Ensure that the beam is within the
adjustable ange width range of the trolley.
Using the provided washers/spacers, assemble an equal number of washers/spacers on each side of the
bail to position the sideplates so that there is an 1/8” gap between the ange of each wheel and the beam.
The bail must be centered. The extra washers should be placed equally on the outside of the sideplates.
NOTE: There must always be at least one washer on both sides of each sideplate.
Once the correct number of washers/spacers are in place, loosen the nuts slightly. This will allow the
sideplates to be installed over the beam more easily.
With the sideplates installed onto the beam, rmly tighten the nuts on both sides of the trolley. Secure these
nuts with the second locknuts. Ensure that both sets of nuts are tight.
NOTE: On the Geared Beam Trolley, there may be an anti-tilt pin located on the sideplate opposite the
handwheel. This pin should be adjusted so that the wheel (pin side) on the sideplate cannot lift off the
beam. Some clearance should be allowed so that the trolley moves smoothly, typically about a 1/8” gap.
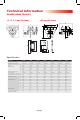
Quick Adjust Trolley Installation
Measure the width of the beam that the trolley will be mounted on. Ensure that the beam is within the
adjustable ange width range of the trolley.
Spin the handle on the threaded adjustment rod of the trolley so that the sideplates move farther apart. This
allows the wheels to be installed onto the beam.
Spin the handle on the threaded adjustment rod of the trolley so that the sideplates move closer together.
This mounts the wheels securely on the beam. Maintain a 1/8” gap between the ange of each wheel and
the beam.
On the threaded adjustment rod of the trolley, there is a second locking handle. Once the trolley is
adjusted, tighten this locking handle to lock the adjustment rod into place.