
Product Manual


EN pg.6
Once the OZ Lifting Products LLC
®
base has been installed, assemble the crane with the following
steps:
1. Install the mast into the base. The mast will slide easily down into the base (no tools are
necessary). Assure that the mast is properly positioned on the pin at the bottom of the base. This can
be conrmed by moving the mast from side to side to check for excessive play. The mast should t
snugly. Assure that the height adjustment plate is facing forward.
2. To set the boom on the mast, align the holes on the rear of the boom with the holes in the top of
the mast. Insert clevis pin #3. Secure with lynch pin.
NOTE: Releasing your grip on the boom at this point in assembly may cause the boom to
swing down into the mast. This could result in injury or damage to the product.
3. Align the bottom of the support bar with your selected hole on the height adjustment plate.
4. Align the top of the support bar with the boom’s anchor plate.
NOTE: the STEEL DAVIT CRANE by OZ Lifting Products LLC
®
will ship from the factory partially
assembled. The following steps are only for reference if the product must be reassembled.
5. Slide the sheave pulley into the boom cap from either the top or the bottom. Align the holes on the
sheave pulley with those on the boom Insert clevis pin #1 and secure with lynch pin.
6. Center the winch over the mounting holes on the top of the boom. The drum should be facing
toward the sheave pulley. Secure the winch to the boom in the frontmost mounting position, or the
set of three holes closest to the sheave. There are two bolt patterns on the boom. The smaller bolt
pattern is for the manual winch.
NOTE: Disassembly is the reverse of the assembly. It is not necessary to fully disassemble the crane
to transport it.
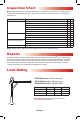
Assembly Diagram
1.
4.
2.
5.
3.
6.